Monthly Archives: September 2020

Jubilee Gardens and the World’s Longest Safety Poster

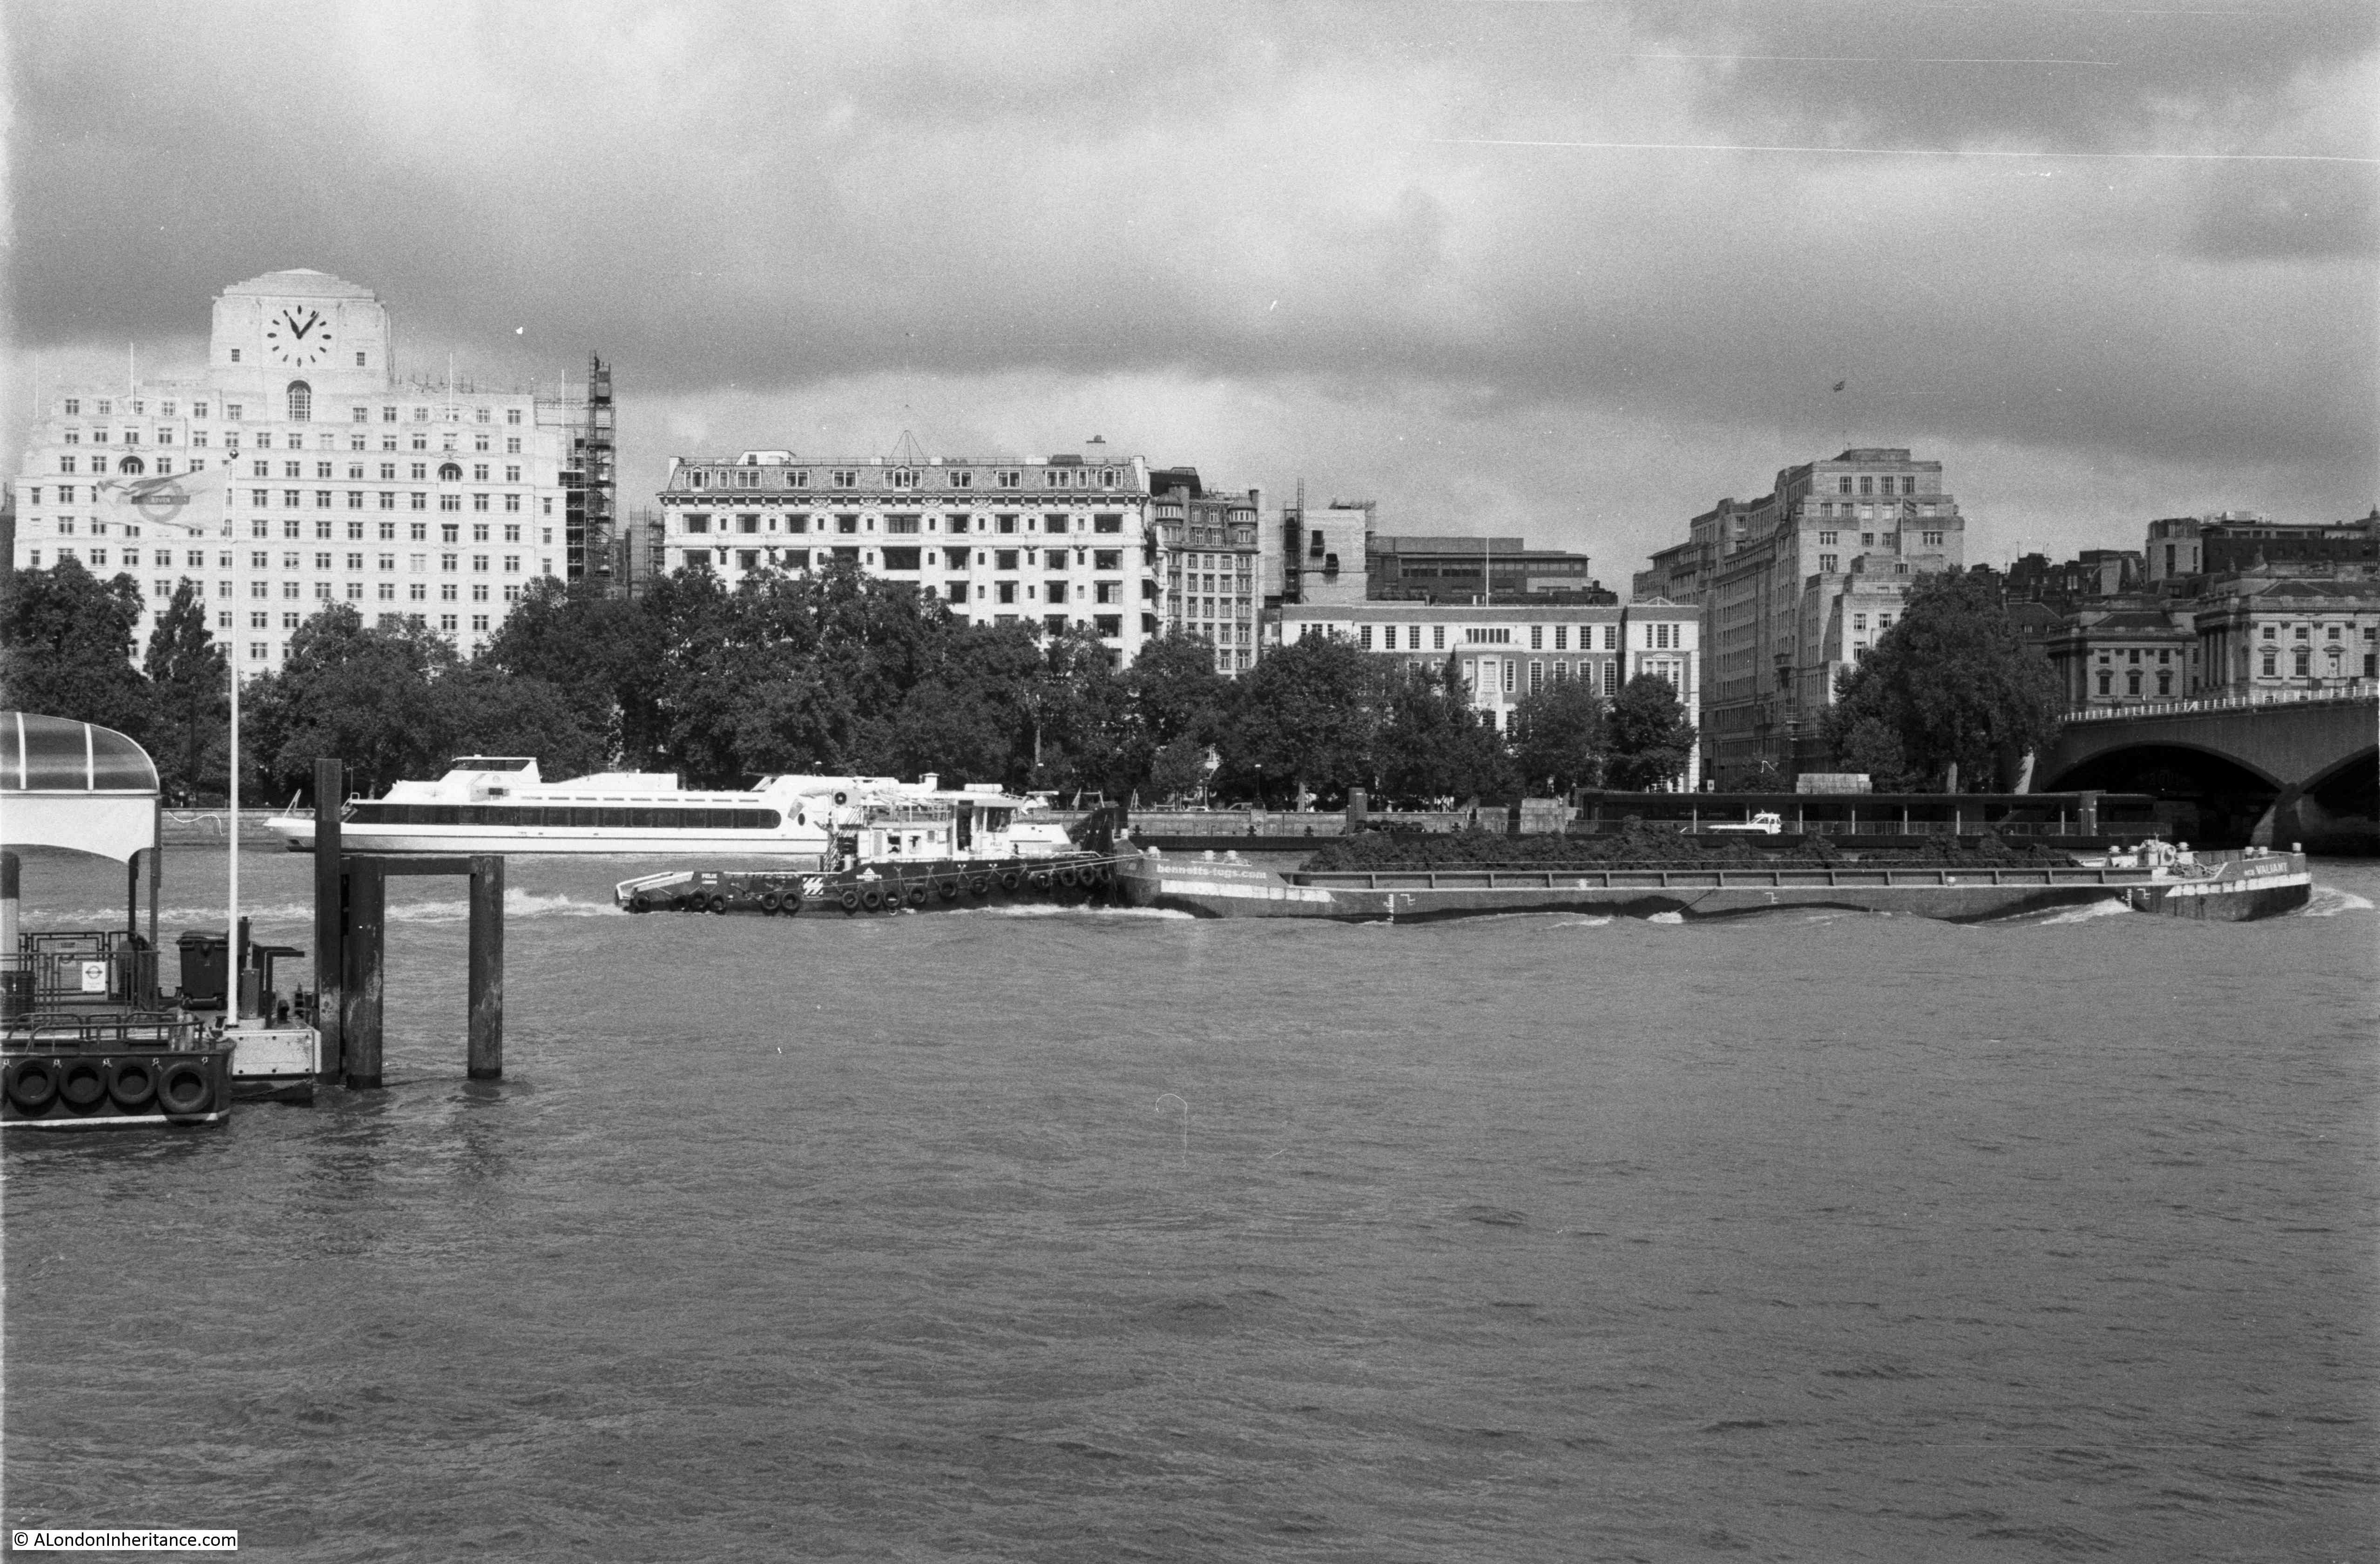
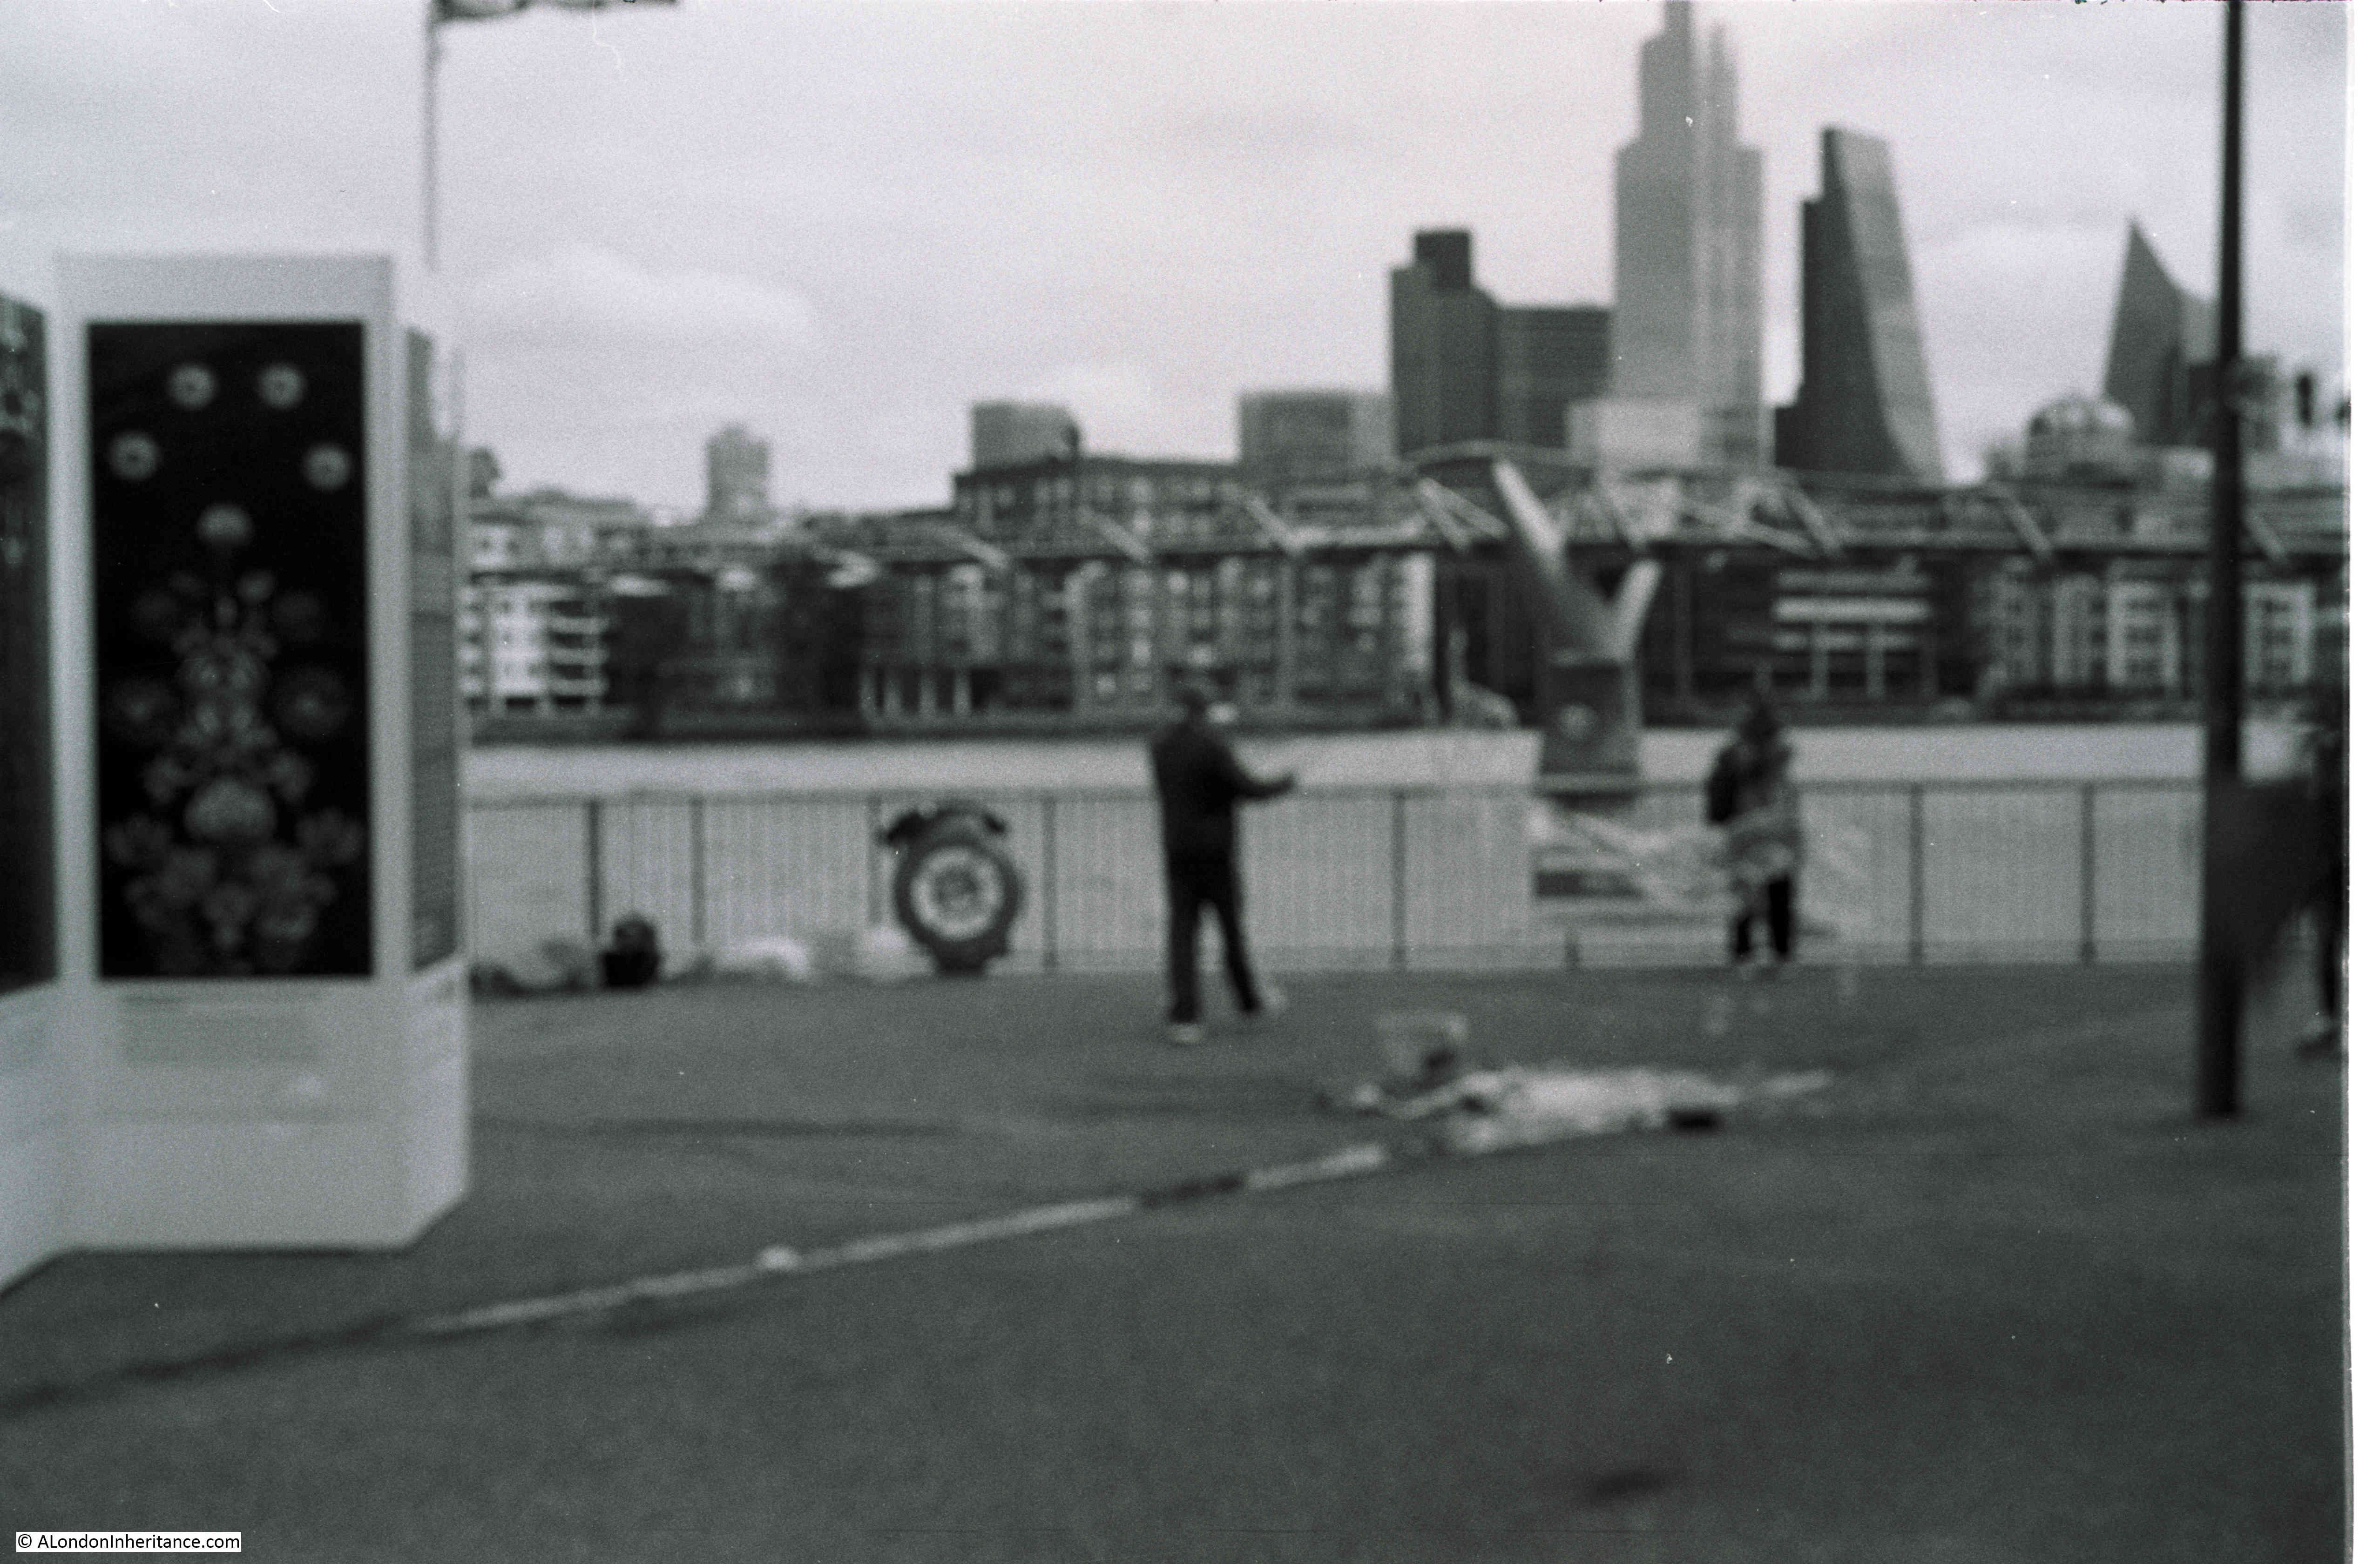
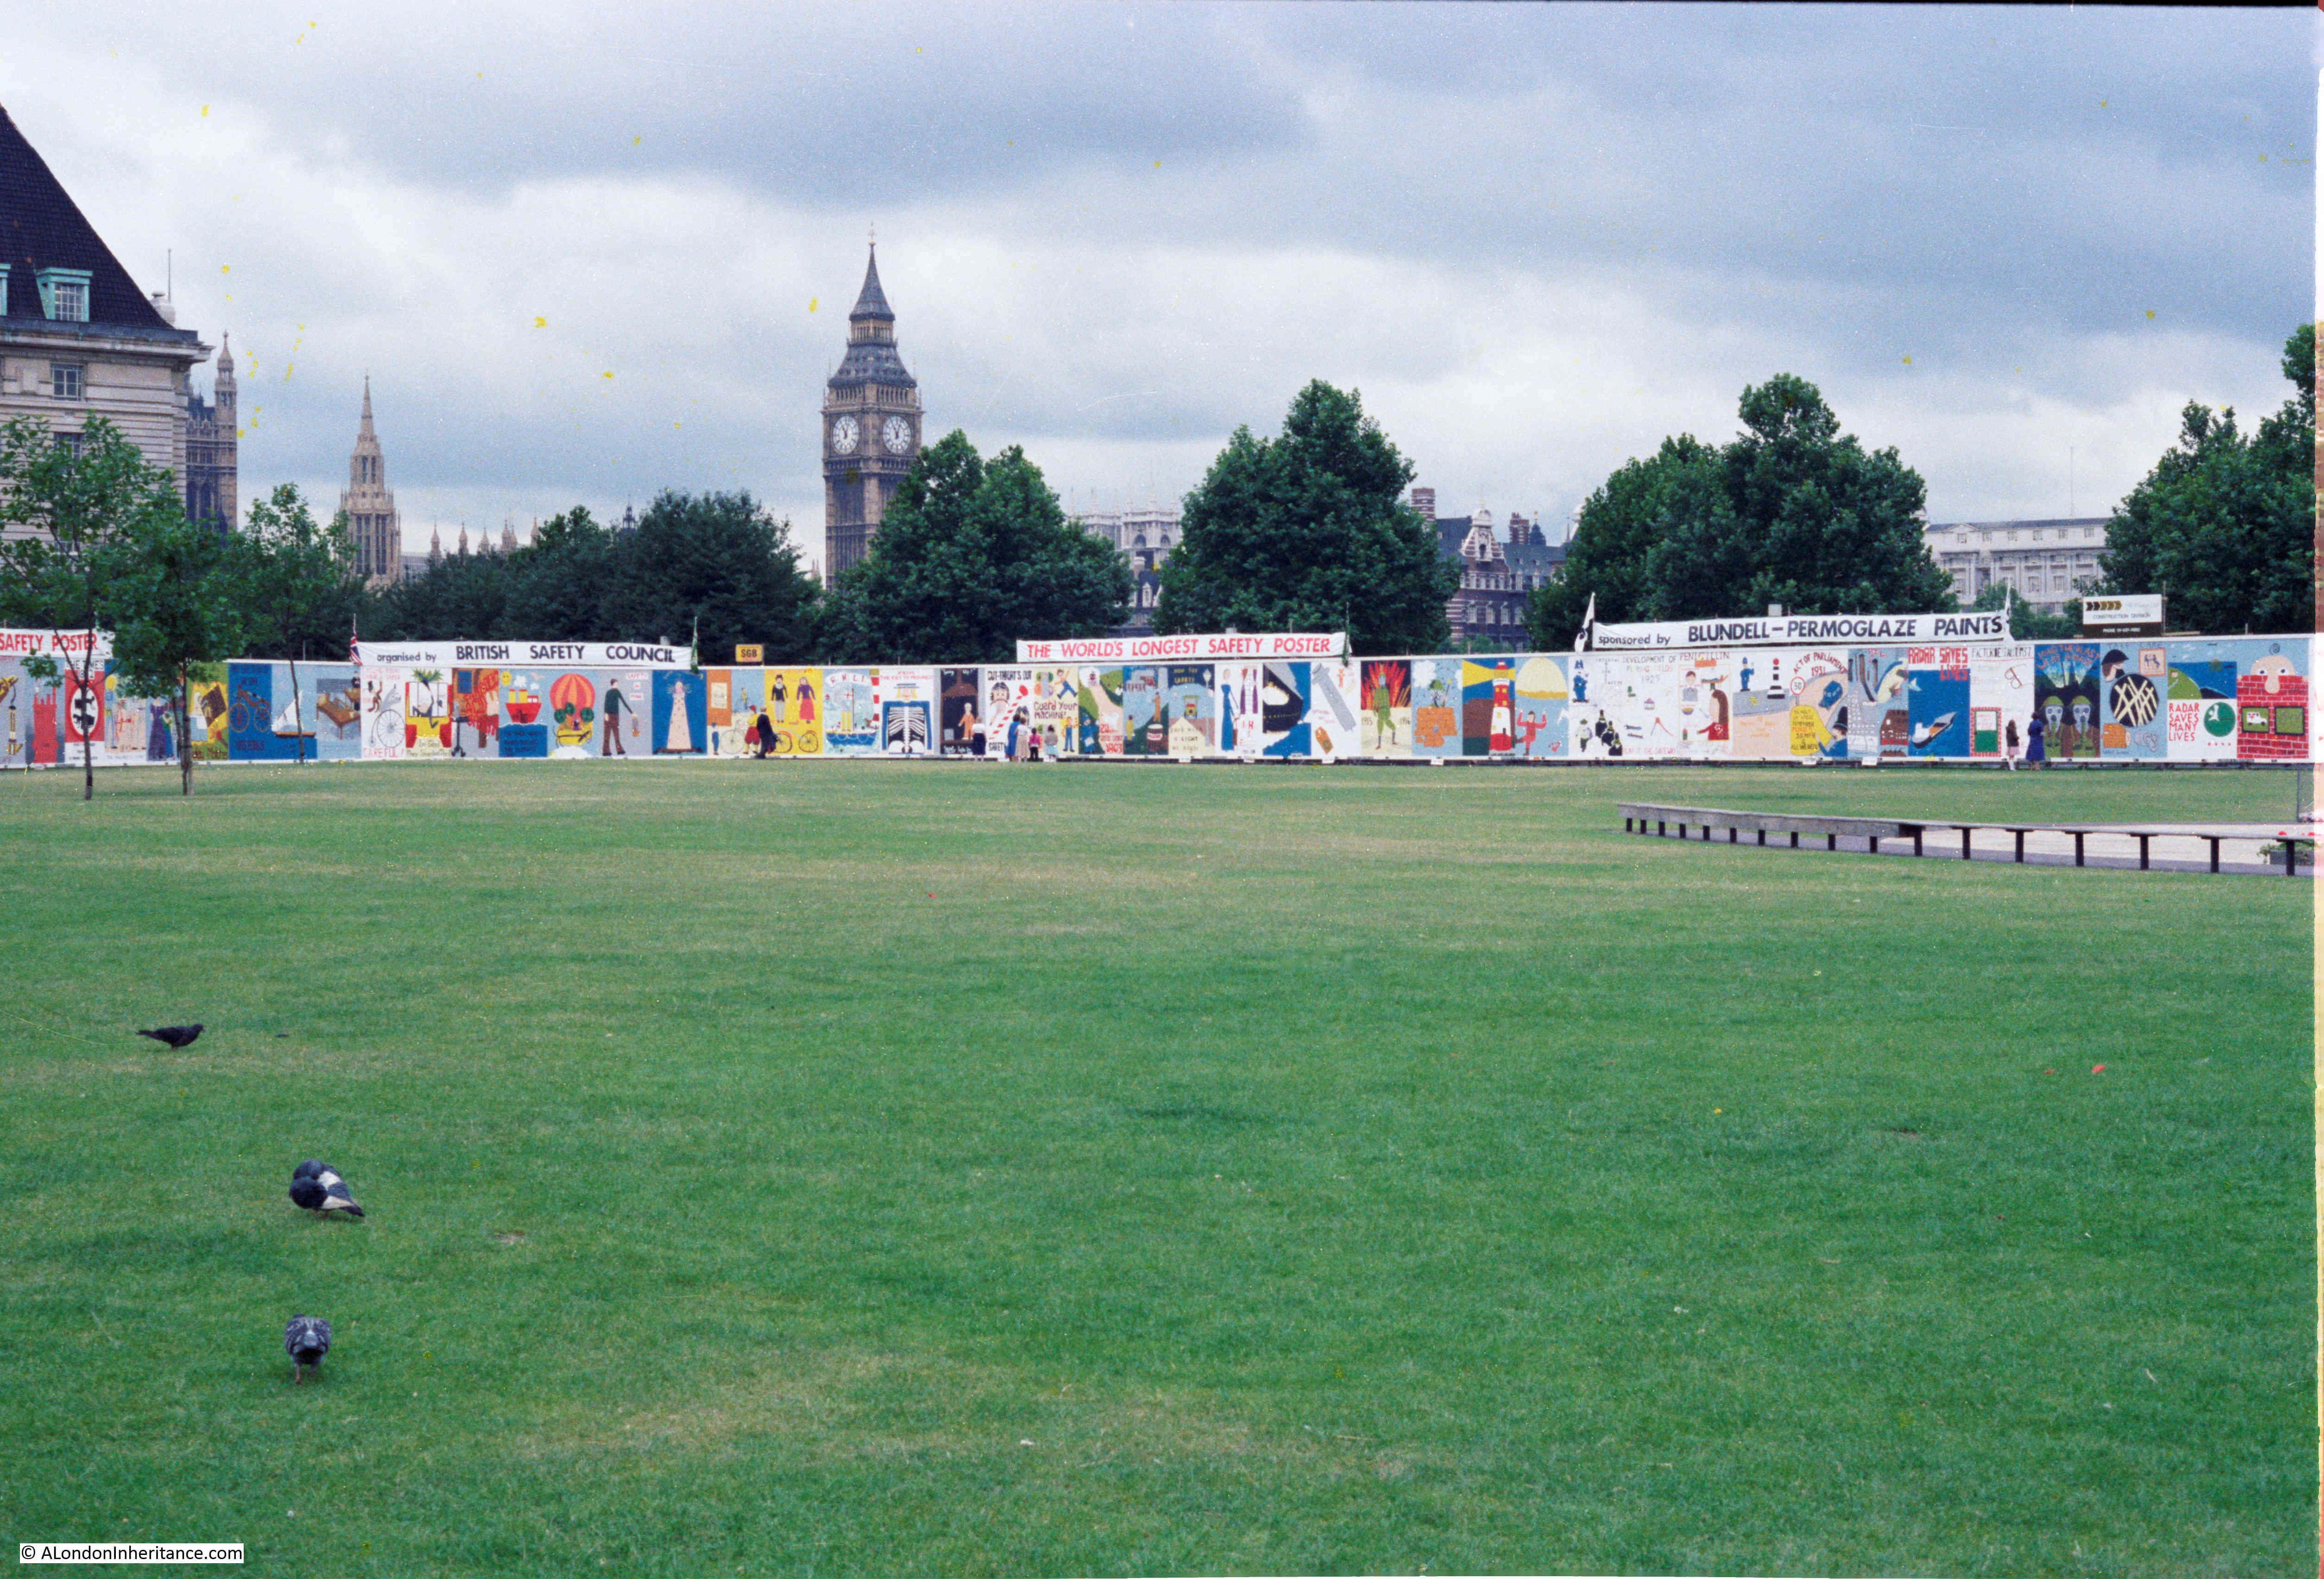
In July 1979, the Jubilee Gardens on the south bank of the River Thames near Waterloo Station and County Hall, was the location for the World’s Longest Safety Poster:

Jubilee Gardens

I took a couple of photos during a lunch time wander along the south bank:

Jubilee Gardens

The poster was an attempt on the world record, although a search of the online database of the Guinness Book of Records does not bring up any reference, although they do not have data online of all records, and this was 41 years ago.

1979 was the Year of the Child, and 360 children from across the country painted individual posters over a four day period, each showing a different aspect of safety, of the emergency services, or some other form of safety message relevant to a child.

The combined posters measured 800ft by 10ft and circled around the central green space of the Jubilee Gardens.

When I photographed the scene, the Jubilee Gardens were two years old. As their name suggests they were created in 1977 to mark the Queen’s Silver Jubilee, and they quickly became a popular lunchtime spot for the thousands of workers in the Greater London Council, County Hall, or the Shell Centre buildings – the two large office complexes on two sides of the gardens.

To the east of the park (just visible to the right of the first photo), there was a small stage area, and lunchtime concerts were organised by the GLC.

When weather was not so good, for the rest of the working day, and at weekends, the Jubilee Gardens were quiet. County Hall’s conversion into a hotel and centre for tourist attractions, along with the London Eye were still some decades in the future.

The Jubilee Gardens were closed for a number of years during the 1990s as they were one of the construction sites for the Jubilee Line extension which runs slightly to the west between Westminster and Waterloo Stations. An access shaft was dug in the centre of the gardens down to the level of the tunnel workings.

I often wonder if the access shaft is still there, below the surface, when ever I walk across the gardens.

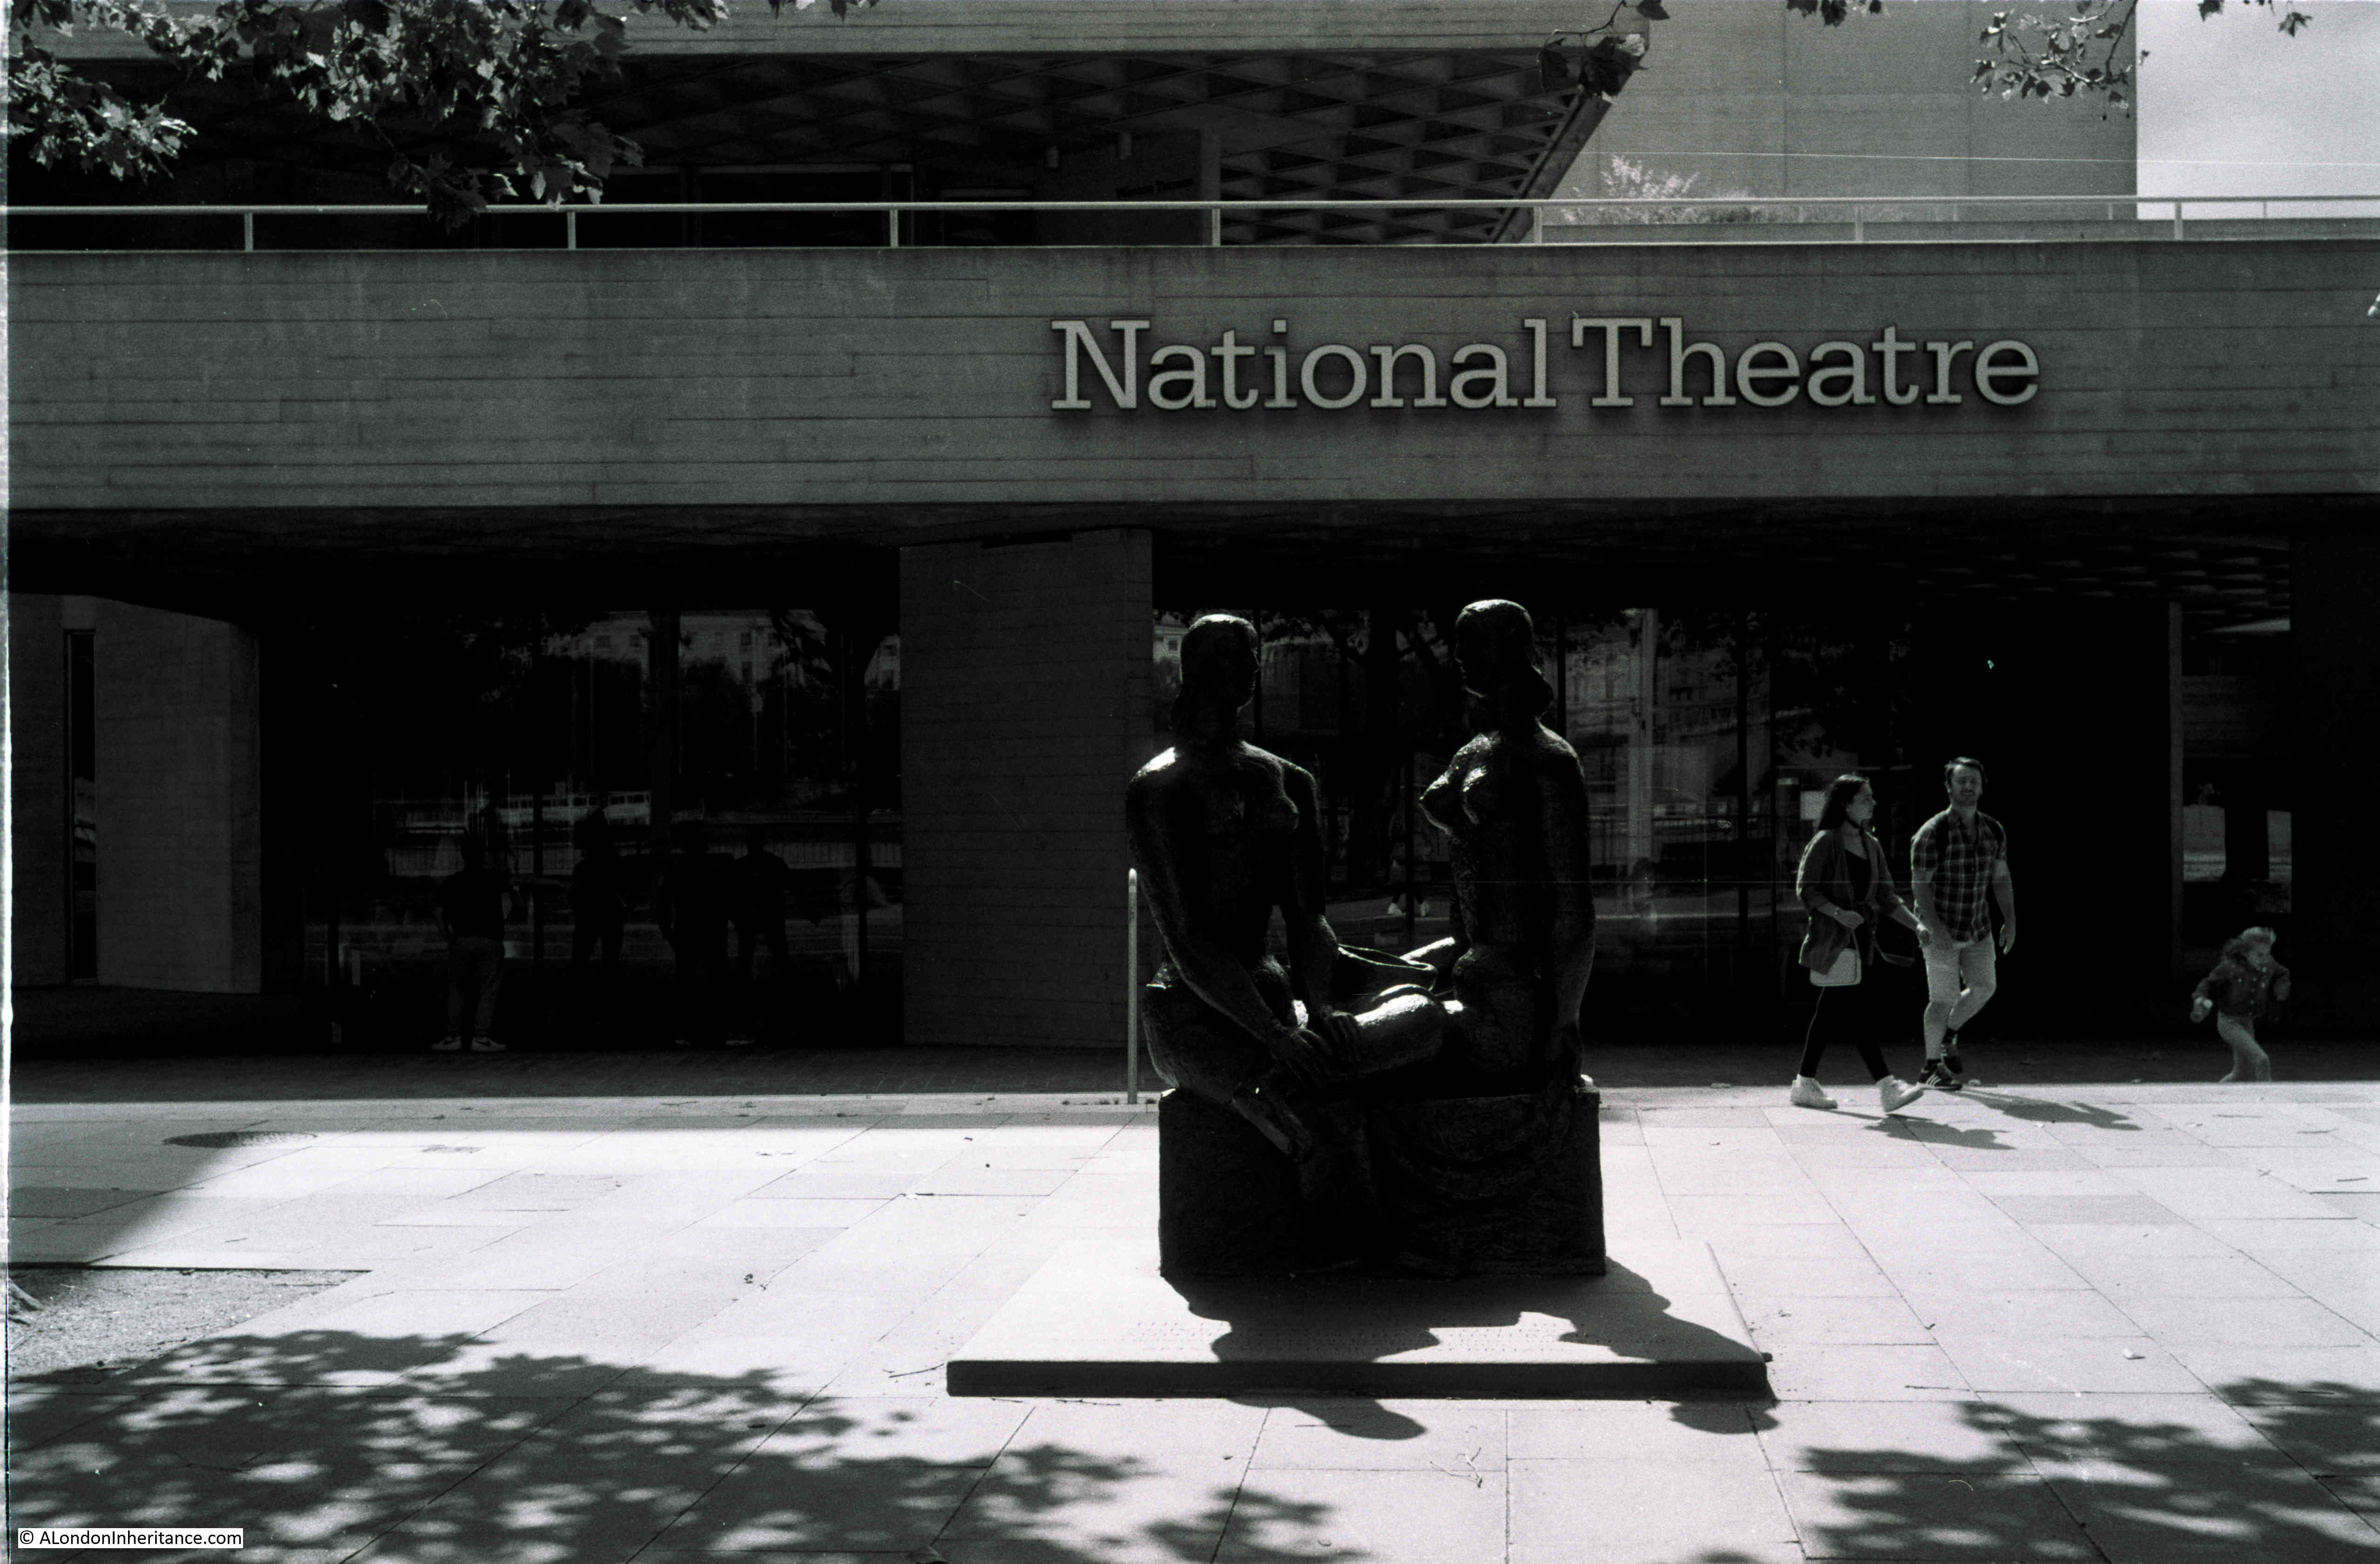
After the gardens were reopened, they did deteriorate somewhat, but underwent a major redesign and restoration project, reopening in 2012, and it is these gardens we see today:

Jubilee Gardens

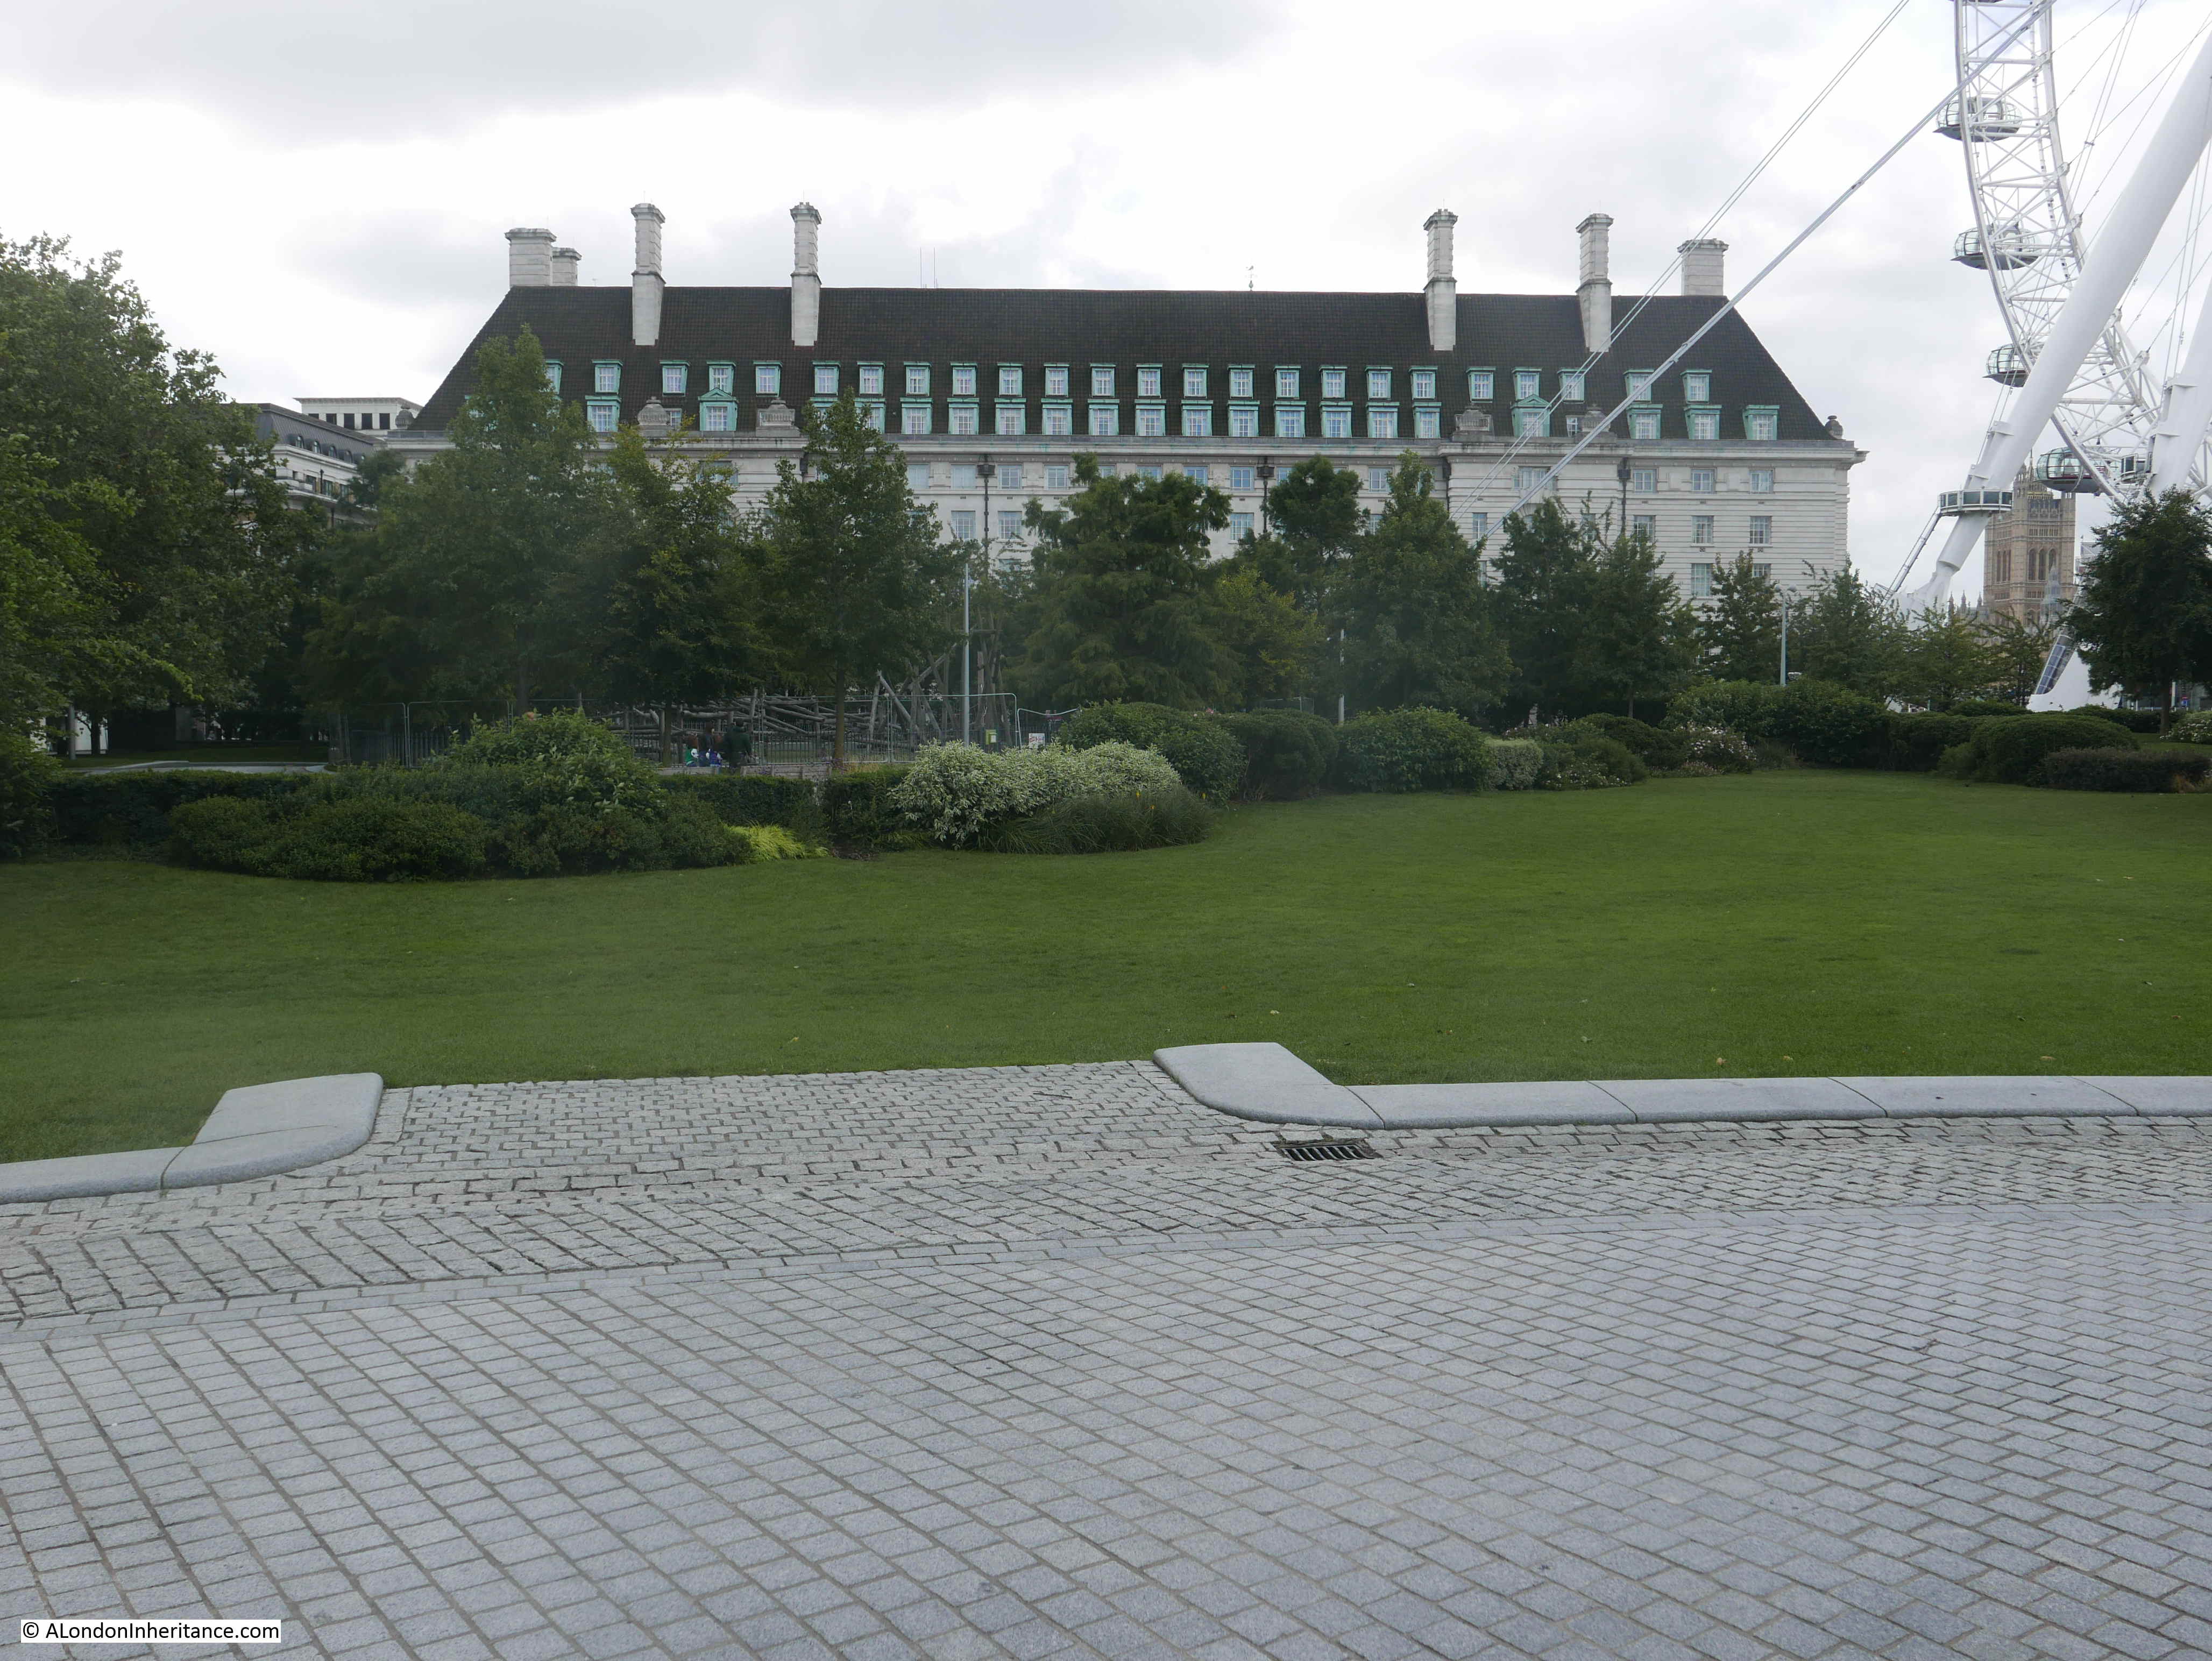
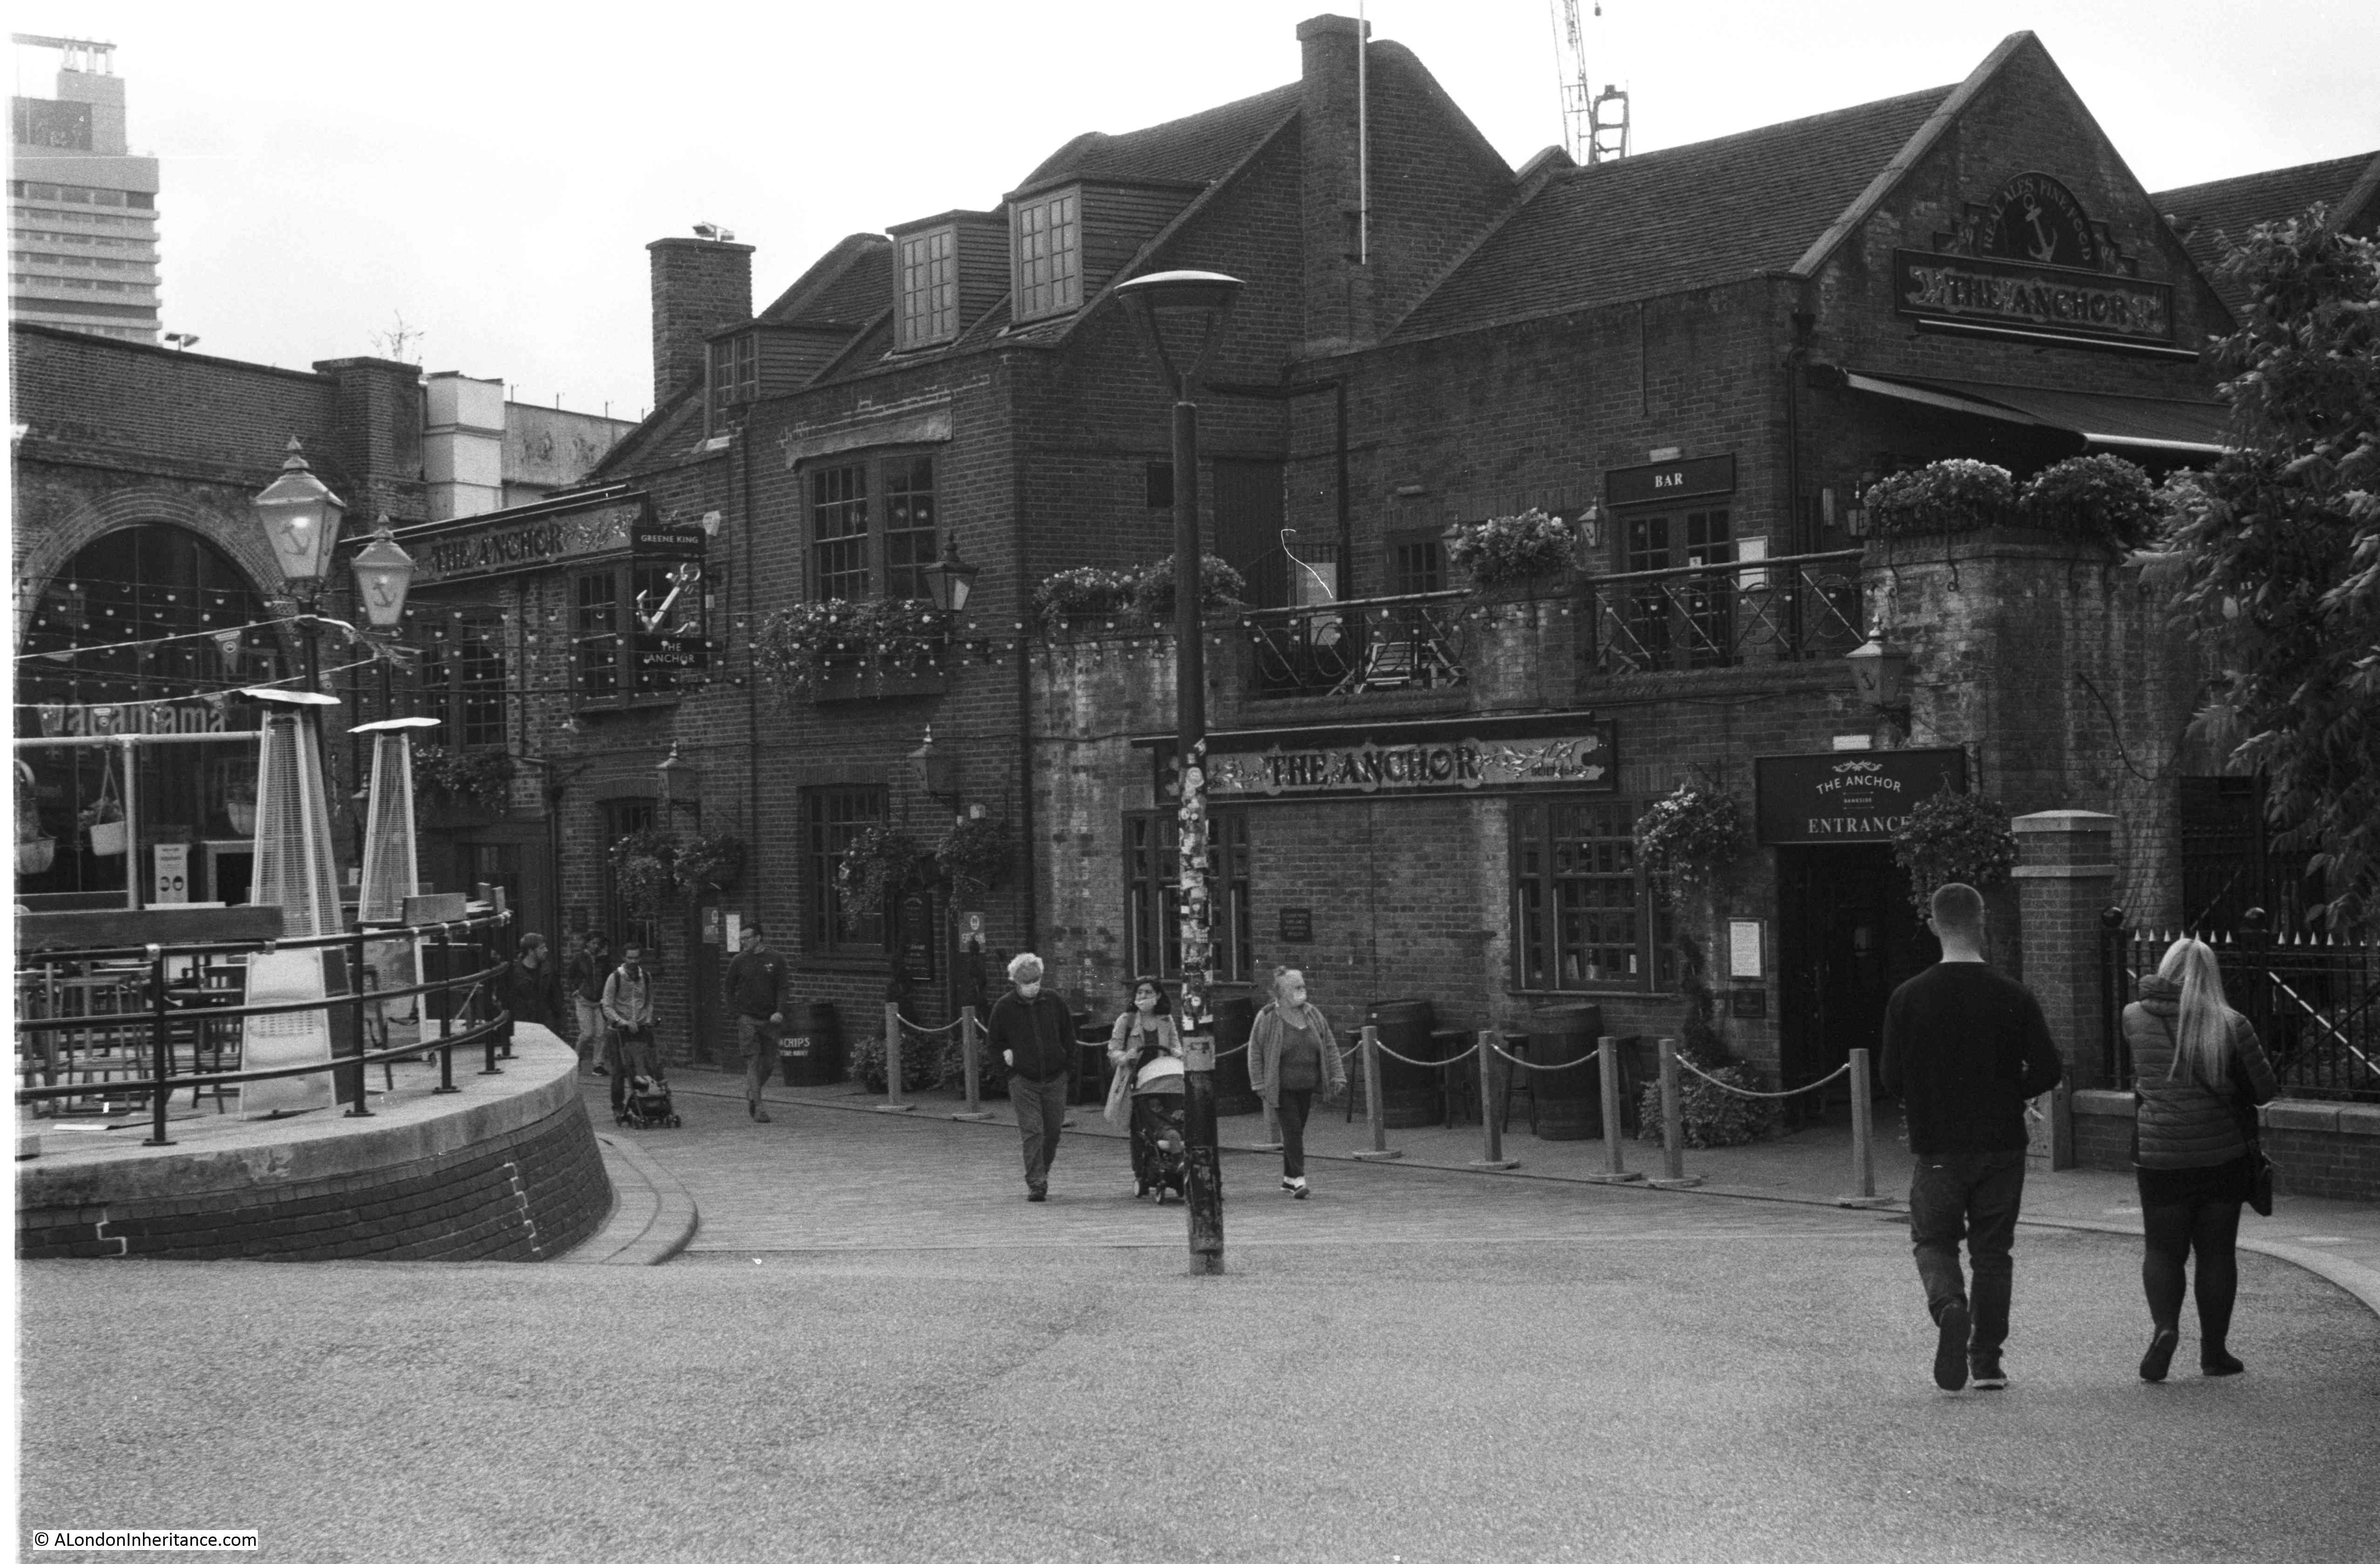
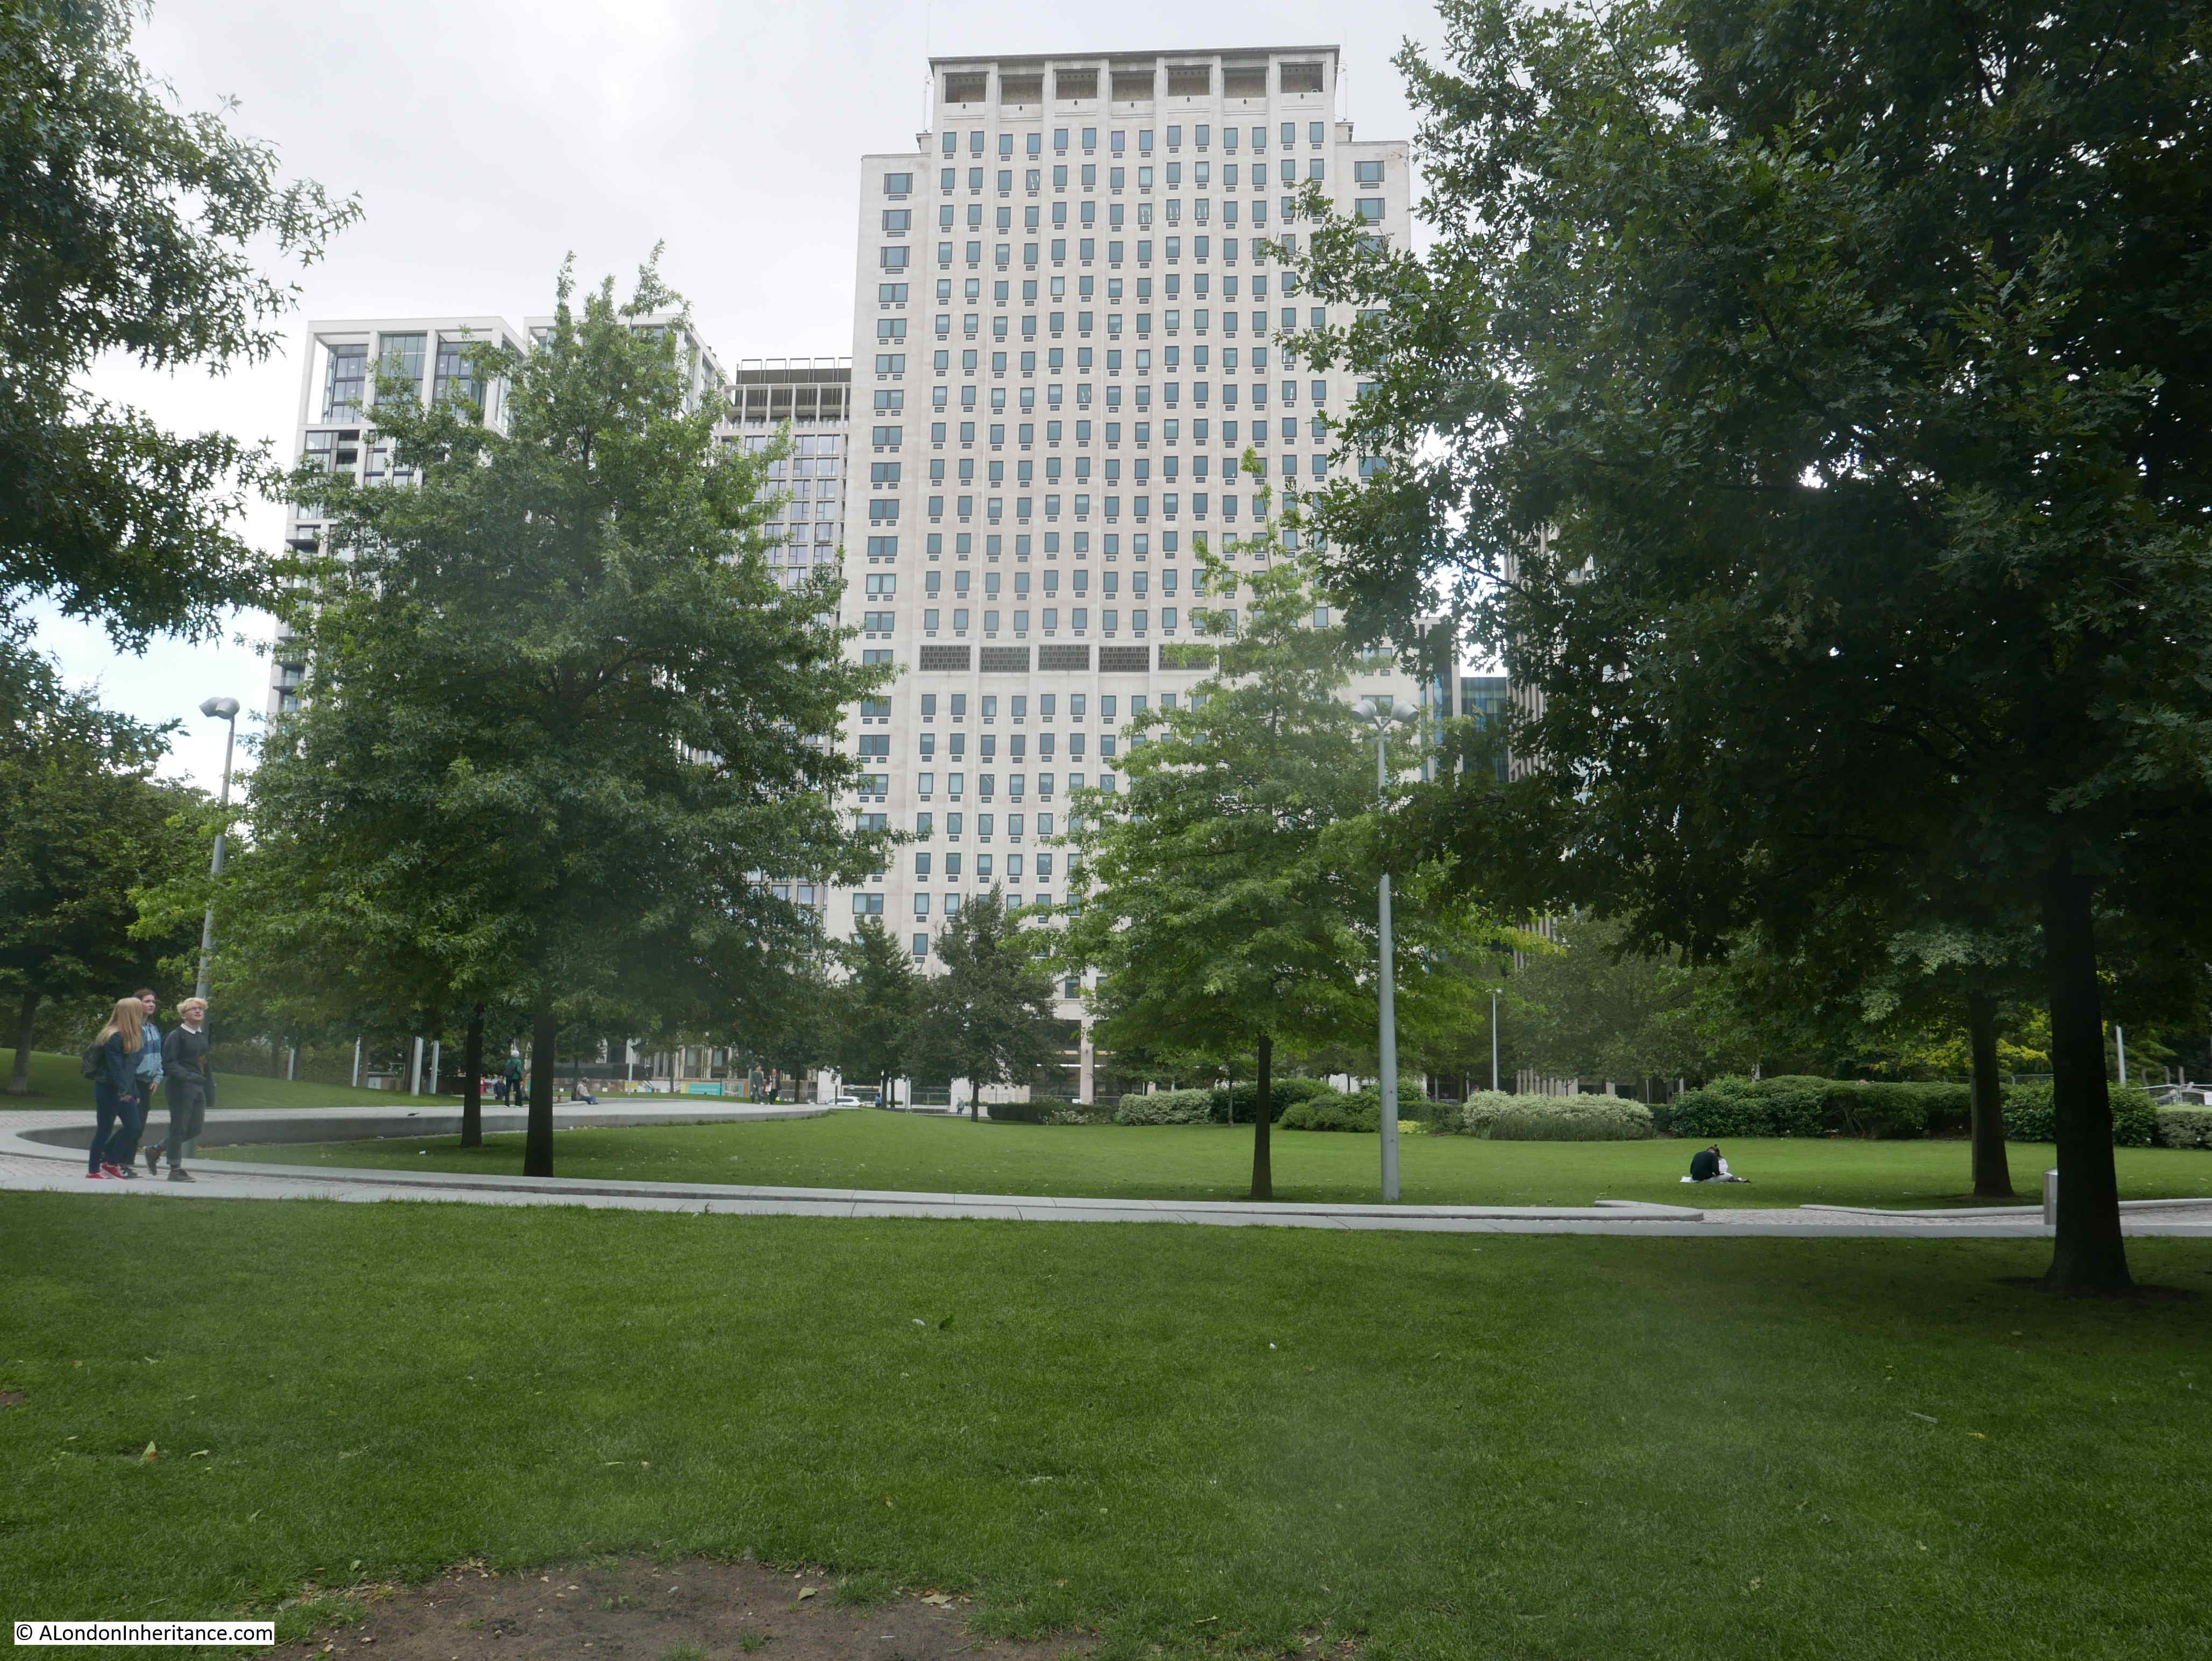
As well as the design of the gardens, their surroundings have changed considerably over the years, and the people who probably make most use of the gardens today are not office workers, they are more likely to be tourists.

The GLC was disbanded in 1986, and the buildings now host functions mainly aimed at the tourist industry.

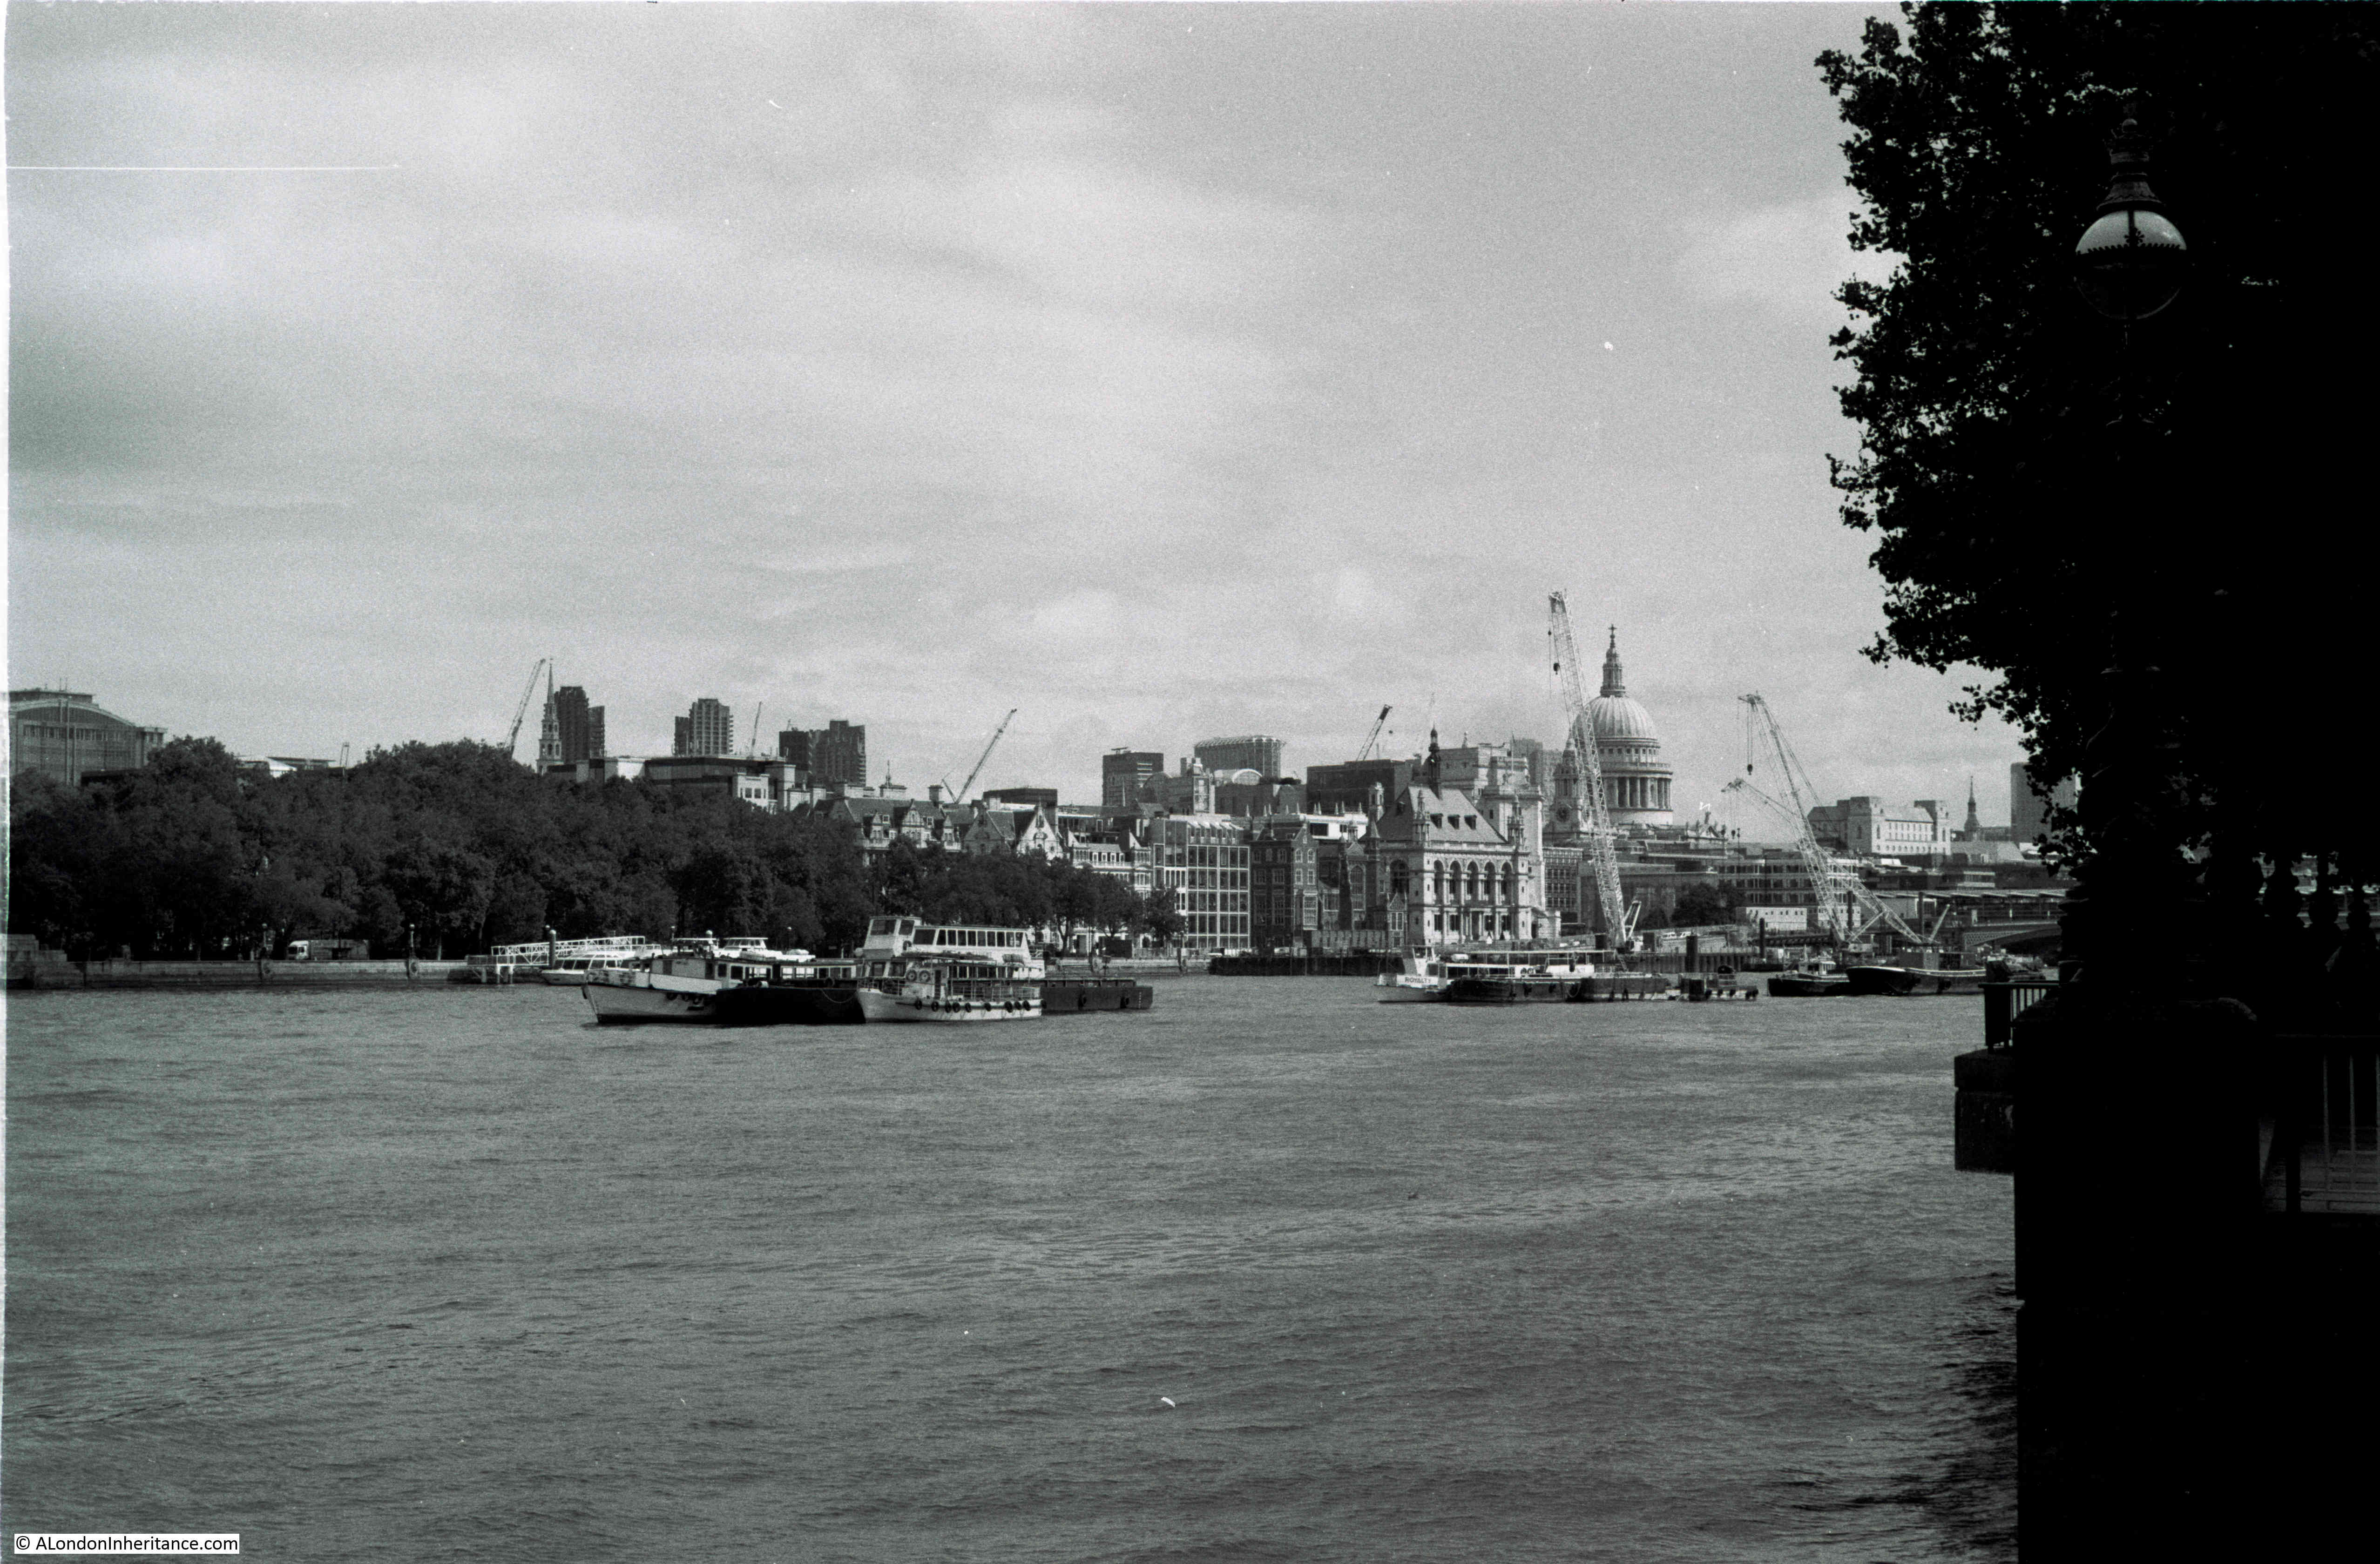
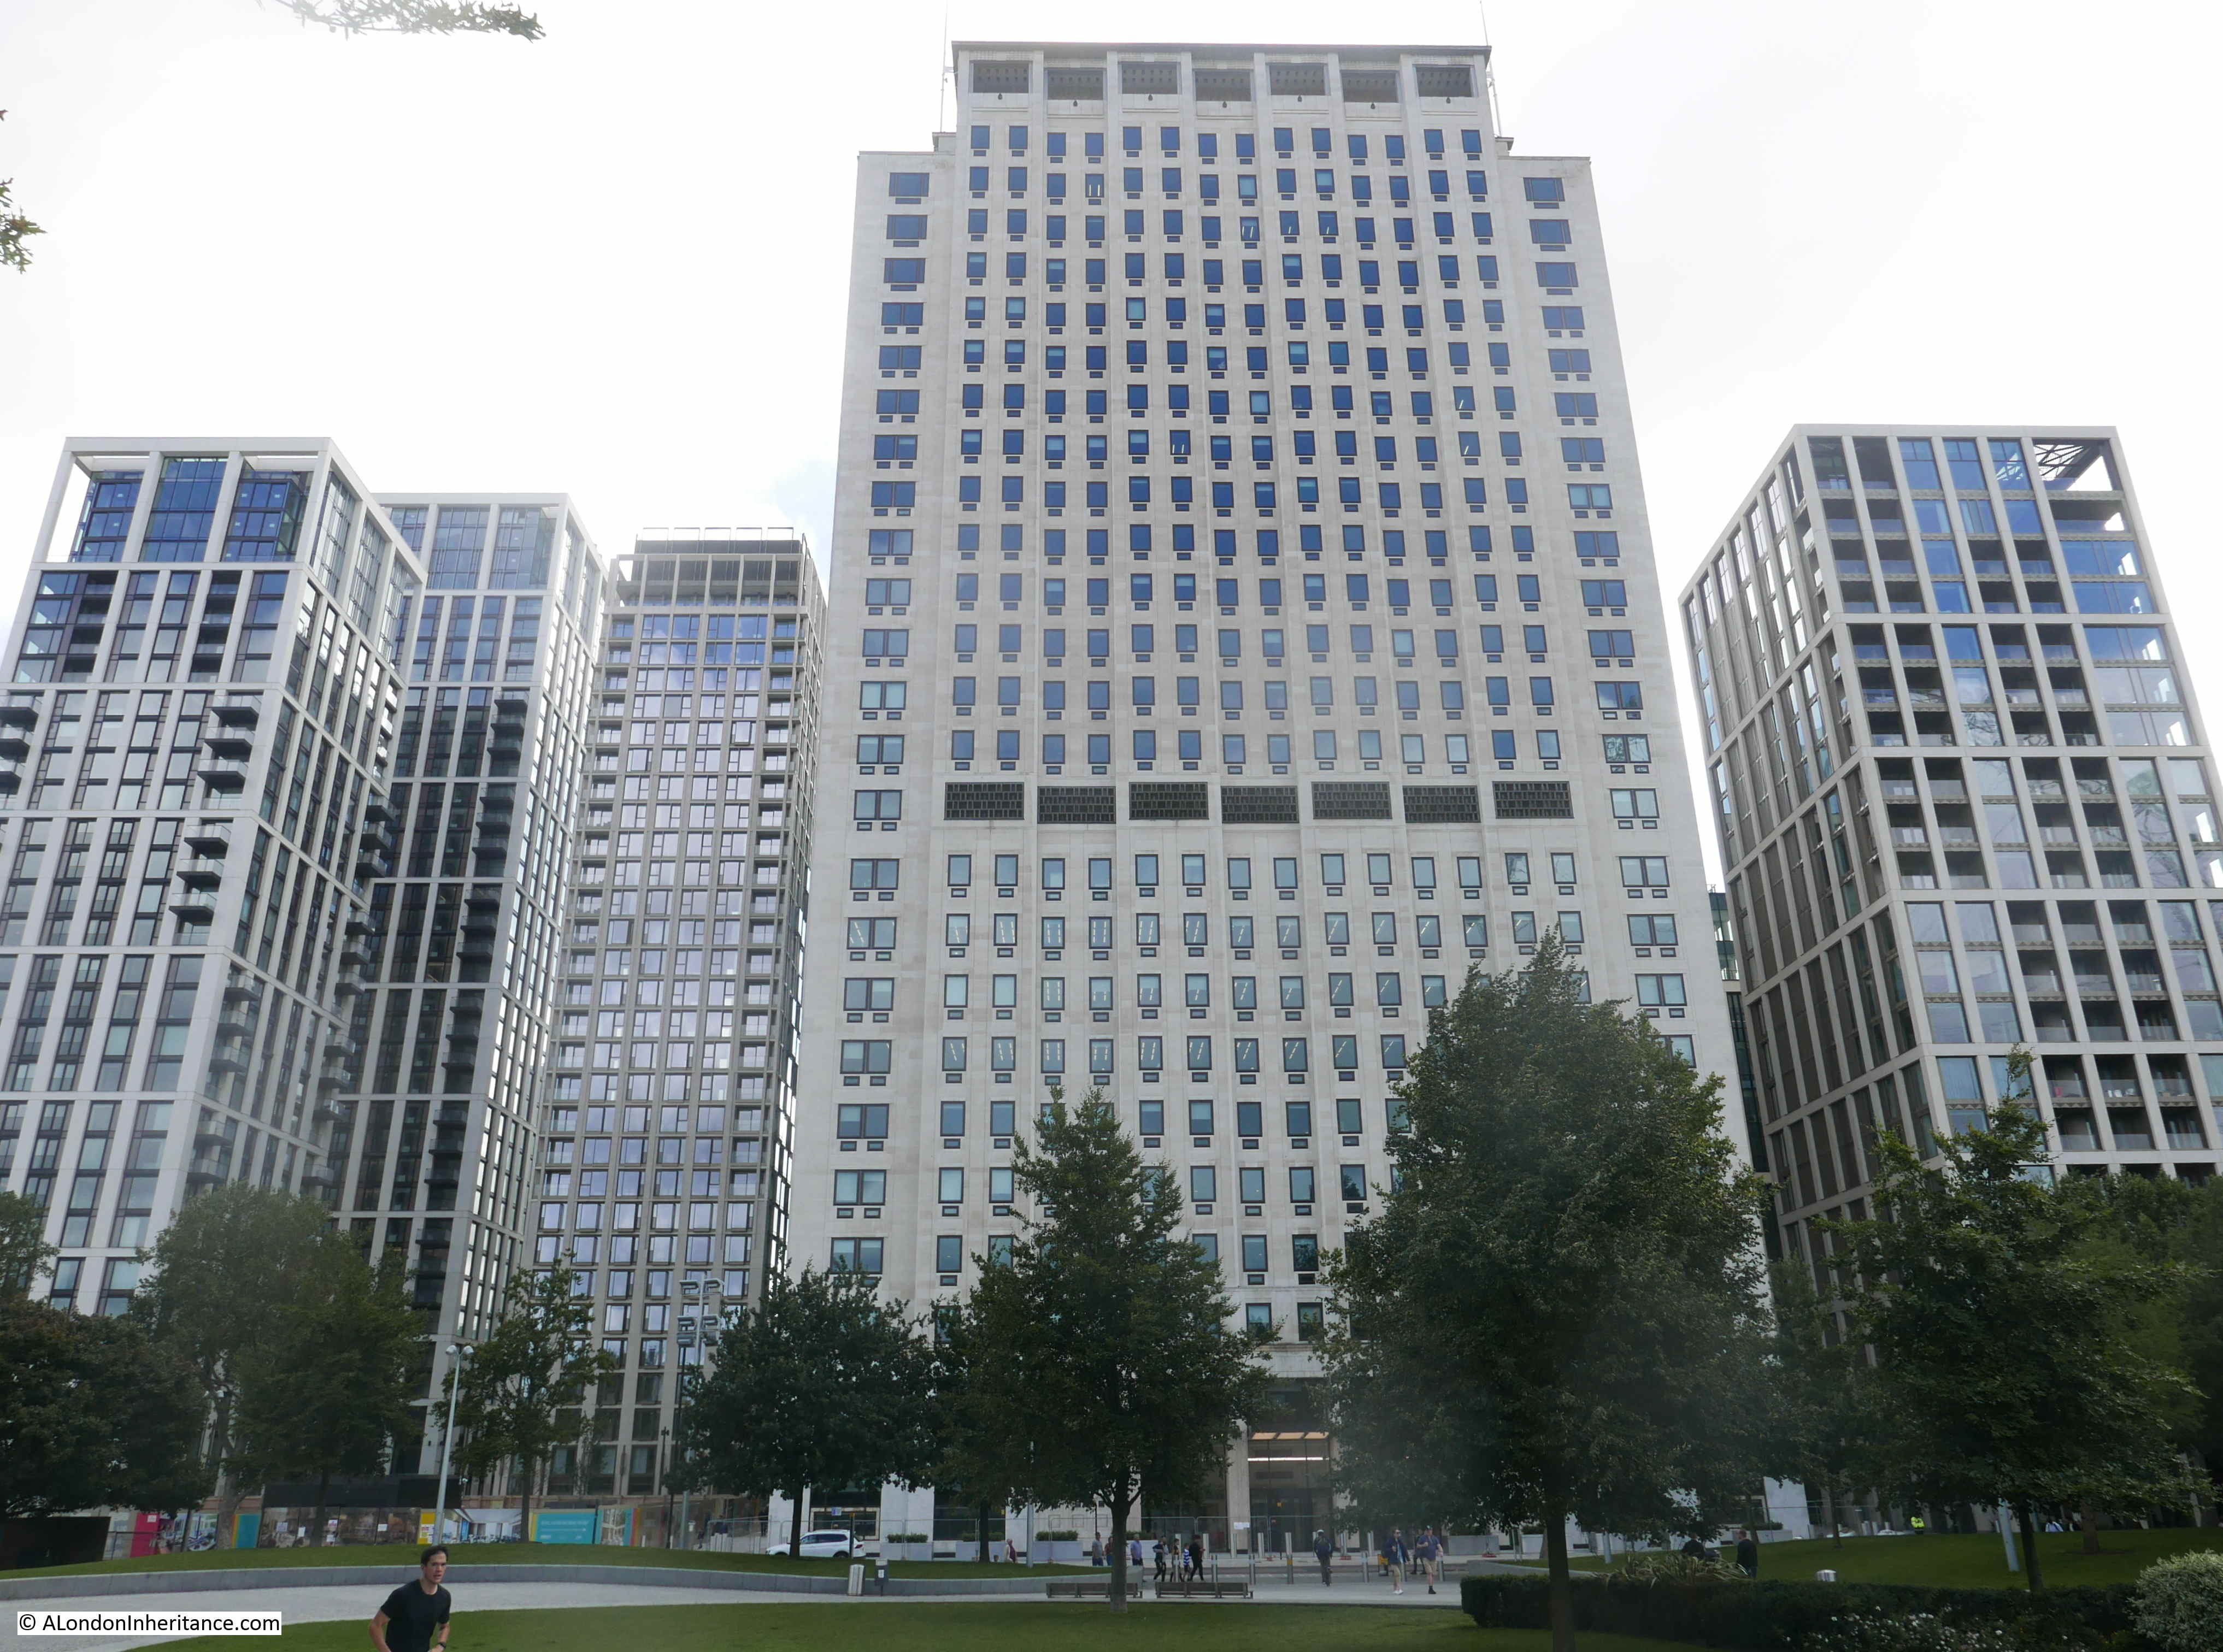
Shell have sold off most of the space originally occupied by their offices with today only the tower remaining. New apartment towers have recently shot up around the original Shell tower. The following photo shows the southern edge of the Jubilee Gardens:

Jubilee Gardens

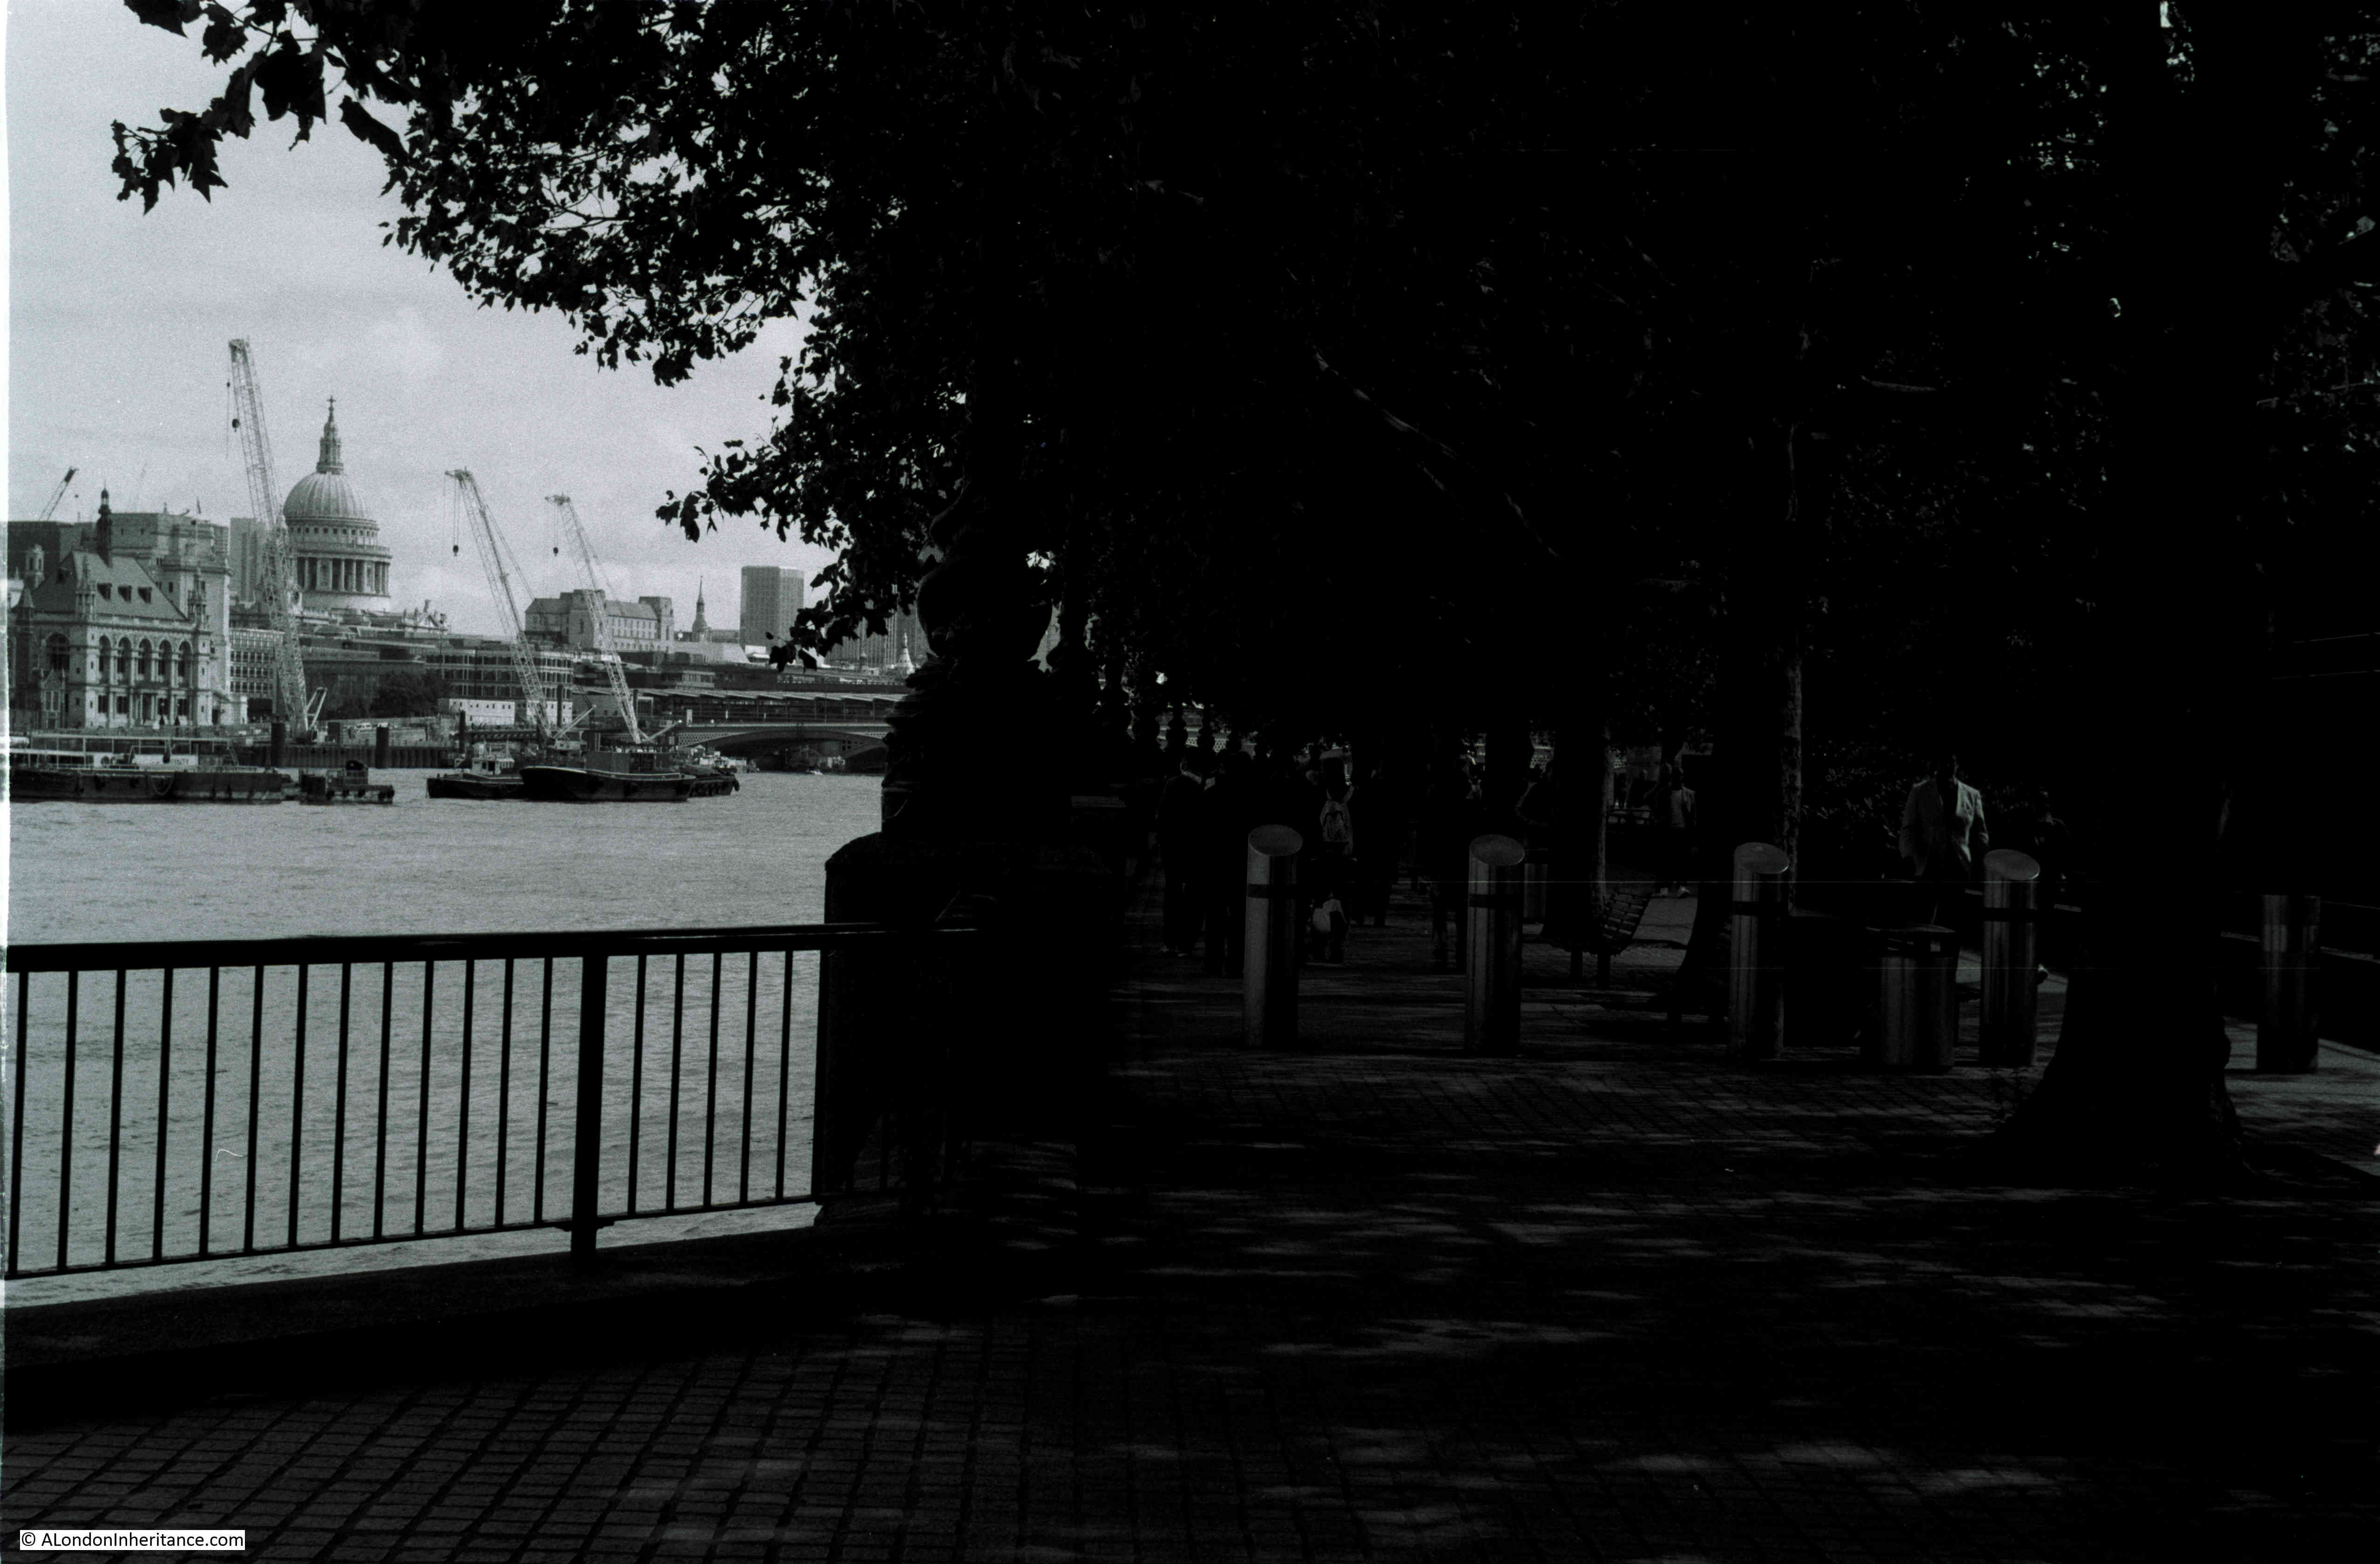
The view across the gardens from the northern edge, adjacent to the Embankment walkway:

Jubilee Gardens

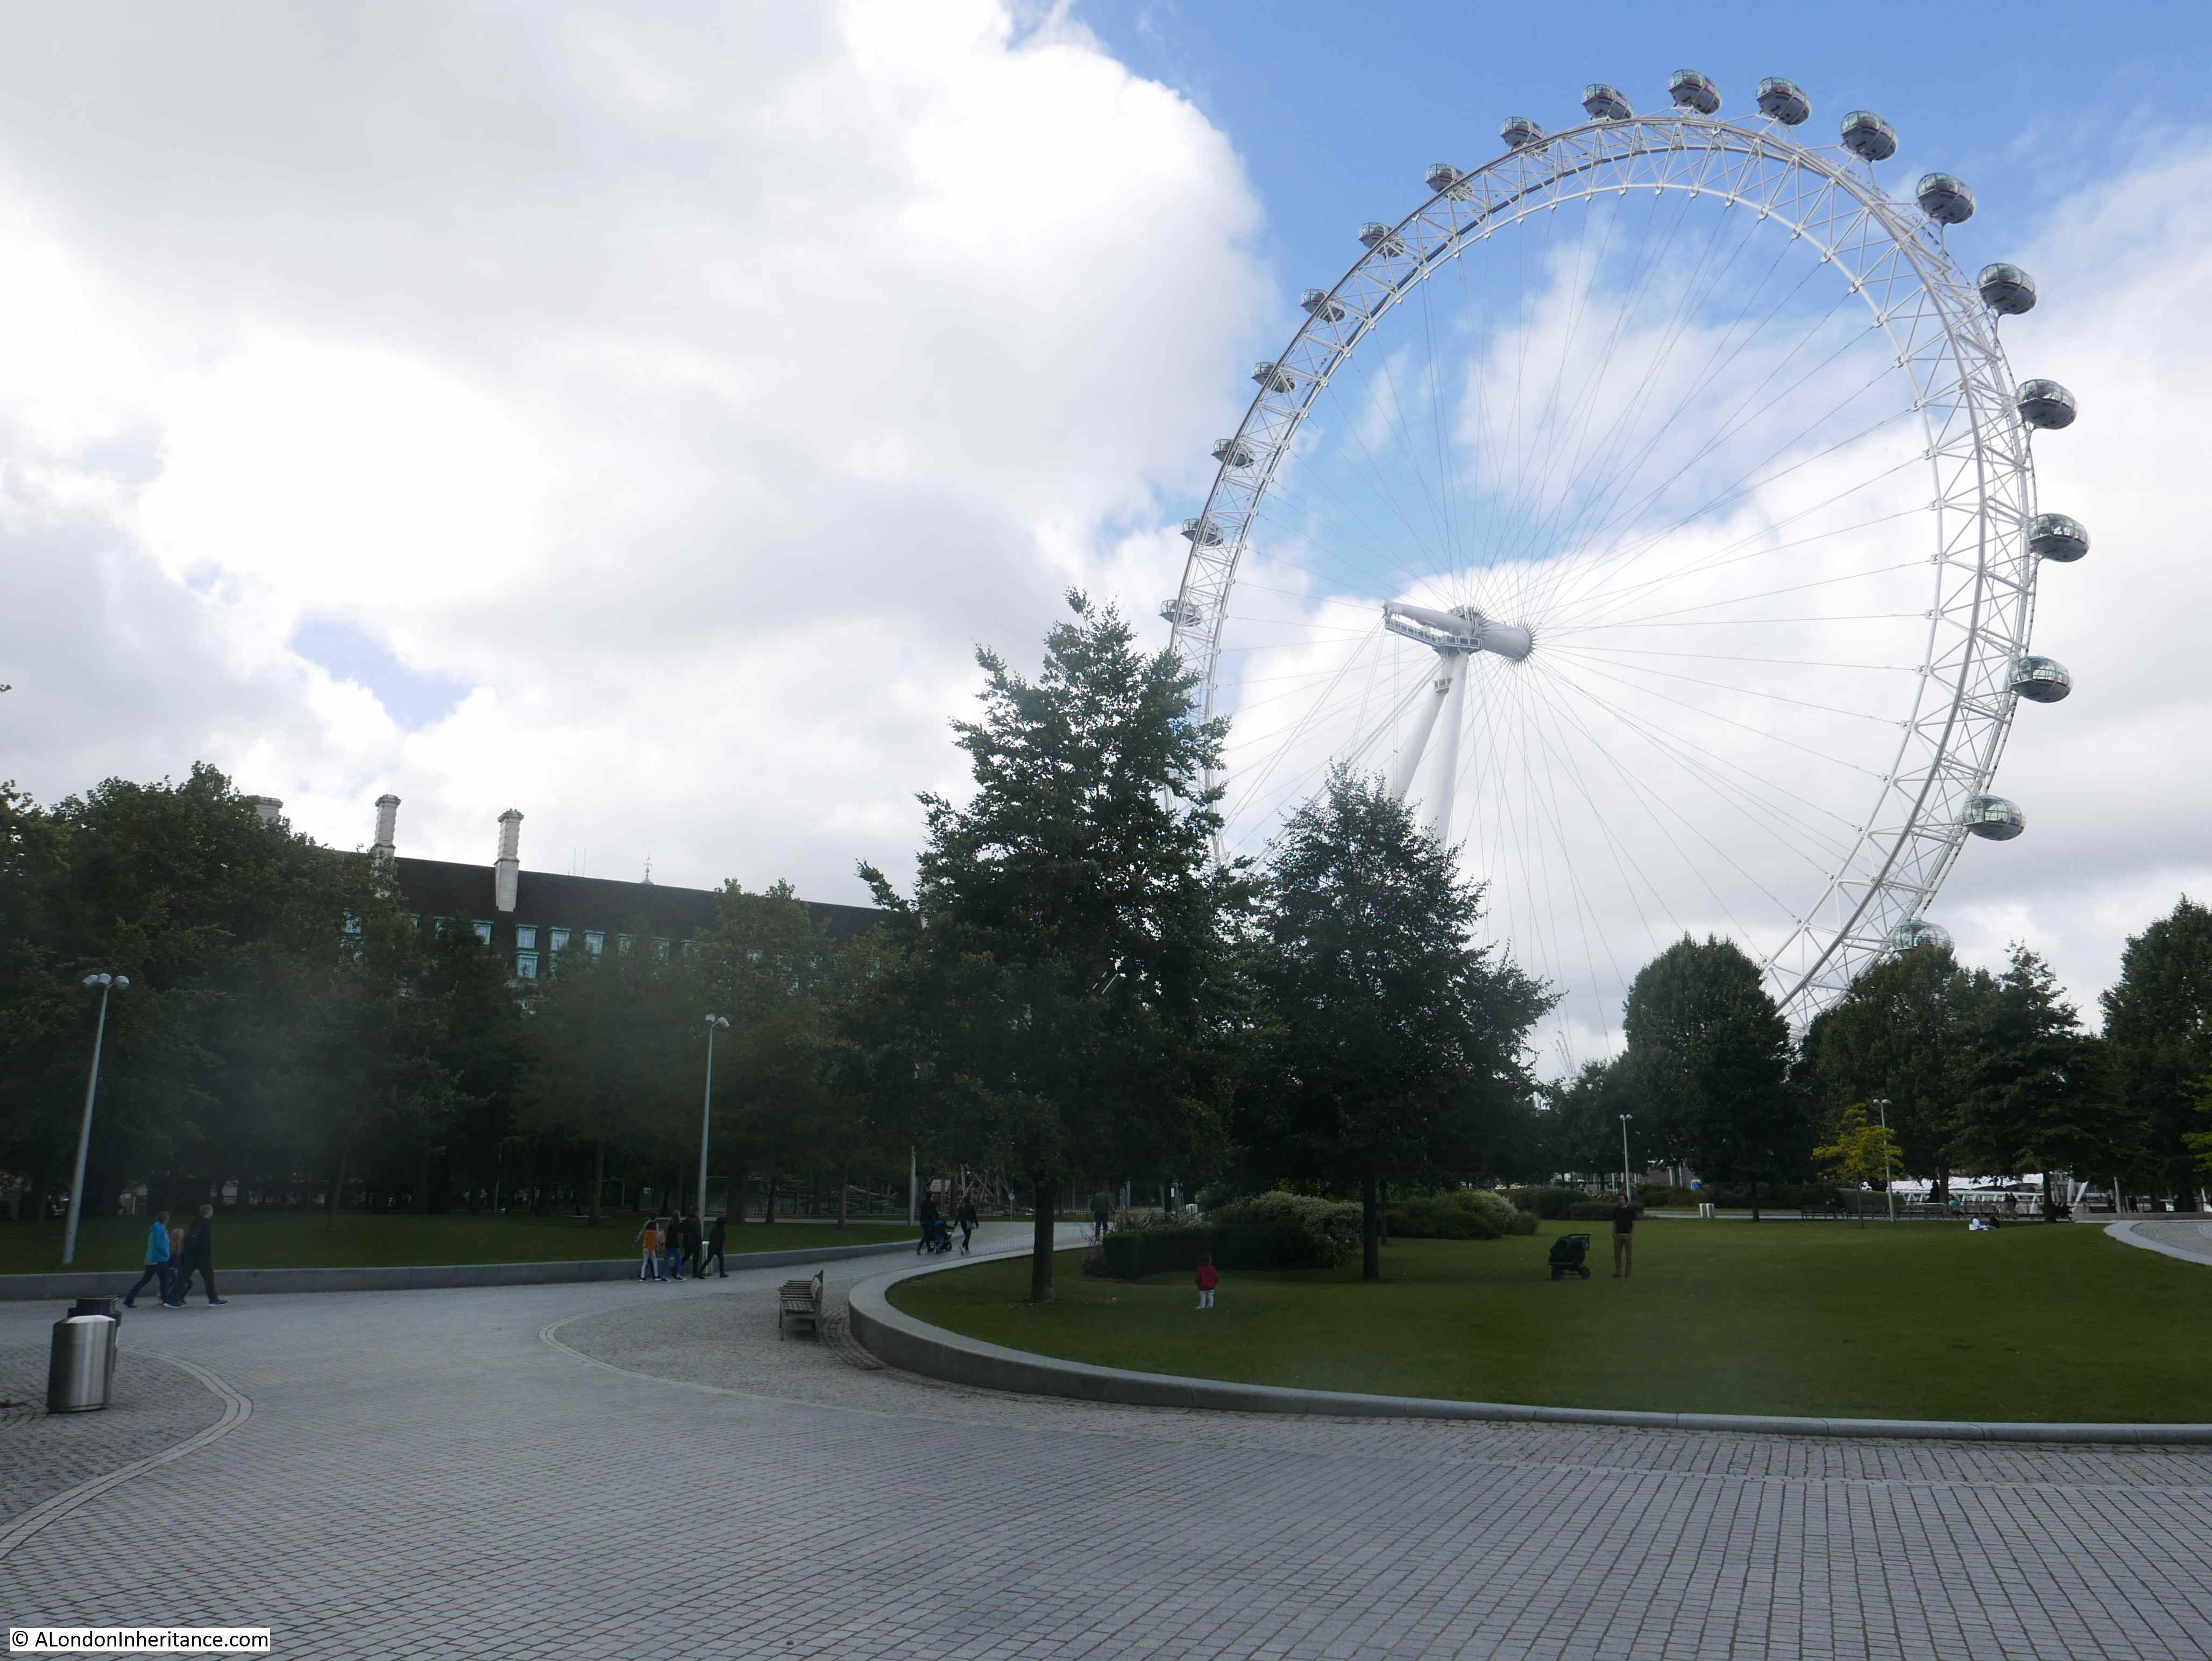
The London Eye now dominates the view across the Jubilee Gardens:

Jubilee Gardens

The Jubilee Gardens as an open space date back to just after the Festival of Britain which occupied the site in 1951. The Shell Centre complex was built on part of the Festival site between Belvedere Road and York Road, construction being between the years of 1957 and 1962.

Part of the plan for the development of the south bank was to leave the space between the Shell tower and the river as open space, enabling an unobstructed view of the tower down to ground floor foyer level from the north bank of the river. The following photo from 1978 shows the view. I took this in the spring so the trees are only just starting to come into leaf, so the gardens are almost invisible from the north bank.

Jubilee Gardens

From the closure of the Festival of Britain, until the creation of the Jubilee Gardens in 1977, the site was a temporary car park – temporary in that it was never properly constructed as a car park, the space was just for this purpose until a long term use could be found (and financed).

The Jubilee Gardens were part of the Jubilee Celebrations along the South Bank in July 1977, when there were a number of short, informal performances, and if you had been in the gardens on either the 2nd or 9th of July, you could have seen “Morley College Choir, Tilford Bach Festival Choir, Morley Meridian Choir, Morley Brass Band, Morley Jazz Orchestra, along with performances of opera, early music groups with folk, court, ballet and modern dancing”. Morley College is a specialist provider of adult education, founded to address the learning needs of Waterloo and Lambeth, hence the local connection with Jubilee Gardens.

The gardens were the scene of a number of demonstrations during the 1980s. Marches demonstrating against unemployment in the early 1980s and during the miners strike of 1984 to 1985 there were rallies and demonstrations by miners and supporting trades unions in the gardens.

The view across the Jubilee Gardens in 1980.

Jubilee Gardens

The stage area can be seen on the right. The area on the left was still used as a car park. I doubt that anyone at the time could have imagined the London Eye being central to this view.

However, as well as being close to the London Eye, the area was the location for one of the key structures of the Festival of Britain, when the Dome of Discovery occupied the space now occupied by the Jubilee Gardens as can be seen in the following photo:

Jubilee Gardens

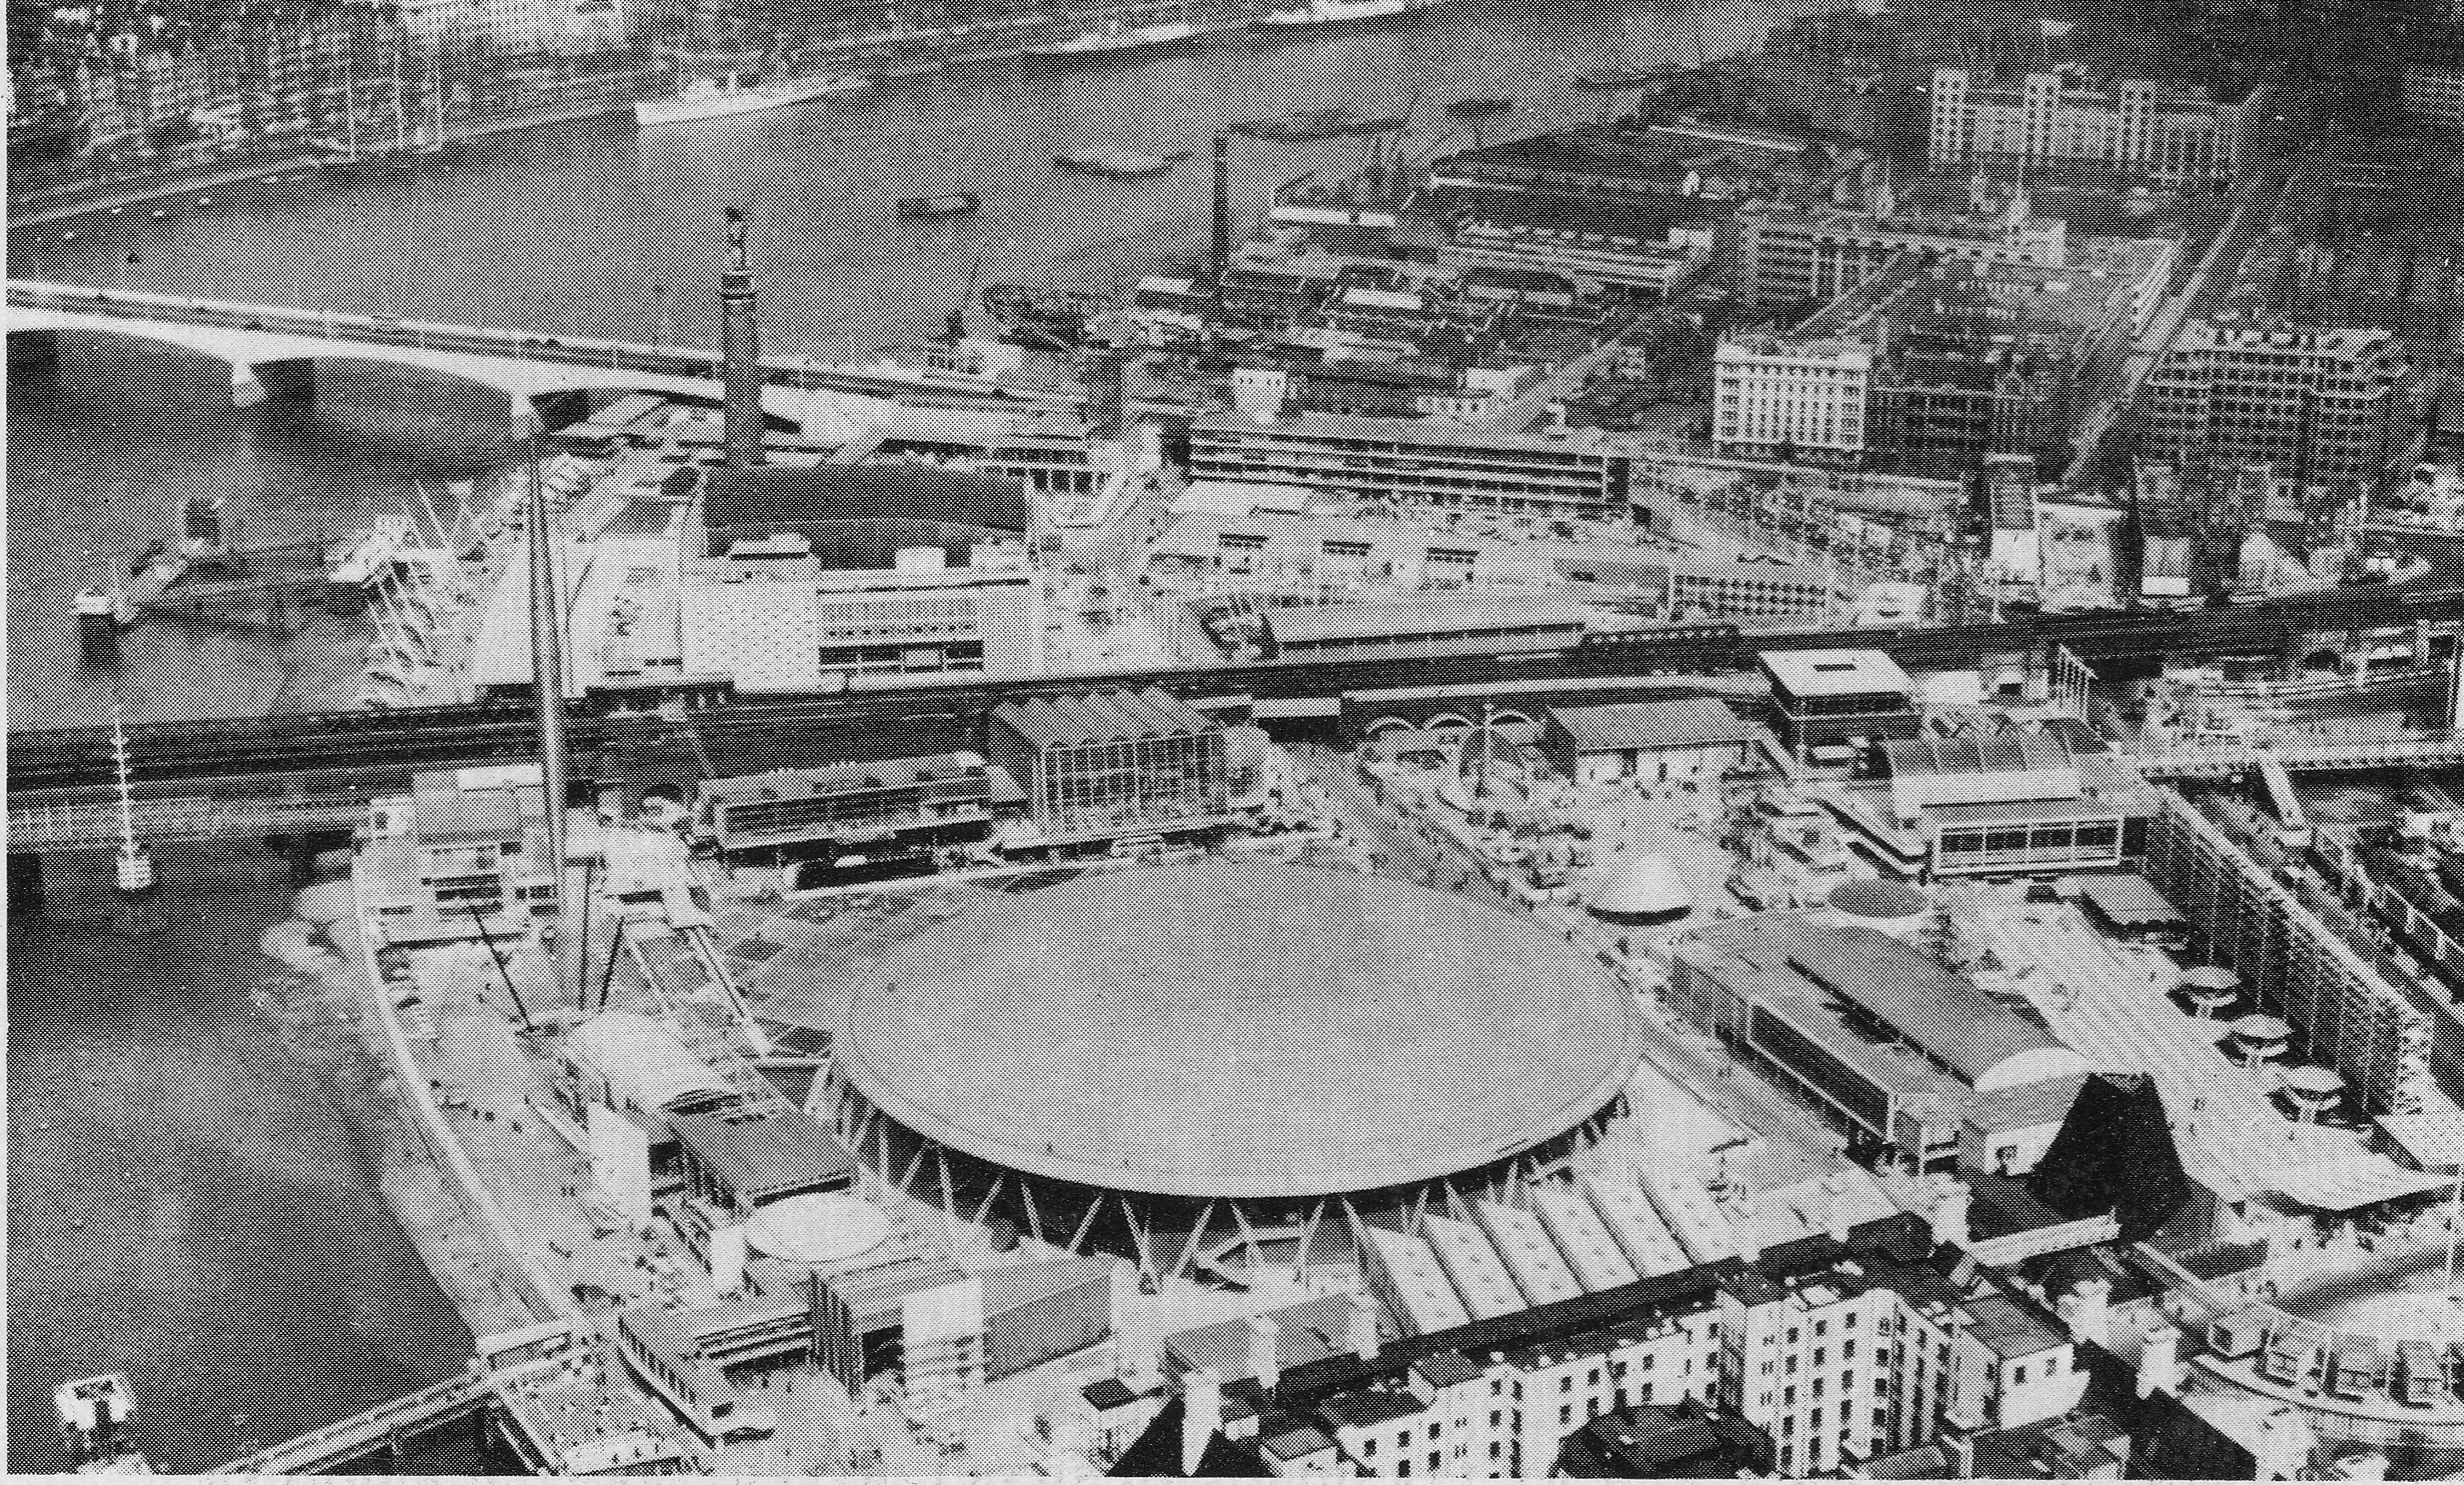
In the above photo, the buildings of County Hall that now face onto the gardens are seen on the lower right of the photo.

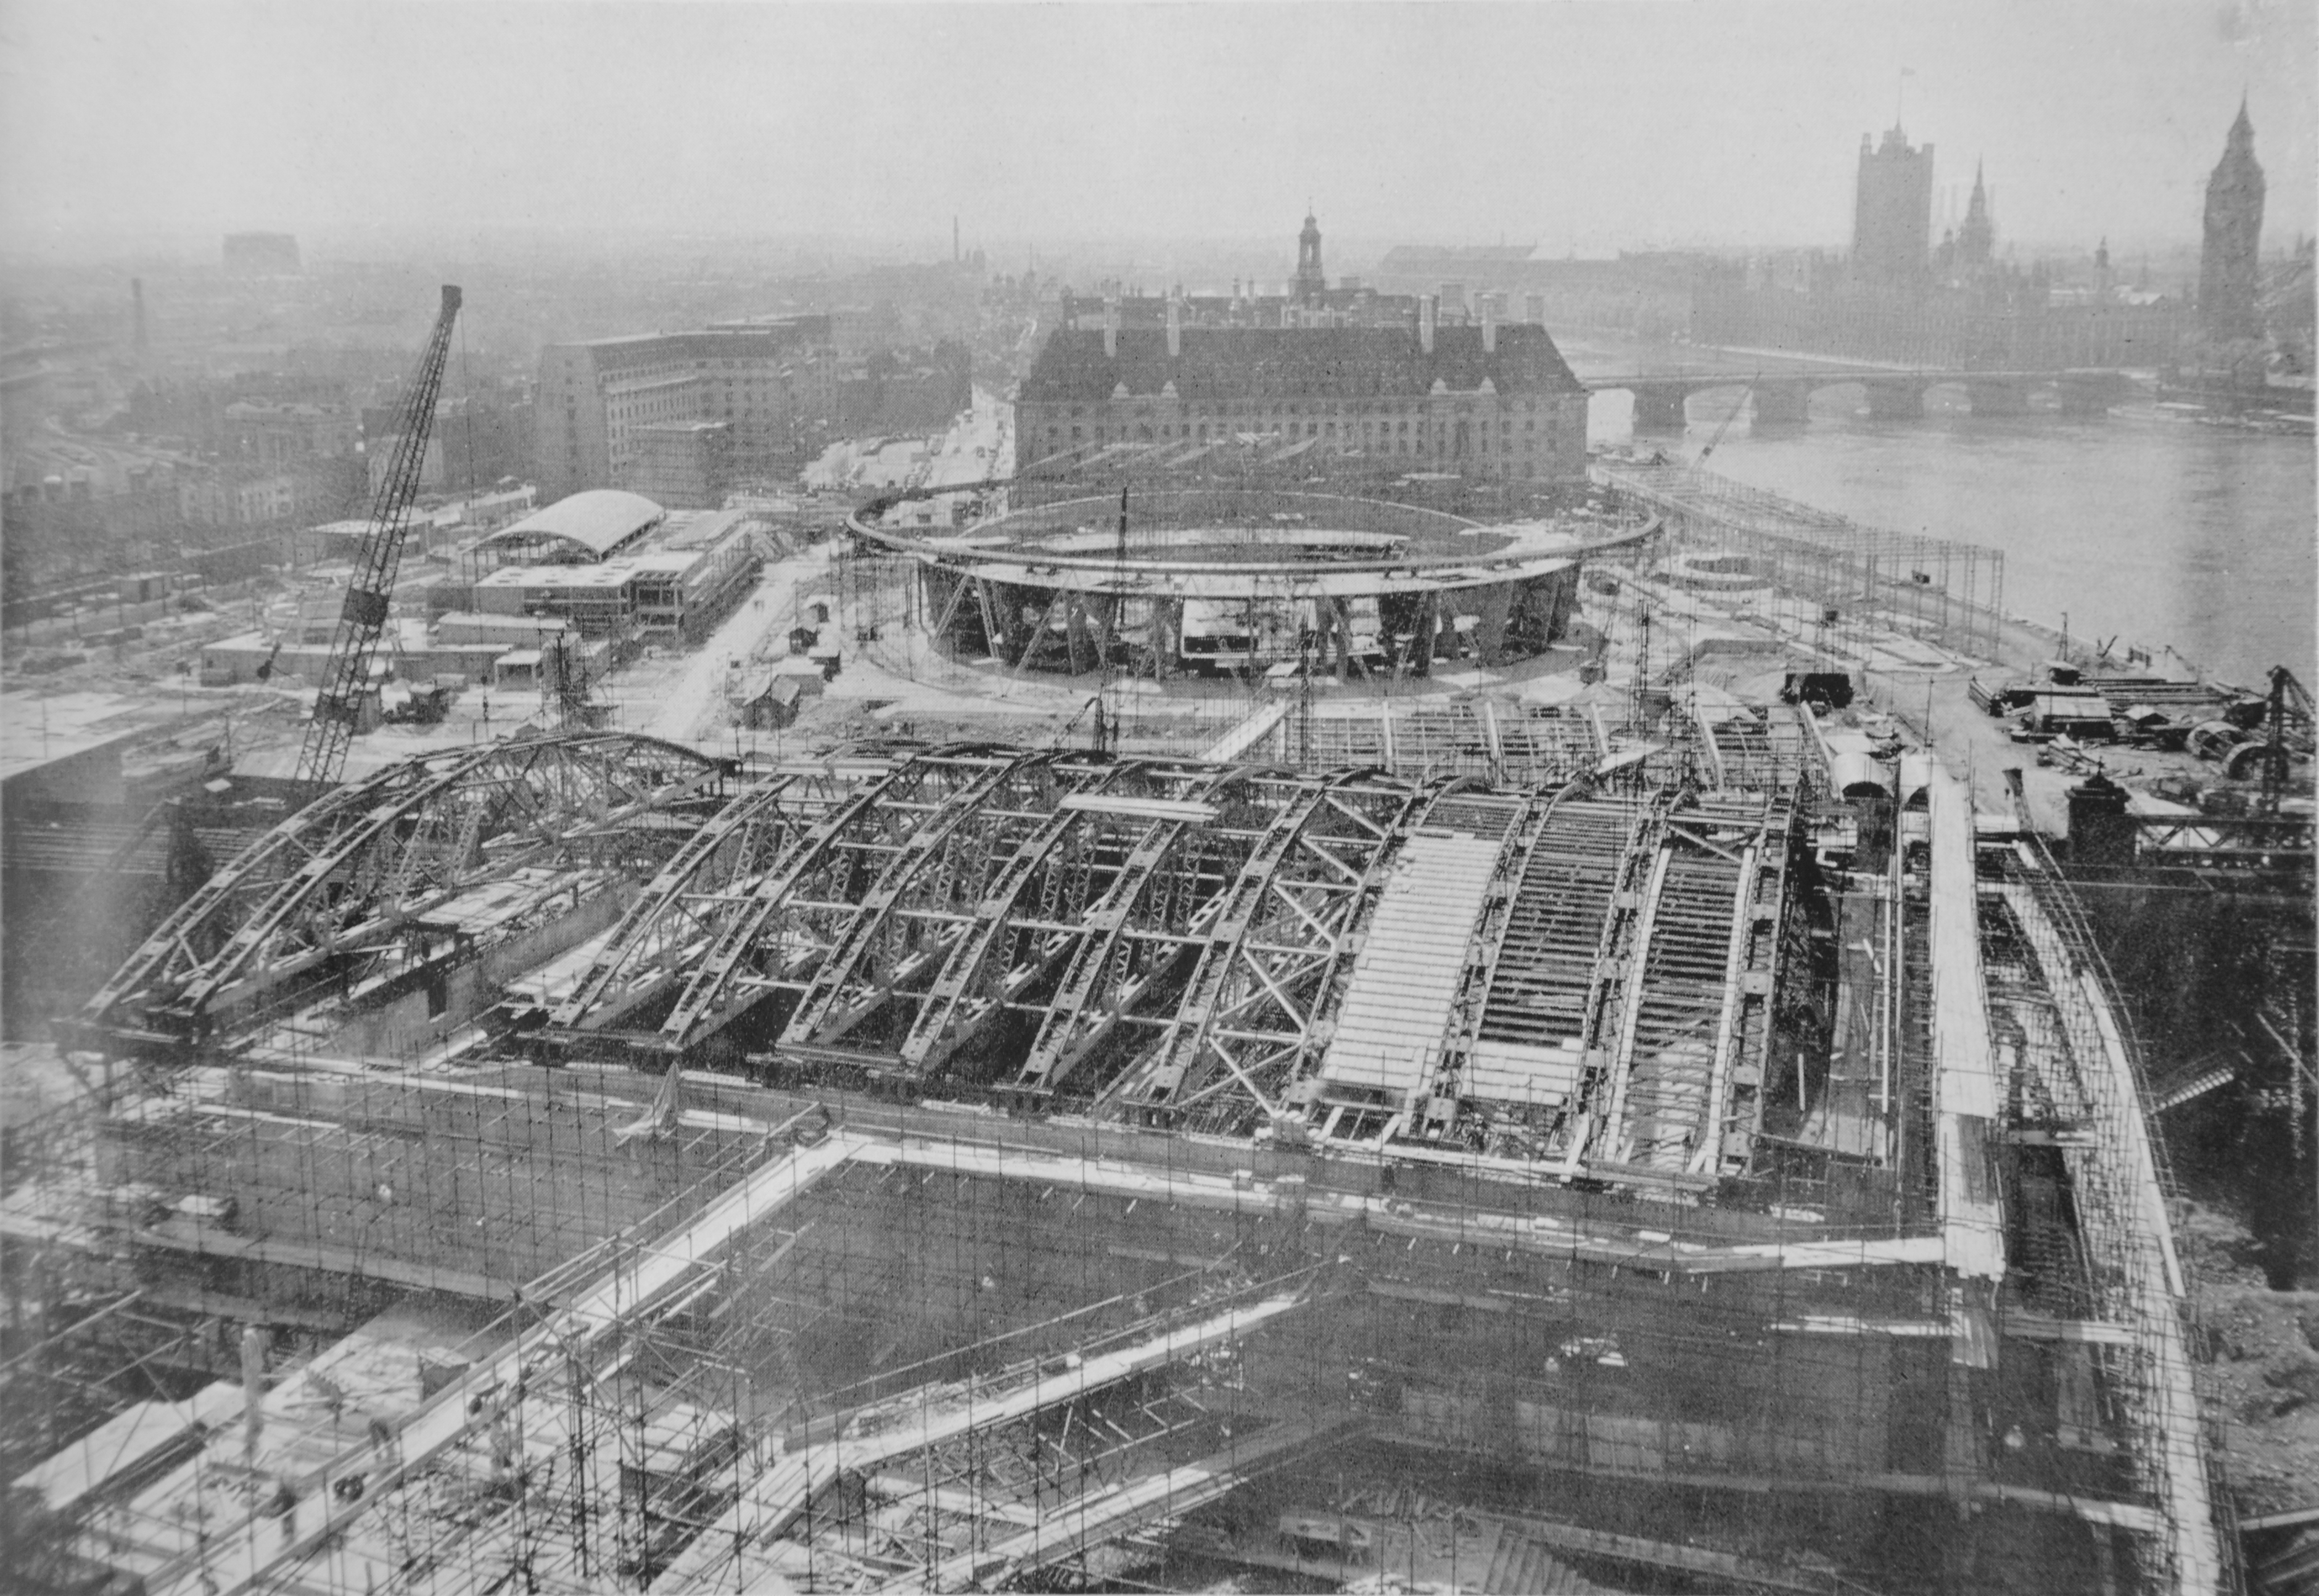
The following photo shows the construction of the Royal Festival Hall (in the foreground) and the Dome of Discover, with the buildings of County Hall in the background to confirm that the Jubilee Gardens now occupy the same space as the Dome of Discovery.

Jubilee Gardens

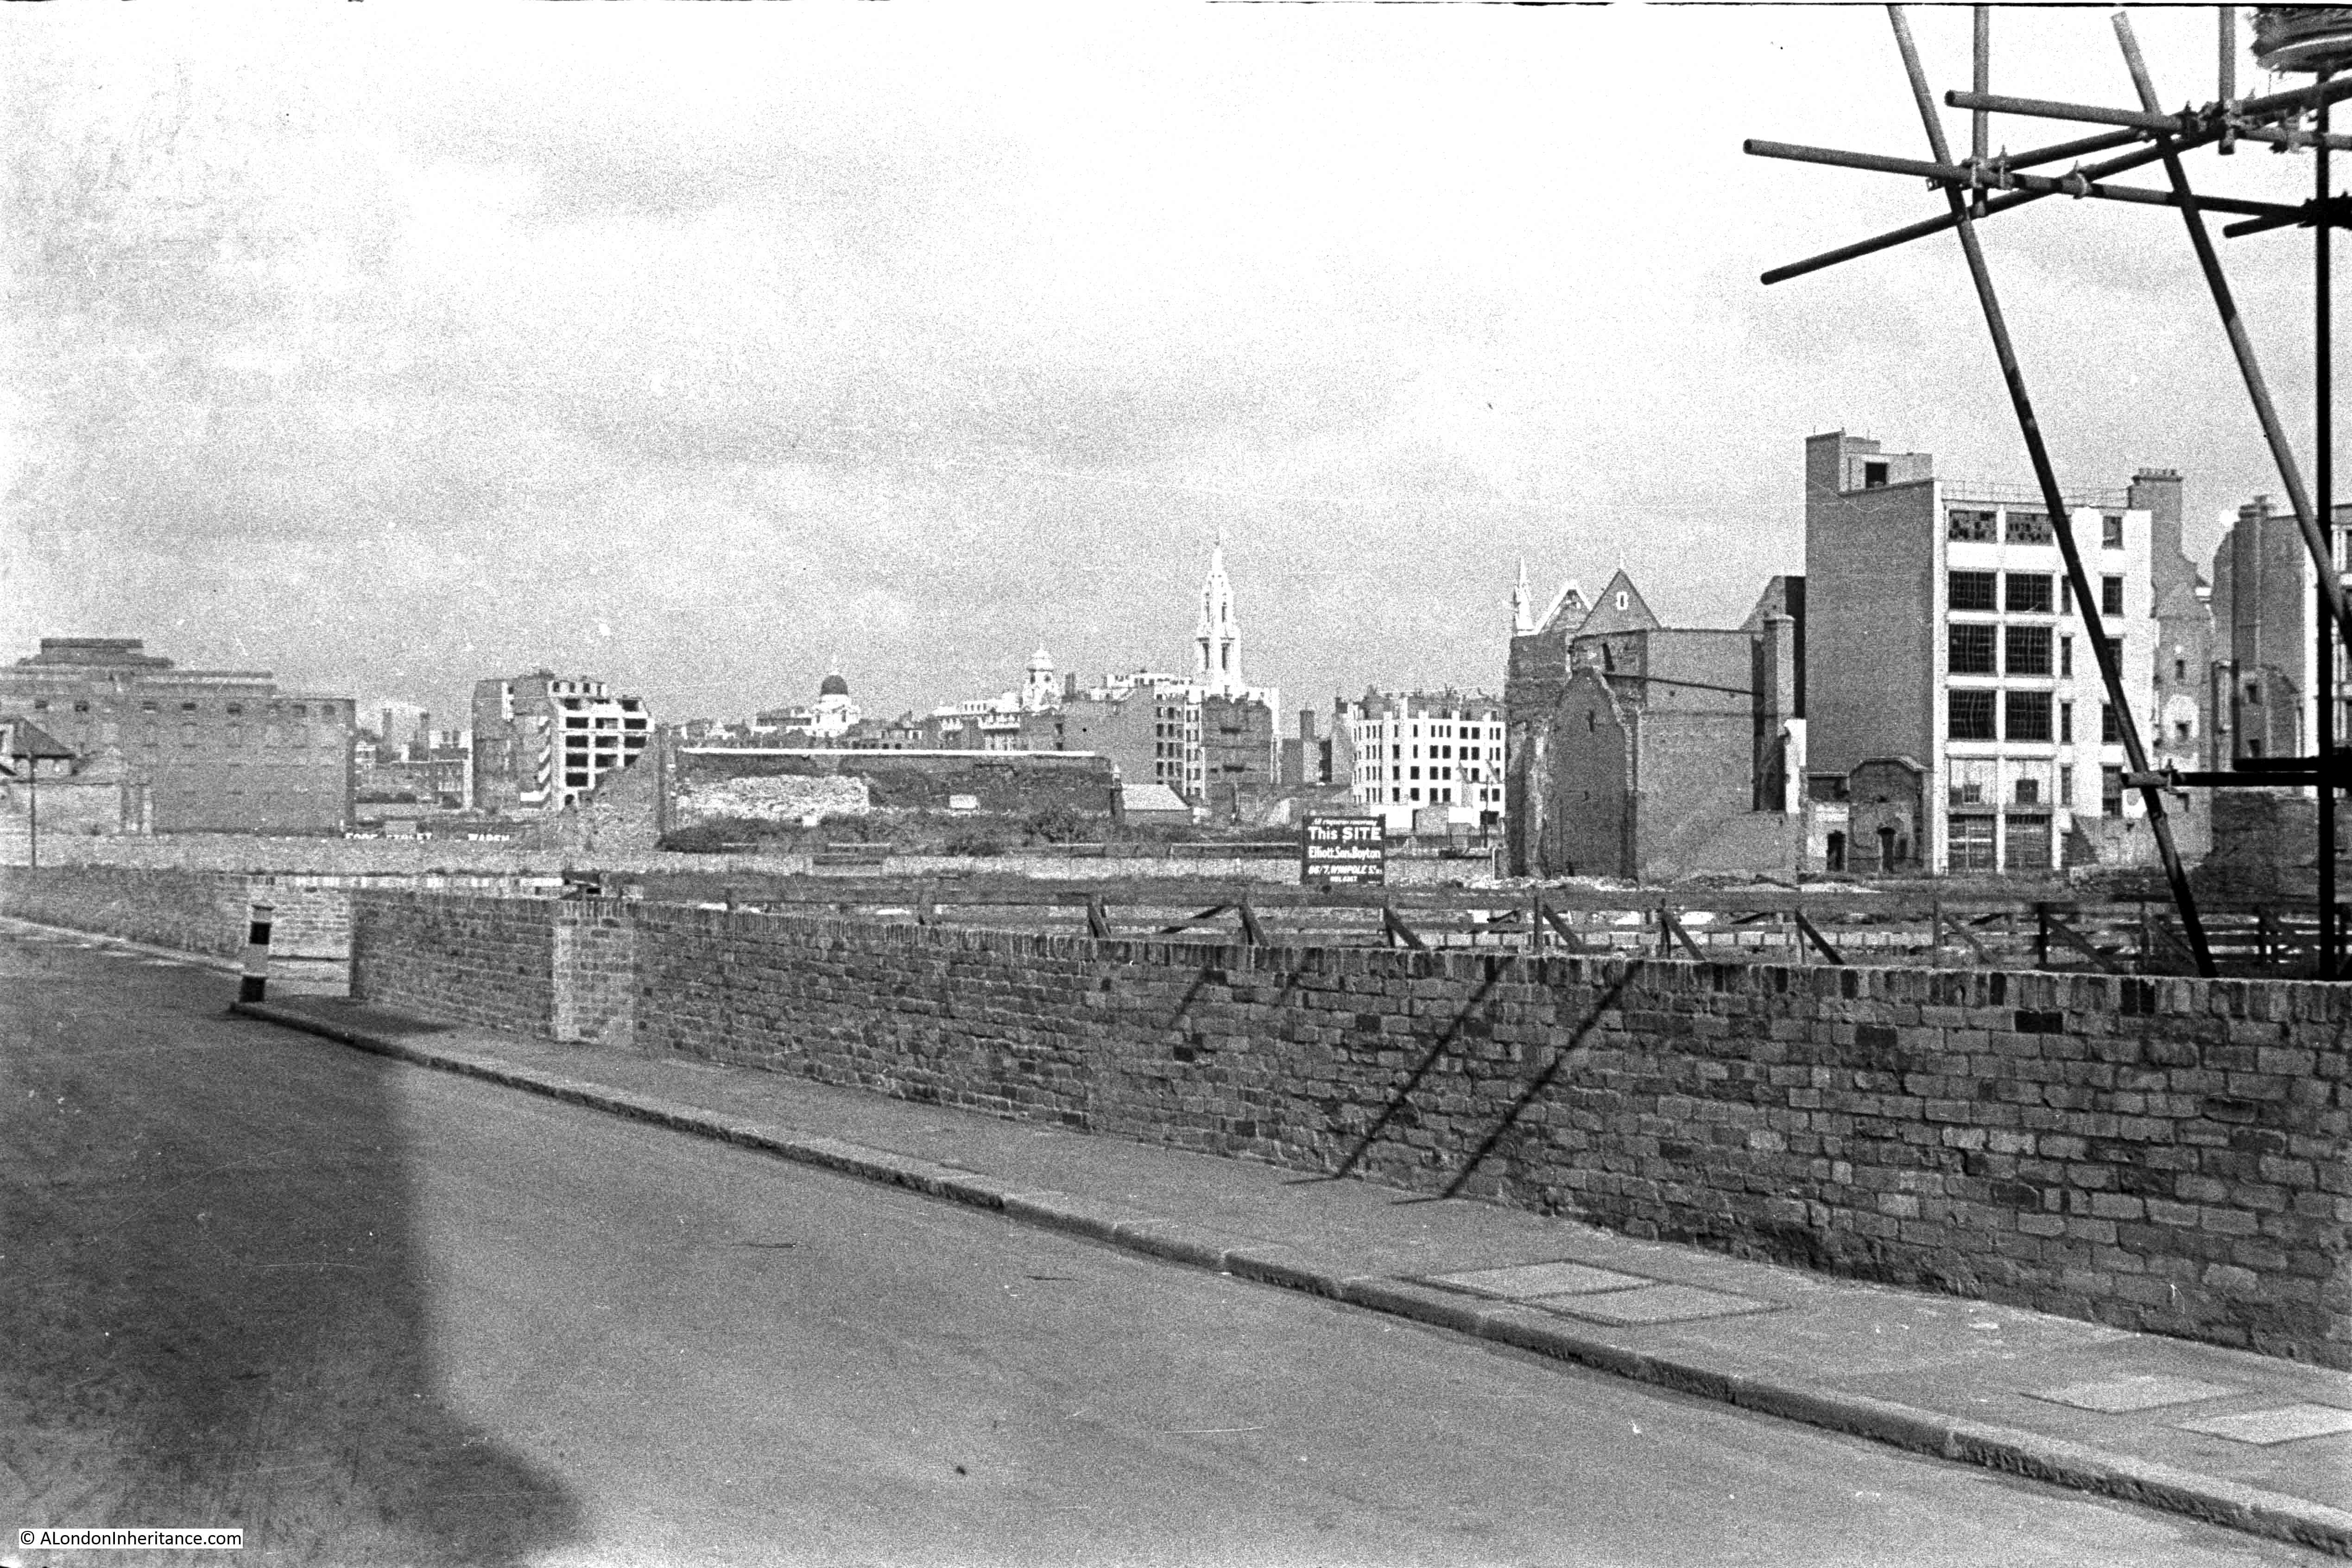
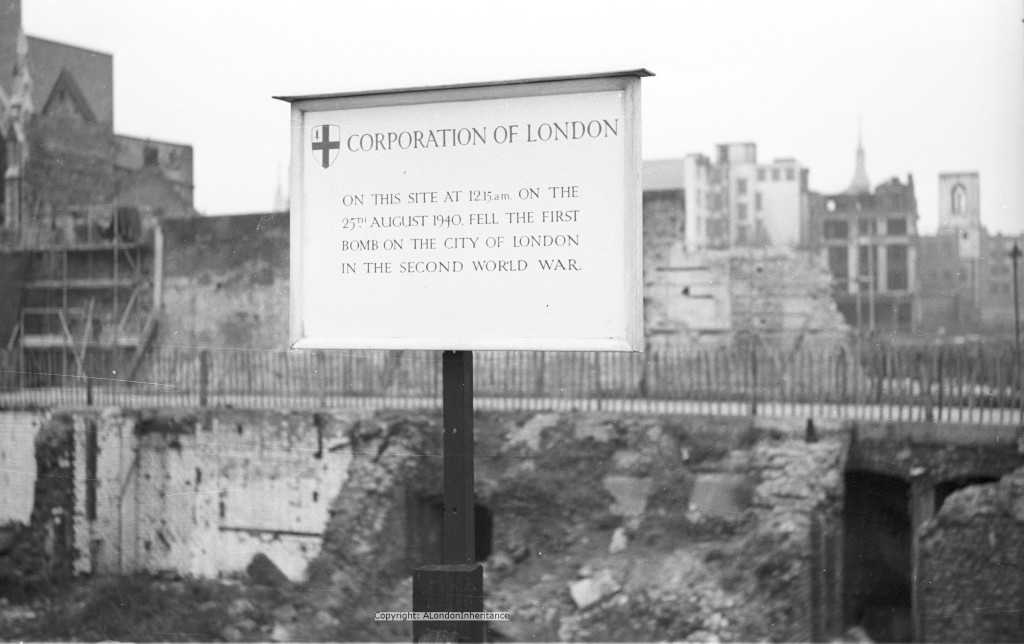
One of the reasons that the south bank site was chosen for the Festival of Britain was that the area had been very badly damaged during the war. During, and just after the war, many of the buildings on the site of the Jubilee Gardens had been demolished, with all that remained being a growing pile of rubble, as shown in the following photo by my father – again the buildings of County Hall confirm the location.

Jubilee Gardens

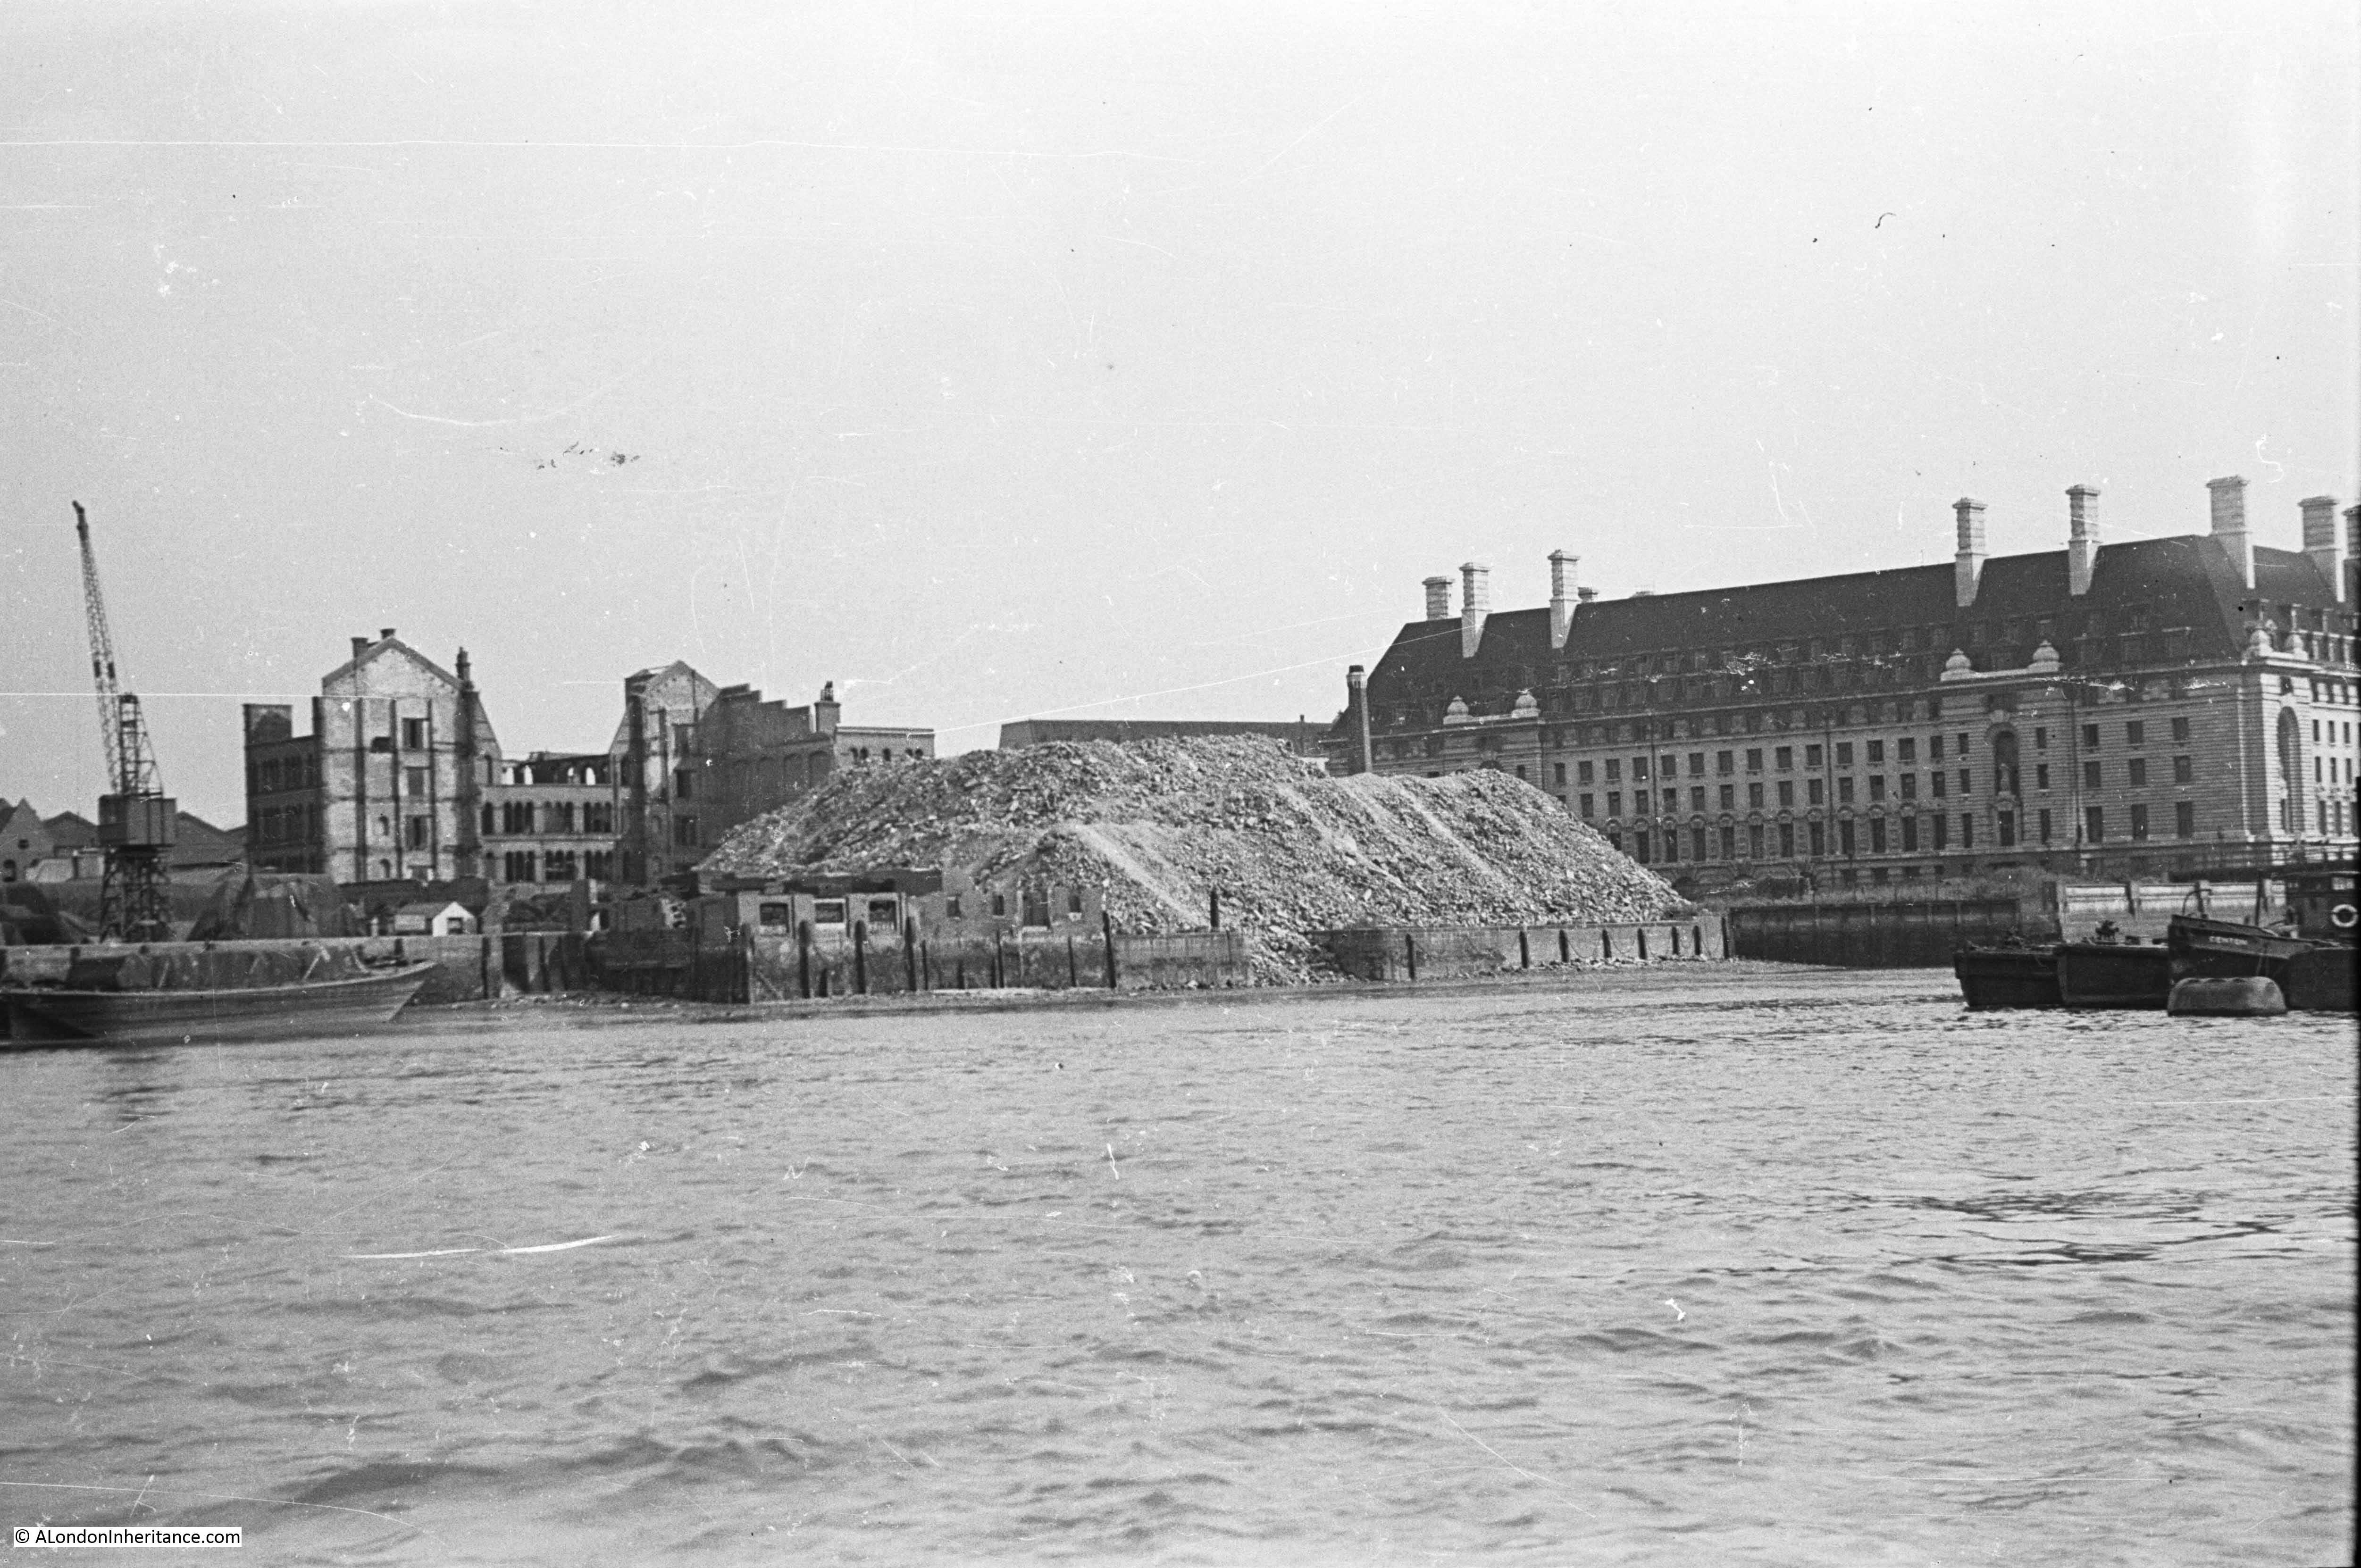
The site was completely cleared as shown in the following remarkable photo, which shows the area now occupied by the Jubilee Gardens cleared down to what was probably the original ground level when this was all marsh land.

Jubilee Gardens

The river must have flooded over the area at high tide – which explains why if you are at ground level at the edge of the side of County Hall facing the gardens, there appears to be an extension of the Embankment wall running inland alongside the building. It was to keep the Thames out.

This was the first area cleared for the construction of the Festival of Britain, as on the other side of Hungerford Railway Bridge, just behind the Shot Tower is the Lion Brewery, which would also soon be demolished.

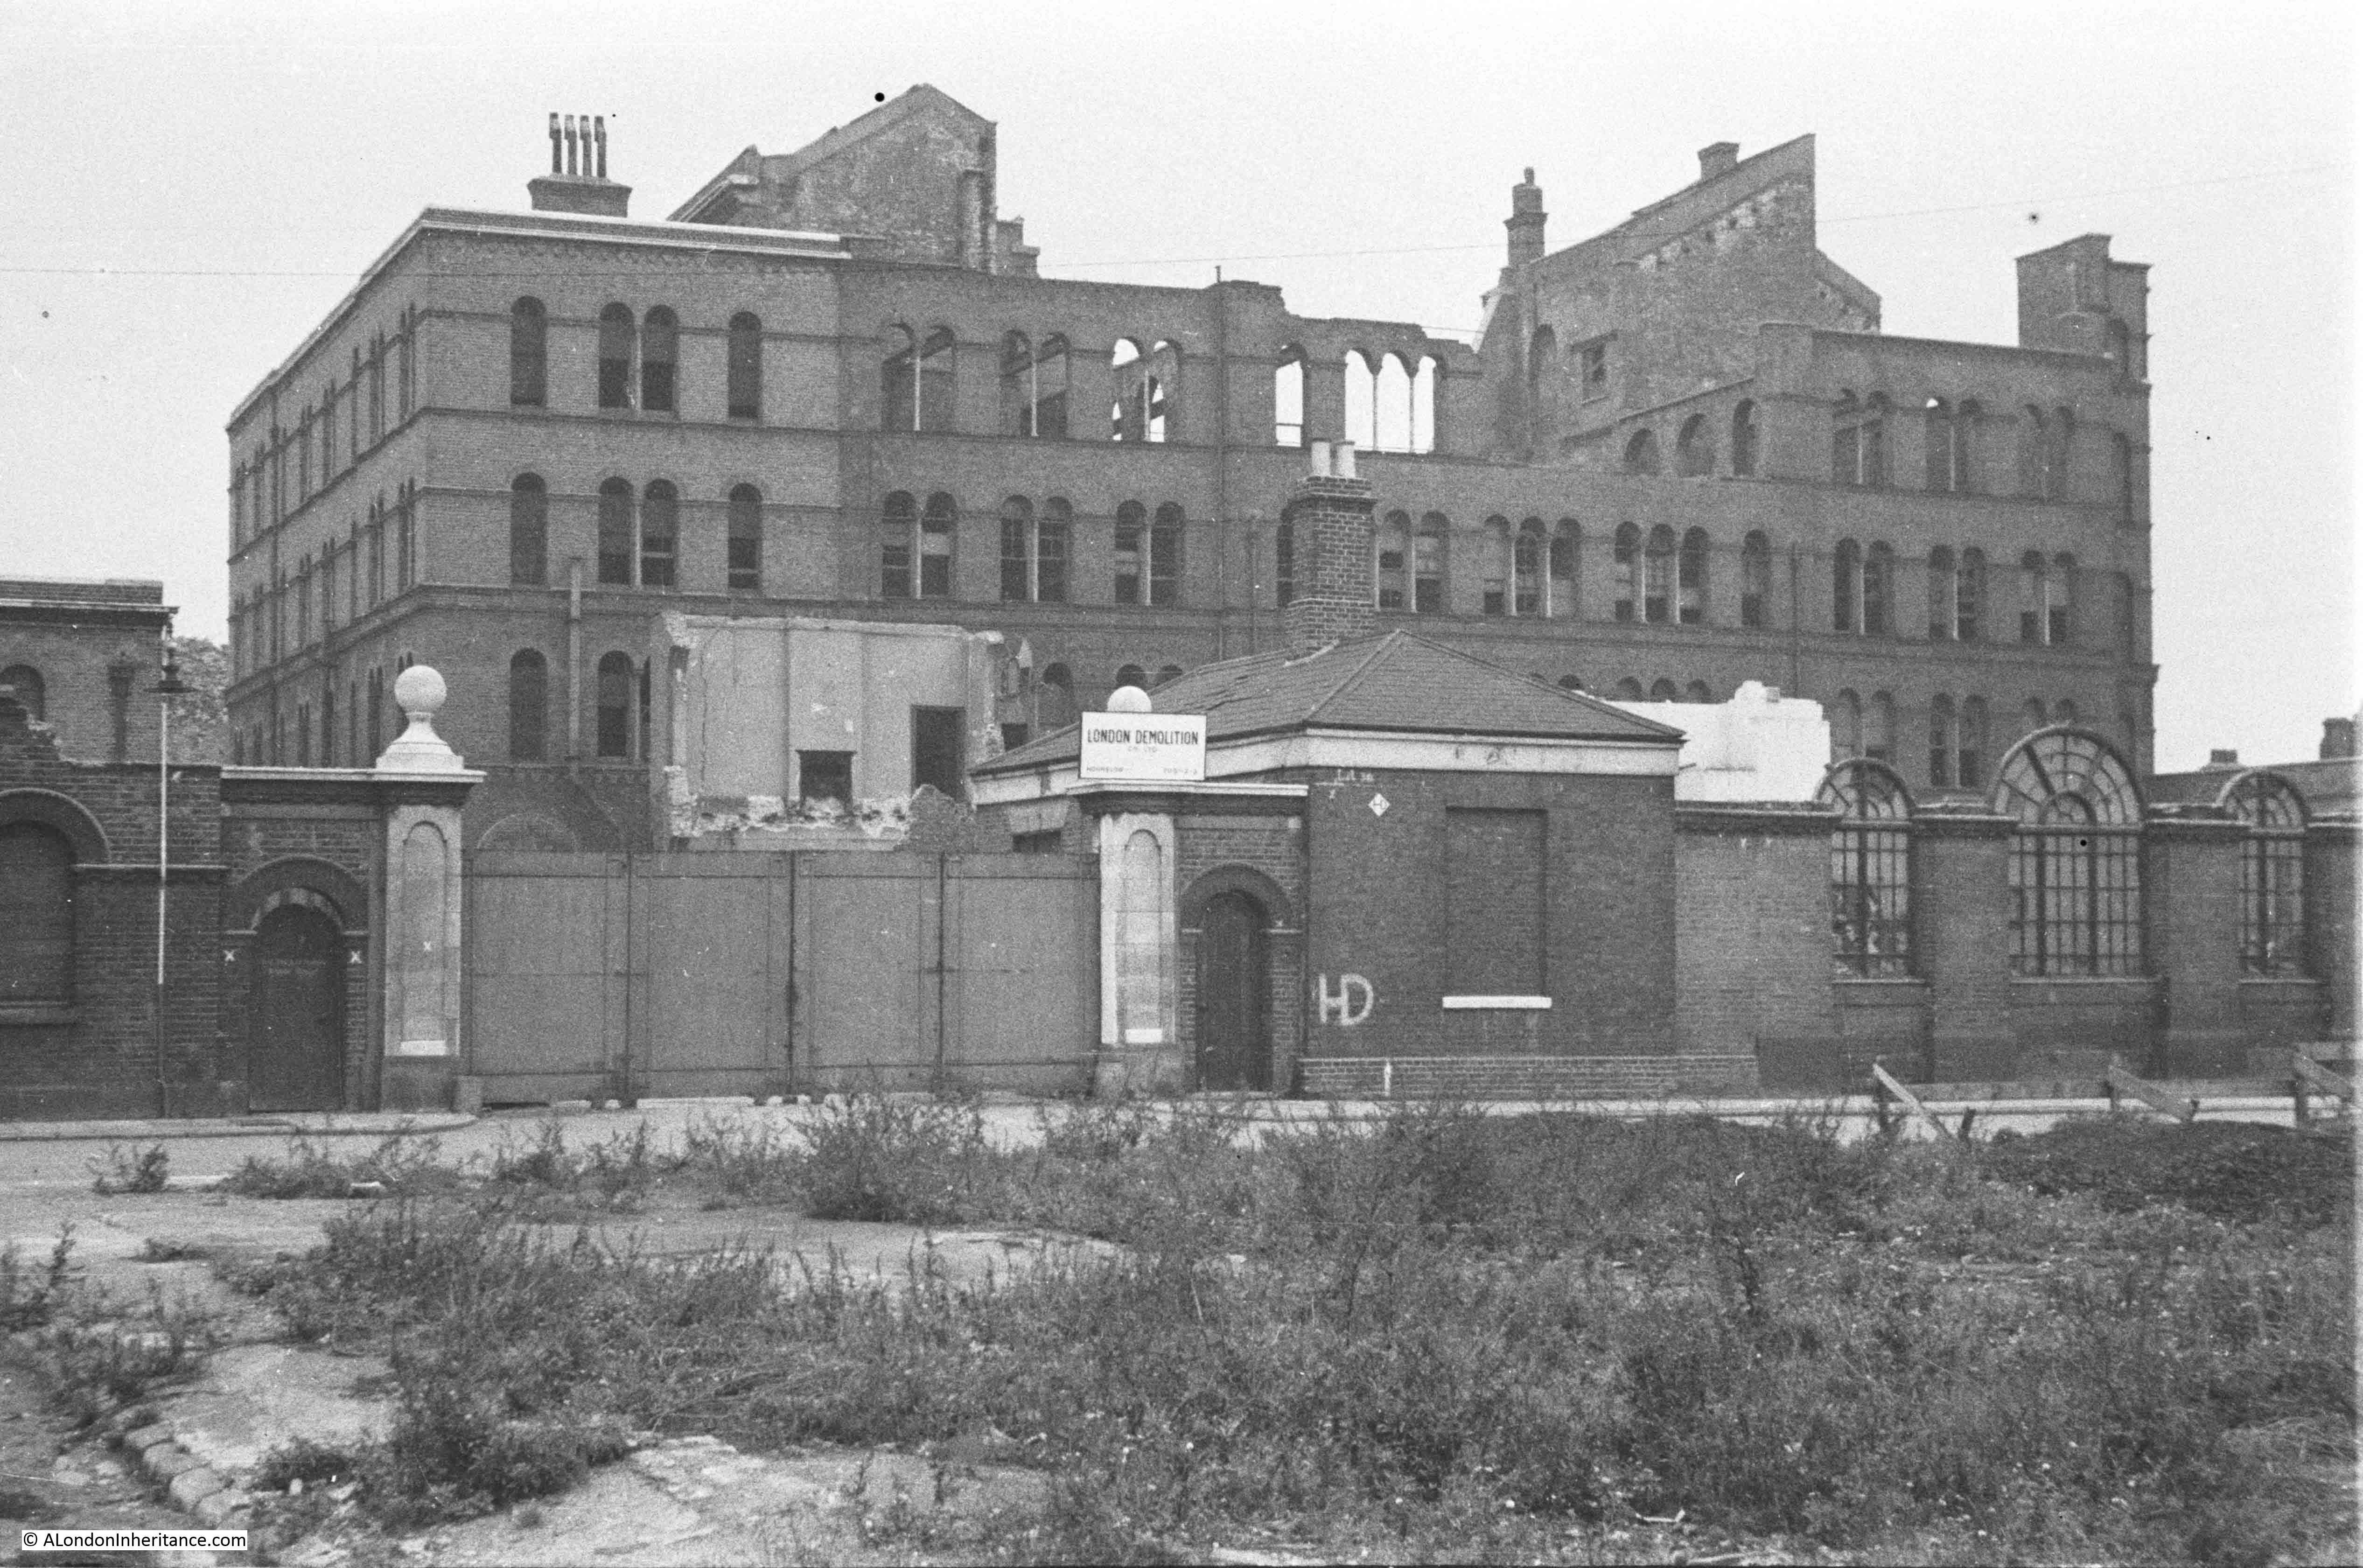
Before the war, the area now occupied by the Jubilee Gardens was mainly warehousing and industrial. A large warehouse – the Government India Stores – occupied the site, along with a now lost street – Jenkins Street, as shown in the following map extract (again the buildings of County Hall provide a point of reference).

Jubilee Gardens

The Government India Stores, or the India Stores Depot was built in 1862 on land leased by the Secretary of State for India. The purpose of the building was to hold goods that had been purchased in the UK by the Government of India, prior to shipping to India.

By the end of the 19th century, this was getting to be a dubious exercise with questions being asked in Parliament about why the Government of India was purchasing goods in the UK which could also easily be purchased in India, and would benefit the Indian economy.

My father photographed the post war remains of the Government India Stores prior to demolition:

Jubilee Gardens

The area occupied by the Jubilee Gardens has long been an industrial site. The following extract from Rocque’s map of London from 1746 shows the sweep of the river as it curves down to Westminster Bridge at lower left.

Jubilee Gardens

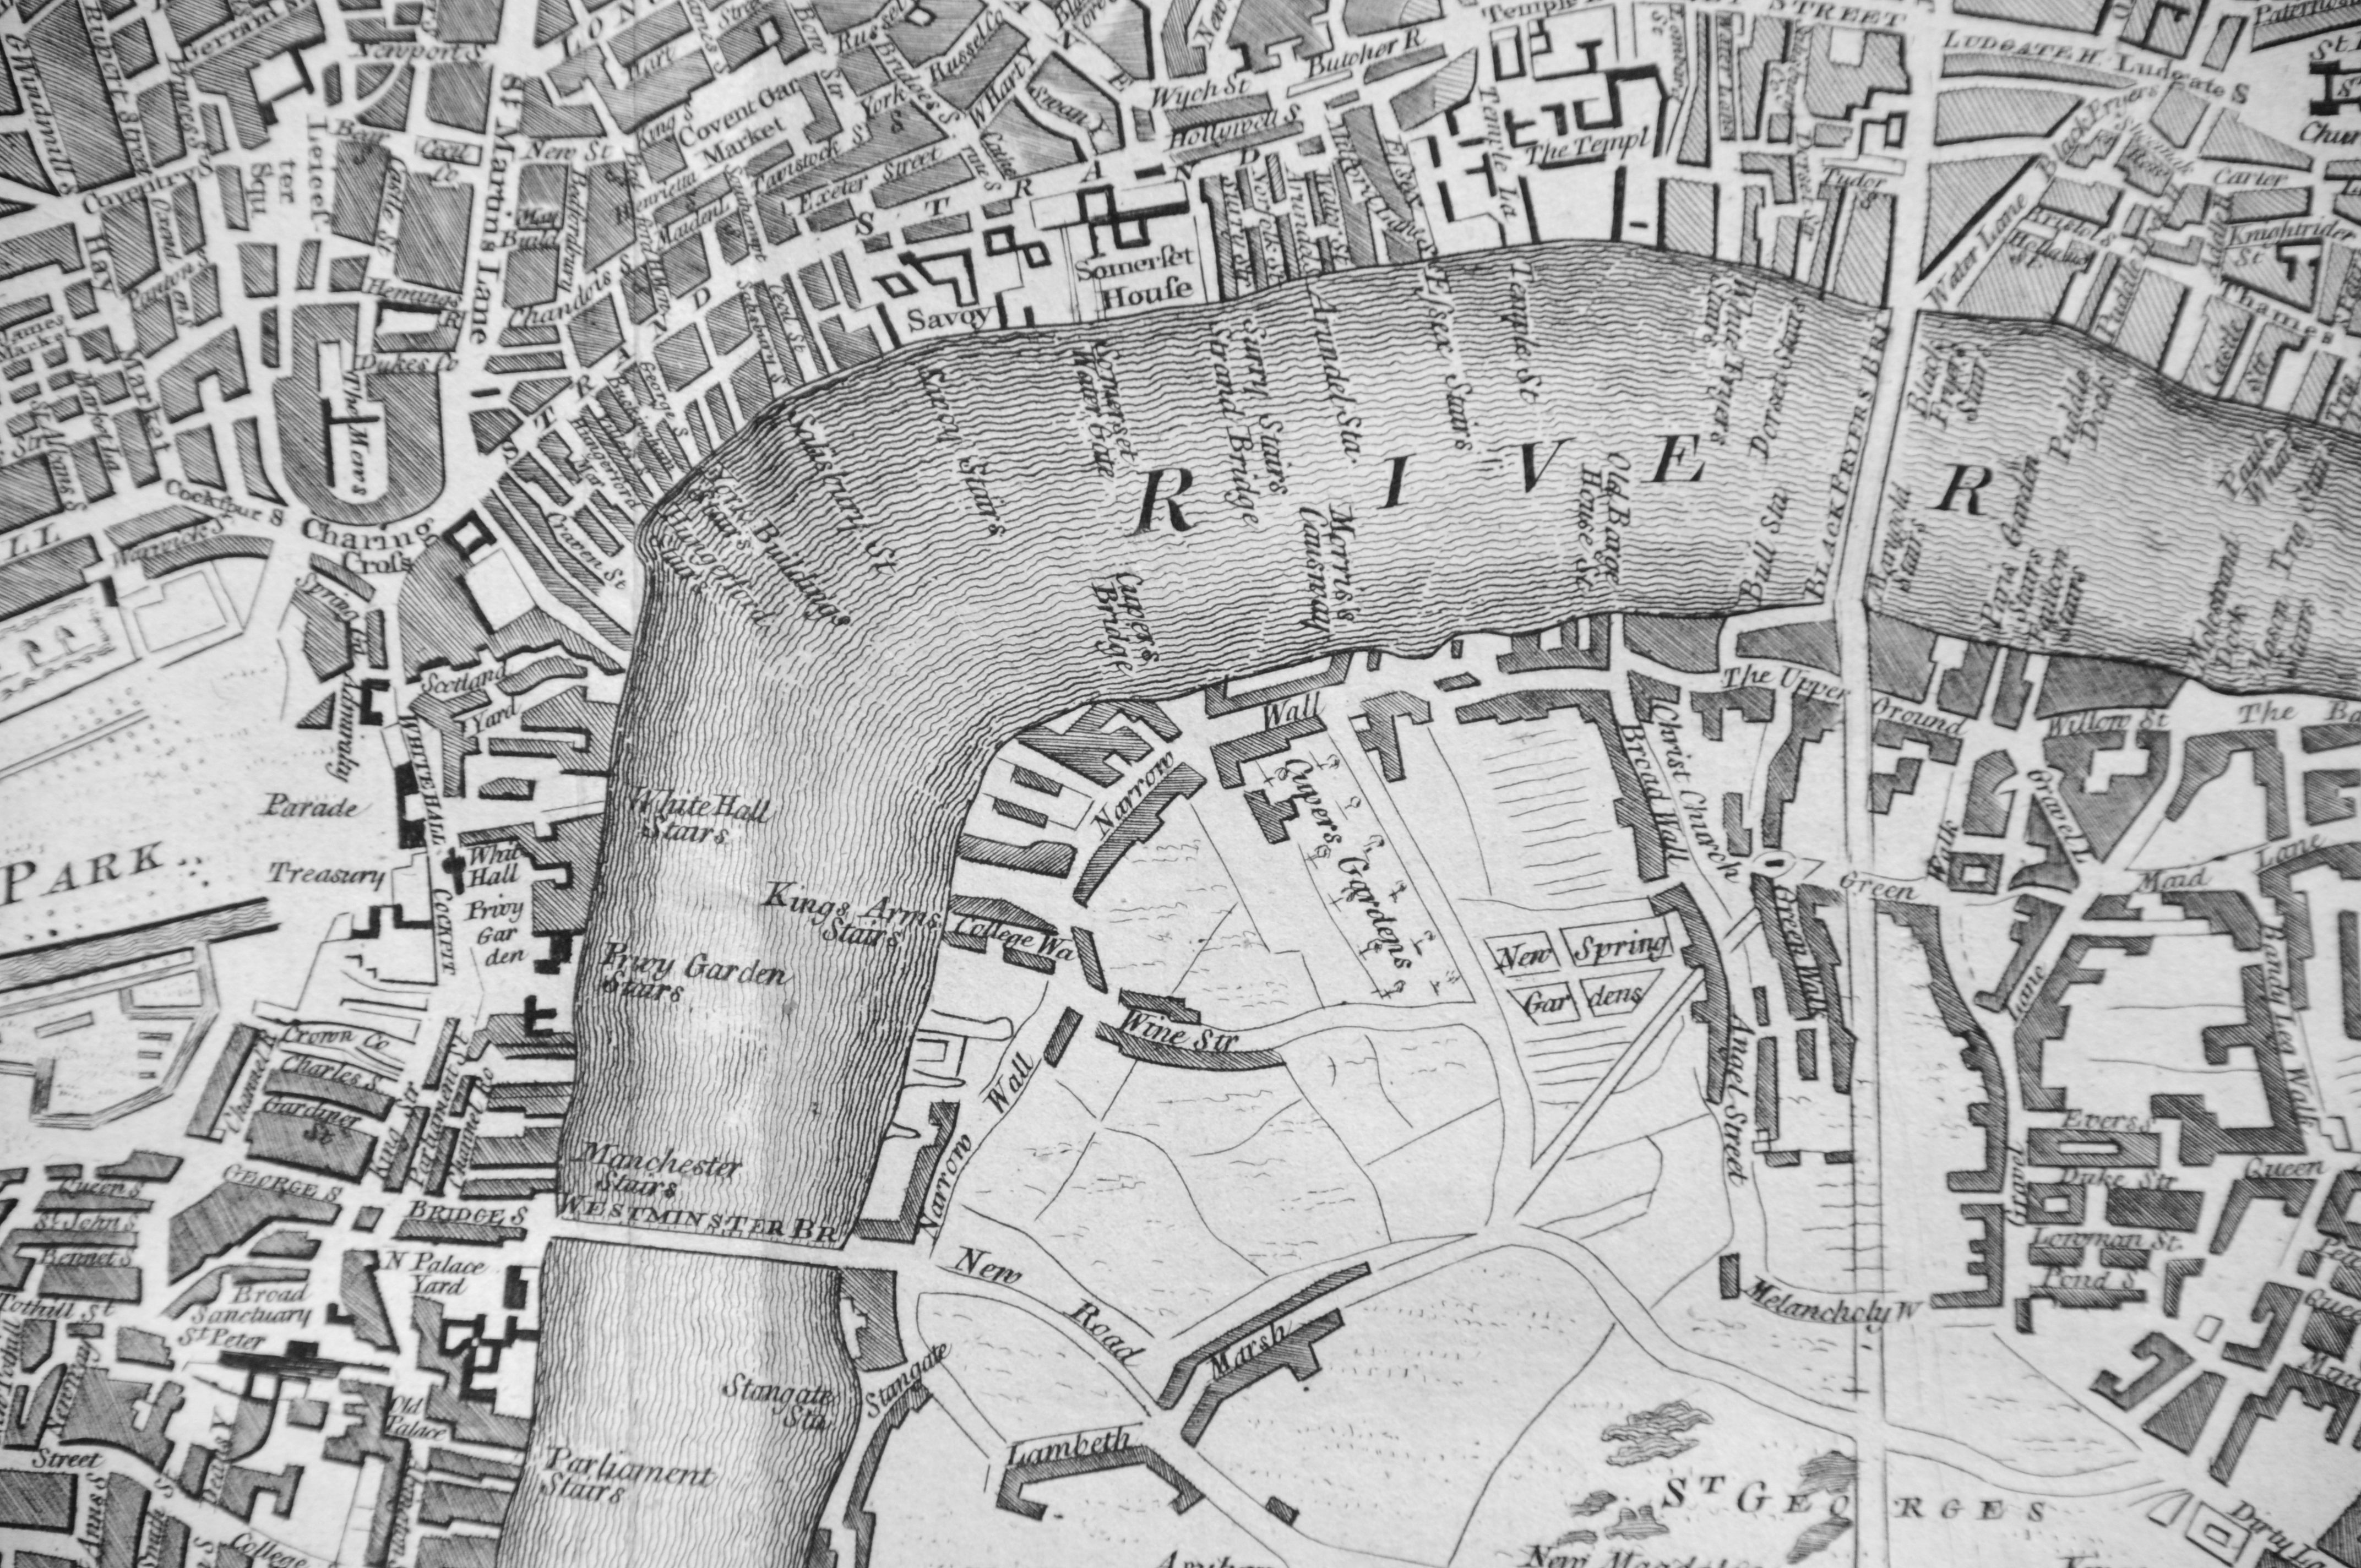
Where Westminster Bridge lands on the right side of the river, a street named Narrow Wall runs north. The site of the Jubilee Gardens are roughly to the left of the word ‘Wall’. The map shows that the area of land between Narrow Wall and the river was the first to be developed.

Before any buildings had occupied the site, the area had been marsh, and part of the river foreshore. The name Narrow Wall probably refers to an embankment between the river and the land, with a roadway of some basic form running along the embankment.

Just south of the site of Jubilee Gardens, where County Hall is now located and long before any building occupied the location, a Roman Boat was found during the construction of County Hall:

Jubilee Gardens
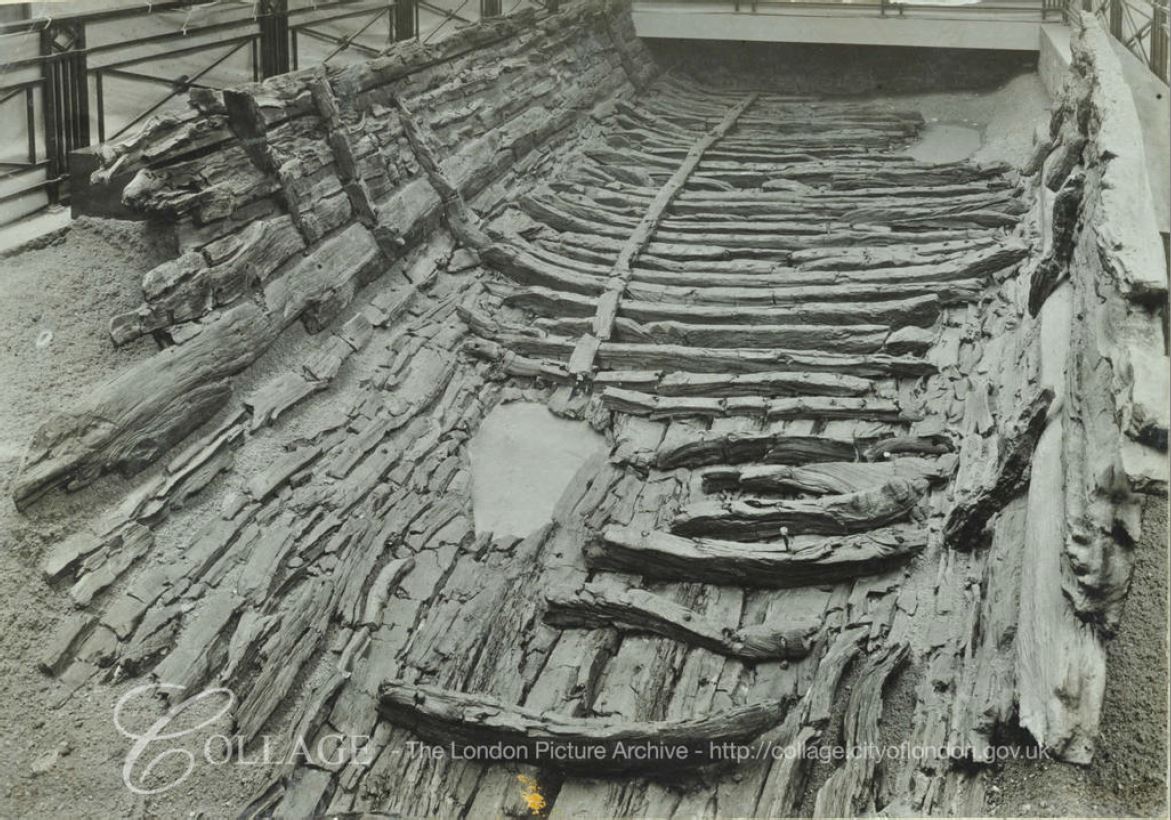
Image credit: London Metropolitan Archives, City of London: catalogue ref: SC_PHL_04_15_53_27D

So the area around Jubilee Gardens has a long history and it is intriguing to imagine the Roman boat beached on the foreshore of the Thames and gradually sinking into the mud.

The Jubilee Gardens have seen the dramatic rise in tourism over the last few decades, although they are relatively quiet today as London is still missing the millions of tourists that visit the city.

Their location has seen the London County Council and the Greater London Council come and go, along with the construction of the Jubilee Line extension, the Dome of Discovery and the Festival of Britain. The site has been bombed and was the location of a warehouse for goods bound for India.

They have been the site for demonstrations, a wide range of entertainments, and a green space for office workers to spend summer lunchtimes – and possibly the record breaking World’s Longest Safety Poster,

alondoninheritance.com

London with a Leica – First Light

I hope you will excuse a rather self indulgent post this week, but it is a post I have been wanting to write for a long time – my first attempt at using my father’s Leica IIIg camera.

He used two main cameras for the 1940s and 1950s photos. A Leica IIIc for the earlier and a Leica IIIg for the later photos. He sold the IIIc to help pay for the IIIg, and gave the Leica IIIg to me about 20 years ago.

He last used it at the end of the 1970s, when it developed a problem with the shutter sticking, and rather than getting it repaired, he purchased a new SLR camera.

I have been wanting to use the camera for some years. A couple of years ago I had it repaired to fix the sticking shutter problem, and a few weeks ago I finally had the time to learn how to use the camera. I purchased some film, and took the camera on a walk through London to take a reel of film and see how it performed – mainly how I performed using a very different camera to my digital cameras and my old Canon AE-1 film camera.

The Leica IIIg is completely manual. Everything has to be set, shutter speed, the aperture opening of the lens and the focus. The film also needs to be moved to the next frame ready for the next photo.

The Leica IIIg:

Leica

The lens is not the lens meant for the camera. It is from my father’s earlier Leica IIIc. He wrote the following in his notes to the camera “the lens is not the standard lens that should accompany the body, but is from my previous Leica IIIc bought, because it was the best lens to be used in both camera and enlarger”.

He developed and printed his own films, therefore the reference to the enlarger is to the item of equipment that you would use to shine a light through the negative and focus onto photo paper during the printing process. The lens would be unscrewed from the camera and placed in the enlarger to allow negatives to be printed onto photo paper.

The lens is therefore the lens through which the majority of my father’s photos which I feature on the blog from the 1940s and 1950s were taken.

Luckily, I have the instruction booklet that came with the camera, and a diagram in the booklet details all the functions of the various knobs, levers and windows on the camera.

Leica

You may have noticed there is no light meter on the camera, to measure the amount of light and therefore setting the correct speed and aperture – I will come on to this later.

You may also be asking why on earth I would want to use such a camera, limited to 36 photo films, with the cost of film and developing, when digital cameras are so good, and after buying the camera, the cost of photos is almost zero?

A couple of reasons. Obviously the sentimental one that it was the camera and lens that my father used for so many of his early photographs, but also because using such a camera really forces you to think and perhaps relearn the whole process of photography.

The number of photos available on each roll of film, and the cost of film and processing means you really have to be selective and think about the photo you want to take – I could not take the 200 to 400 photos that I would normally take on a walk around London.

It also makes you really think about light. Having to manually measure the light coming from the scene you want to photograph, deciding the combination of speed and aperture, focusing on the specific object you want to be the focus of the photo, all combine to make you think more about the process. I know all these combinations of manual options are available in many digital cameras, but so often using the auto option is the easiest way, along with the internal light meter.

The first challenge was to load the film.

The choice of film was relatively easy. I went with Ilford FP4 Plus. The reason being it is a very tolerant film which “will give usable results even if it is overexposed by as much as six stops, or underexposed by two stops” (a stop is basically either the halving or the doubling of the light hitting the film, so the film can still give good results if too much or too little light hits the film for the ideal photo).

My first attempt at loading the film in the camera was not good. Firstly, the film has to be trimmed with scissors so there is a long enough length of half width film to avoid the winding mechanism, then the film needs to be securely and accurately wound onto the take up spool.

And you will not know if it has worked correctly until the film is in the camera and you start winding on the film.

The pages from the manual detailing the film loading process:

Leica

Trimming the film – Ilford FP4 already comes trimmed, but not enough for the Leica, so I had to measure and cut a longer trimmed length of film. There must be a winding mechanism at the top of the slot behind the lens, which the film cannot be inserted over, but engages with when the film is pulled through the camera.

Leica

The end of the correctly trimmed film then needs to be inserted into the take up spool. This is where I had most problems as the film has to be parallel with, and tightly up against the lower end of the take up spool as in the following photo. If the film is not correctly positioned (as I found on the first two attempts), the film does not grip and wind onto the take up spool.

Leica

The film cassette, film, and take up spool is then carefully inserted into the slot at the rear of the camera, and the cassette and spool pushed into their positions at the two ends of the camera.

Leica

My first two attempts failed. You cannot confirm the film is inserted correctly until you try winding on the film.

There are two knobs at either end of the top of the camera. The Film Transport and Shutter Tensioning Knob – which pulls the film forward, out of the cassette and onto the take up spool after each photo has been taken, as well as tensioning the shutter ready for release. The second is the Rewind Knob that engages with the film cassette and is used to rewind the film back into the cassette when the full length of film has been used.

If the film is inserted correctly, winding the film transport knob, should also result in the rewind knob turning as film is pulled out of the cassette.

With my first attempt, the film had slipped off the take up spool, and with my second, the film was winding on correctly, but there must have been so much slack in the cassette that the rewind knob was not turning. I wasted that film as I was not sure how much film had been wound on and therefore exposed when I opened the camera to see what was going on.

With the film correctly loaded (hopefully) in the camera, there was one final element to learn before taking the camera out on the streets of London – how to set the speed and aperture correctly.

Basically, the aperture sets how much light the lens allows through to the film, and the speed is the speed with which the shutter opens, also changing how much light is let through to the film. They also impact the photo in different ways. Low speed can lead to a blurred photo of a moving object and with aperture you can change the elements of a photo which are in focus, for example by a blurred background with the foreground object in focus.

To know the correct range of settings, you need to know how much light is coming from the scene you want to photograph towards the lens of the camera. Today, cameras have built in light meters, but 1940/50s Leica’s needed a different solution, and this was by using an external, hand held light meter, and along with the camera, my father had given me his Weston Master Exposure Meter.

Leica

As the text describes “Your ‘Master’ meter is a photo-electric instrument which measures the reflected light of the subject with scientific accuracy”.

There is a photo cell in the rear of the meter, which generates an electric current dependent on the strength of the light. This electric current drives the pointer on the meter on the front of the meter.

The pointer, points to a scale of numbers. The light meter first needs to be set up correctly with the speed of the film (tab E and window D as described in the instructions), then the exposure dial is turned to point at the number the pointer in the electric meter is pointing at, and the range of aperture and speed combinations can be read from the scales F and G in the instructions.

One of the problems with using the meter was that the pointer would be moving up and down depending on where I was pointing the meter in the overall scene to be photographed. It was relatively stable in a scene where there was little change in light, but looking at a combination of river, buildings and sky, the meter would change considerably with minor changes in position.

The same challenge happens with digital photography, but again using an entirely manual method really gets you thinking about light.

Using the light meter on London Bridge (photo taken on my phone which handled light measurement, speed, aperture and automatically focused without me having to do anything – how photography has changed)

Leica

So, with film loaded, a reasonable understanding of how the camera and light meter worked, I went out for a walk to see if the camera worked, did the light meter still give accurate readings, and could I take photos using a Leica IIIg.

Back at home, the film was wound back into the cassette, posted to Aperture (who as well as repairing cameras, also develop and print), and I waited expectantly for 10 days for the negatives and prints to drop through the letter box.

The first photo taken by the Leica IIIg in over 40 years – looking to the north bank of the river from the south bank.

Leica

Much to my surprise, the photo came out well. The river, buildings and sky all gave different light readings, so I used an average to see what would happen.

I was not aiming to take photos of specific objects, or scenes of any historic or architectural value, it was just a random walk looking for different scenes to see how the photo would come out. This following photo did not do so well.

Leica

The photo is of the Frank Dobson sculpture “London Pride” in front of the National Theatre. The sculpture was backlit with bright sunshine, The photo works well for the National Theatre, but the sculpture is too dark.

A view across the river to St Paul’s:

Leica

The following photo did not work well. On the left was the brightly lit view across to the City. The view on the right should have been really good as shafts of sunlight were breaking through the tree cover onto the walkway. I had set the exposure for the view on the left, not the view through the trees.

Leica

Really not sure what happened with the following photo, but it seems out of focus.

Leica

Focusing needs to be set manually on the Leica IIIg. There is a separate viewing window to focus the view. Looking through this window and if the scene is out of focus, you will see two views of the same object, each slightly apart.

To focus the camera on the scene, you need to turn the lever adjacent to the lens, which should bring the two views of the scene together. When the views of the primary object in the scene meet as one, the camera is correctly focused.

The Anchor pub:

Leica

I was starting to get to grips with the light meter and camera, and took the following photo in Winchester Walk. Borough Market on the right and Southwark Cathedral at the end of the street.

Leica

I took the above photo as my father had used the same camera, 67 years ago to take a very similar view (I did not have the original with me, so I was not at exactly the right location). The same camera and lens – 2020 above and 1953 below:

Leica

The following photo was taken from London Bridge, where the colour photo earlier in the post with the light meter was taken. It was a difficult scene. Point the light meter at the sky and it would shoot up, down at the river and a much lower light reading. Going for an average reading seems to give a reasonable result.

Leica

I took the following photo as there was plenty of detail on the base of the monument, a building in the background, and the scene in relative shade due to the surrounding buildings.

Leica

View down Fish Street Hill to the church of St Magnus the Martyr:

Leica

The view looking up Gracechurch Street from Eastcheap:

Leica

Entrance to Monument Underground station in King William Street. I wanted to see if I could get the exposure right for the street scene and the steps below ground, and also focus on a close object and with the rest of the view in focus.

Leica

Construction site for the new entrance to Bank Underground station in Cannon Street with the tower of St Mary Abchurch in the background.

Leica

Temporary bike lane in Cannon Street. Pleased with this as both the adjacent barriers and the tower of St Paul’s at the end of the street are all in focus.

Leica

View down Laurence Pountney Lane:

Leica

Entrance to Cannon Street Station – I should have exposed more for the darker interior of the station, but I was trying to get the way the lights swept into the station.

Leica

Dowgate Hill at the side of Cannon Street Station, with the Strata Tower at the Elephant and castle in the distance:

Leica

One of my favourite City buildings – 30 Cannon Street:

Leica

The main entrance to 30 Cannon Street:

Leica

Really pleased with the above photo. Architectural photography is one of the areas where black and white photography seems to work well.

The St Lawrence Jewry Memorial Drinking Fountain at the top of Carter Lane. A good spot for skateboarding down into the lane.

Leica

Welcome To The City Of London – map near the visitor information center.

Leica

I took the above photo as I was interested in the level of detail that could be recorded on film. The map had lots of text and detail within the map, and the photo below is a small extract of the above. It shows that extracting a small part of the photo and enlarging still retains an excellent level of detail.

Leica

Walking down Ludgate Hill and I noticed this closed shop. Originally a “traditional” sweet shop, probably catering to the tourist trade on the route to and from St Paul’s Cathedral. Now closed and empty – possibly a victim of the lack of tourists for most of the year.

Leica

Looking up Ludgate Hill towards St Paul’s Cathedral – I have never seen it so quiet on a Sunday afternoon in late August.

Leica

Road works and temporary traffic lights looking down Ludgate Hill:

Leica

The film I was using was theoretically capable of 36 exposures, however I only managed 29 photos from the roll of film. I suspect I lost some at the start of the film by needing to trim an extra long length, then winding the film on too much to make sure it was on the take up spool and the rewind knob on the film cartridge was turning. Whilst this showed that the film was correctly loaded – it did waste some of the total number of photos that should have been available.

The camera does have a dial that shows the number of photos that have been taken, and the dial is manually set to zero before the first photo is taken, however the dial assumes the film is loaded with minimum film on the take up spool to give 36 exposures.

The final couple of photos on the film showed problems with double exposure, the following photo is an example. Not sure why as the film did appear to wind on correctly, but obviously a problem at the very end of the film.

Leica

The photos are very routine photos of the south bank of the river and the City of London, however, for me, they are very special.

They show that the Leica camera and the Weston light meter are working well, and that I have a basic understanding of how to use them.

There is something rather special taking photos with such a camera. The lens is over 70 years old, and was already taking photos of London in the late 1940s.

One of the problems of taking the “now” photos to compare with the photos from the 1940s and 1950s is that my current camera is so very different to the Leica. Completely different lens, different method of capturing the photo etc. This means that whilst I can take a “now” photo of the scene, it is never exactly the same as the original. What I hope to do is revisit the sites of my father’s original photos with the Leica and take new comparison photos. With the same lens and camera I should be able to get the new photos to be exact comparisons.

I also still have much to learn. The camera also came with a number of accessories such as an open frame sports viewfinder, red and yellow/green filters to add contrast to a black and white photo etc.  I suspect I will be experimenting with the Leica and film far more over the coming months.

alondoninheritance.com

Fire, Blitz and Route 11 – How Two Historic City Walls Have Survived The Centuries

I find it fascinating comparing my father’s photos of the bombed City with London of today. Exploring how much has changed, how the long history of the City survived, and despite how much has changed over the last seventy plus years, how much remains the same.

The following photo was taken in Wood Street looking roughly north east.

St Alphage

I know the exact spot where my father was standing to take the photo, and there are a number of landmarks that can be identified. I have marked these on the photo below, and will explore them in today’s post.

St Alphage

Firstly, the photo was taken from Wood Street, a short distance north of the tower of the church of St Alban. The following photo is from my post of a couple of weeks ago on the churches of St Alban and St Mary. Just behind the tower of St Alban is a building with scaffolding projecting from the side. This is the same scaffolding seen in the photo above.

St Alphage

I am trying to work out a way to bring together all the photos of the bombed City to provide a comprehensive walk through of the City in 1947 – not sure the best way to do this yet but they provide a detailed view of the bombed City that my father witnessed.

From the Wood Street viewpoint, the following map extract shows the landmarks identified in the photo. I have used the same symbols as in the above photo (Map © OpenStreetMap contributors).

St Alphage

The following photo shows the view from the same place that my father was standing at, in 1947. A very different view with none of the landmarks visible.

St Alphage

The shadow of the tower of St Alban is on the lower right corner, and the building with the scaffolding would have been on the right, with the scaffolding protruding into the edge of the photo.

The rather solid looking building on the right of the above photo is the Wood Street City of London police building, constructed in 1965.

In the 1947 photo there is a street entrance on the right. This was Addle Street, a street that has been lost in the development of the area. It was roughly just after the tree in the above photo.

Looking at the landmarks in the distance, and one of the most distinctive is a tall tower which I have marked with a yellow circle in the map and photo. This building can still be found on the north side of Finsbury Square.

St Alphage

The tower belongs to the building that was Royal London House, but is now called Triton Court. Royal London started as a Friendly Society and grew rapidly during the first half of the 20th century. They occupied the entire north side of Finsbury Square. The building on the left with the cupola on the corner was constructed first in 1905. The central block with the tower was added in 1930, and the block to the right was added in the 1950s.

The block on the right is now a hotel and the two earlier blocks are office space. Internally, the buildings have been mostly gutted as part of the conversion to new offices, with only the facades remaining as they were, including the original statue of the Roman god Mercury, who has been looking out over London for over one hundred years.

St Alphage

To the left of the tower in the 1947 photo is the cupola on the corner of the first of the Royal London buildings, then look further to the left and there is another cupola. This is marked on the photo as 1 City Road / Lowndes House (red circle on the map), and is seen in the following photo at the end of the street, where City Road bends to the left.

St Alphage

The building is now 1 City Road, but was called Lowndes House when built in 1929 for the Singer Sewing Machine Company as their London headquarters. It was designed by architect William Lewis, and is now Grade II listed.

The 1947 photo, and also just by walking the streets, show the boundaries of the fires caused by bombing during the Second World War. They covered an extensive area of the land now occupied by London Wall, the Barbican, and east to towards Finsbury Square, but getting towards Finsbury Square and many of the buildings that remain are still pre-war rather than the post-war buildings to the west.

Much of the damage to the area was through the fires caused by incendiary bombs rather than high explosive, and many walls of buildings did remain. Many had been cleared by the time my father took the original photo, however the clearance, and following post war work, did reveal some much older structures which, fortunately, have been preserved.

To the right of the 1947 photo there is the shell of a building that I have labelled St Alphage (yellow star on the map and photo).

Churches were also left during wartime demolition. Although many City churches were reduced to their outer walls and tower, there was an expectation that being churches they would be restored, which indeed did happen to many churches, although some were demolished. One was St Alphage, although not before some medieval remains of an earlier building that had been integrated within the structure of St Alphage were identified and saved.

These were from the former priory chapel of St Mary Elsing (also Elsyng and Elsyng Spital – Spital being the name given to a charitable establishment that would provide care for the sick), and these medieval remains can be found today alongside London Wall.

In the following photo looking east along London Wall, the stone arches of St Mary Elsing can be seen on the left.

St Alphage

The walls that we can see today alongside London Wall are from the medieval chapel of St Mary Elsing. This chapel was part of a hospital and priory which had been founded by Sir William Elsing early in the 14th century.

St Alphage

The hospital was founded with the intention of providing care for the blind, presumably by the nuns and sisters of the priory. It was common across the City for hospitals and priories to be a single institution.

The location of the priory may have been a religious site back to the 11th century when a nunnery may have occupied the location.

The priory was closed during the dissolution in 1537 when it became the property of the Crown, although most of the land and buildings were soon sold off.

The view of the remains of the priory of St Mary Elsing viewed from London Wall.

St Alphage

The area has recently been subject to redevelopment which has considerably enhanced the view of the medieval walls. As part of the original redevelopment along London Wall, the remains were hemmed in by new buildings and under the high level walkways that were such a feature of the post war development of London Wall.

The space around the walls has been opened up, and a new walkway was recently opened, set back from the remains of the priory, and of a much more sensitive design.

St Alphage

Close to the priory of St Mary Elsing was another religious building, the church of St Alphage.

The original St Alphage was built up against the London Wall, a very short distance to the north west of the priory. St Alphage may date from the 11th century, the same century as the saint after which the church is named died.

St Alphage was Bishop of Winchester and from the year 1006 was Archbishop of Canterbury, although this post would not last too long as in 1012 he was murdered by the Danes.

His murder is thought to have taken place at Greenwich, at, or near, the Greenwich church also dedicated to St Alphege (using one of the alternate spellings of his name).

St Alphage

By the early 16th century, the first St Alphage was in a very poor condition, and the parishioners were looking for an alternate site for the church. They were given the tower and chancel of St Mary Elsing, they converted the building, and moved their parish church into the new site.

The original St Alphage was demolished and the site sold to a carpenter. Wilberforce Jenkinson in London Churches Before The Fire states that the original location is “now used as a little garden of rest for London wayfarers”.

The view of the remains of St Mary Elsing, looking back towards London Wall is shown in the following photo. The tall arches which formed the base of the tower can clearly be seen. At the left there is a low wall. This has a small, arched recess which may have been used to house a tomb.

St Alphage

Note that there is a slight height difference between the base of the walls and the surrounding street level. The new St Alphage therefore included some of the medieval walls from St Mary Elsing. These medieval walls have been incredibly lucky to survive into the 21st century.

St Alphage survived the Great Fire of London. The church was significantly rebuilt in 1777, and the medieval walls remained.

In 1913, a new Gothic front was built on the side of the church facing the original route of London Wall. A couple of features of this facade can be seen in my father’s 1947 photo, where there is a short pinnacle on the top left corner of the church along with the triangular top of the wall.

The 1947 photo shows that these were on the northern side of the church which at the time was facing onto London Wall, however the route of London Wall was about to change, and St Alphage would see the final, dramatic change to its immediate landscape.

I have covered the route of London Wall in previous posts. The change in route was to meet the expected post war rise in car usage through the City. During the war, plans were made for the post war redevelopment of the City, and these included major new, wide roads through the City along with the parking needed for all those who would be driving into the City.

One of these new routes was Route 11, an 86 foot wide dual carriageway that would run from Ludgate Circus in the west to Aldgate High Street in the east.

The section between Aldersgate Street and Moorgate was the easiest to build as the area had been so damaged during the war and was almost an empty space waiting for redevelopment. The majority of the other sections of Route 11 were through existing streets that had not suffered so much damage and would have required major demolition of buildings.

The section of Route 11 between Aldersgate Street and Moorgate was named London Wall, with the western section being moved south from the original route of London Wall so that the new route would align with the expected westward extension.

The following photo from 1958 shows the construction of Route 11 along the new London Wall. I have marked the position of St Alphage and the original western section of London Wall.

St Alphage

The photo shows how the medieval walls of St Mary Elsing moved from being to the south of London Wall, to their current position to the north of the street.

The photo also demonstrates what a significant construction project this was. Basically a long hole being dug, then filled with a concrete box. Car park being within the concrete box and new street running along the top. The car park below London Wall has space for 250 cars – and includes the remains of a Roman Wall.

The plan for post war redevelopment – “Reconstruction of the City of London” by the Corporation of London was published in 1944 and includes a map of the planned trunk routes through the City. The routes included in this original plan were changed slightly. I have marked the original London Wall route in the map with A and B.

St Alphage

Whilst the eastern section would end where the new London Wall currently ends at the junction with Moorgate, the western end was originally planned to be at a large new roundabout at the Aldersgate Street / Long Lane junction, by Barbican Station.

This original route would have taken Route 11 through the area now occupied by the Barbican, and as plans for the Barbican were taking shape when the final plans for Route 11 were being made, the western end of the new street was moved south to leave a large area free to the north ready for the Barbican Estate.

The construction of London Wall did require the demolition of a small southern section of St Alphage. The majority of the church was demolished in the 1960s leaving the medieval walls of St Mary Elsing as a scheduled ancient monument, standing separate from the church that had been built around them, and looking out on a very different landscape.

We can get an impression of how the walls and arches of St Mary Elsing were incorporated in the structure of St Alphage by looking at some old prints.

The following print from 1815 states “An interior view of the porch of the parish church of St Alphage, London Wall: formerly the chapel of the priory of Elsynge Spital”. (©Trustees of the British Museum)

St Alphage

The fact that these were ancient walls was understood as the following print, also from 1815, demonstrates by showing the architectural details of the arches to be found in St Alphage (©Trustees of the British Museum).

St Alphage

The print also includes a map of the area showing the location of the church. Note that in the map there is an area labelled St Alphage Church Yard just to the left of the church, on the northern side of London Wall – we shall come to this later.

The following print shows the southern prospect of St Alphage in 1736. This was before the 1777 rebuild and presumably shows the church much as it could have been when the parishioners moved from their original church to the chapel of St Mary Elsing in the middle of the 16th century (©Trustees of the British Museum).

St Alphage

Hard to believe that the point where the above print was drawn from is now the dual carriageway of London Wall.

There is one landmark from the 1947 photo left to find. In the following photo I am standing in the original route of London Wall, now a pedestrian walkway, close to the junction with Wood Street. This is now called St Alphage Garden. The northern facade of St Alphage would have been at the far end, just where the brown of the high level walkway can be seen.

St Alphage

In my father’s 1947 photo, there is a feature I have labelled as Medieval Wall. This feature can still be seen today:

St Alphage

There is a plaque on the wall from 1872 that states Roman City Wall, however whilst the wall is on the alignment of the City Wall, only the very lower sections are Roman.

St Alphage

An information panel adjacent to the wall explains that the top brick section with the “crenellations and diaper pattern brickwork” (the regular battlement shape of the top of the wall and the brick pattern formed with the dark bricks) date from 1477 when the City Wall was strengthened during the Wars of the Roses. Medieval is below the brickwork, with Roman down at street level.

St Alphage

The space in front of the wall is now a garden / seating area and is the same space as marked in the map in the 1815 print as St Alphage Church Yard. This was also where the original St Alphage church was located.

Whilst the southern aspect of the wall was visible pre-war, much of the rear of the wall had buildings up against it – demolition of buildings damaged during the war opened up both sides of the wall as a free standing structure.

To bring this post full circle with my very first post in February 2014, when I wrote about the following photo.

St Alphage

This was the original sign put up by the Corporation of London in Fore Street to mark the site of the first bomb on the City. What I did not mention at the time was that on the left edge of the photo you can just see the ruins of St Alphage, with the same pinnacle as in the photo seen at the start of the post. The section of City Wall is behind the sign.

It is fascinating how places change. The former priory chapel of St Mary Elsing and the Roman Medieval Wall have survived so much change and now look out on a very different landscape. The area surrounding St Mary Elsing is not the same as the post war rebuild, with most of the buildings being from the last few decades, and the original pedestrianised high level walkways have also been replaced.

I very much doubt whether the view the wall and chapel look out on now could have been imagined by anyone over their hundreds of years of existence. Although my father was aware of Route 11 (he bought the books with the redevelopment proposals when they were first published), he did not expect the size of buildings that now surround London Wall and Wood Street.

When London Wall was built, the car was expected to be the future of transport in the City. The car is now being actively discouraged as a means of transport in the City, so whatever may seem to be the future, will always change.

I suspect the next big change to the area will be when the Museum of London moves, and the proposed Concert Hall is built on the site (if the money is still there). This may drive more local change if there are empty offices to be repurposed due to remote working becoming the norm.

When researching these photos, as well as the history, I always try to imagine what the future may bring to these places, but the lesson of looking at the past is that the future will almost certainly be very different – but hopefully the walls of St Mary Elsing will still be there.

alondoninheritance.com

The Globe at Borough Market

In 1977 I was taking some photos around Southwark using my brand new Canon AE-1, purchased using hire purchase as at the time it was the only way I could afford such a camera, and I was desperate to replace the cheap Russian Zenit camera I had been using. The main feature of this camera seemed to be a sticking shutter which ruined far too many photos.

A couple of these photos were of the Globe at Borough Market. A very different market to the market of today.

Globe at Borough Market

The same view 43 years later in 2020:

Globe at Borough Market

The Globe was built in 1872 to a design by architect Henry Jarvis. A lovely brick pub, the paint on the external walls in my 1977 photo has since been removed to reveal the original brickwork.

When I took the original photo, Borough Market was a very different place. Selling all types of fruit, vegetables, potatoes etc. The market started very early in the morning mainly selling to businesses such as the shops and restaurants of south London.

The narrow aisles between the market stalls meant that vehicles could not easily enter the market so porters were employed to transfer goods from lorries parked in the streets, into the market.

One of the barrows used by a porter is outside the corner entrance to the pub. This was why I took the photo as the barrow and pub seemed to be a good combination that in many ways summed up a London market at the time. There is another barrow parked alongside the Globe at left.

There were a number of pubs surrounding Borough Market, catering to the needs of those who worked in the market, which included being open much earlier in the morning than a normal London pub. Reading the licence information above the door of the Globe gives an indication of days and times that the pub served the market, and the trades of those who were expected in the Globe:

“NOTICE PURSUANT TO THE LICENSING ACT 1964 – Intoxicating liquors are permitted to be sold and supplied in these premises between the hours of six-thirty and eight-thirty of the clock on the morning of Tuesday, Wednesday, Thursday, Friday and Saturday of each week. Excepting Christmas Day, Good Friday and Bank Holidays for the accommodation of persons following their lawful trade of calling as Salesmen, Buyers, Carmen, Assistants or Porters and attending a Public Market at the Borough of Southwark”.

Another photo of the Globe in 1977:

Globe at Borough Market

And in 2020. The days of selling Double Diamond are long gone.

Globe at Borough Market

In the above photo, at the very top right corner, you can just see an edge of the Thameslink Viaduct that was built over Borough Market between 2009 and 2013.

The first floor of the Globe was the film location for Bridget Jones flat in the 2001 film Bridget Jones Diary.

Globe – the name of the pub in stone above the windows, seen in both the 1977 and 2020 photos:

Globe at Borough Market

If you go back to the photo at the top of the post, and look along the left side of the street, and in the distance is an arch with a sign above. The sign still remains although Lee Brothers Potato Merchants have long gone.

Globe at Borough Market

The origins of Borough Market are ancient, dating back for at least 1,000 years. Originally a market at the southern end of London Bridge, however by 1754 the City of London was fed up with the Southwark entrance to the bridge being congested by a market, and that the market was taking business away from the City markets. A bill was introduced to Parliament to stop the market trading in March 1756.

The local residents were not happy with the loss of their market and raised £6,000 to buy an area of land called The Triangle, and this became the new home of what is today Borough Market.

The market flourished, and the arrival of the railways with their local goods yards increased the volume of fruit, veg, etc. being sold at the market.

The end of the wholesale market started in the late 1970s and continued in the early 1980s. The City of London constructed New Covent Garden market in Nine Elms. This was a much larger market with considerably easier access and plenty of parking, unlike at Borough Market.

In parallel was the gradual replacement of the traditional corner shop and green grocer by much larger supermarkets who had their own supply chain and had no need to purchase fruit and veg from a local market such as Borough.

The market’s renaissance started in the late 1990s when specialist food suppliers started to move in, and food fairs were organised. Borough Market has since gone from strength to strength, and on most days (prior to the Covid-19 pandemic) it would be crowded with tourists and shoppers.

When walking among the stalls, it almost looks as if you could buy a different cheese for every single day of the year.

Along with the market traders, a wide range of restaurants have opened surrounding the market, and the old pubs that once served the market porters at 6:30 in the morning, have a new lease of life and are serving a very different customer – no longer are barrows left outside the pub door.

One of the pubs surrounding the market is the appropriately named The Market Porter on the corner of Stoney Street and Park Street.

Globe at Borough Market

The Market Porter dates from 1890, however the site was previously occupied by a pub named the Harrow.

Further along Stoney Street is another pub that looks in a rather strange location, squashed by the railway bridge directly above the pub. This is the Wheatsheaf:

Globe at Borough Market

The current Wheatsheaf building dates from 1840, although a pub had been on the site since the 18th century. It originally had three floors and was part of a terrace. The pub lost the third floor when the pub closed in 2009 for the construction of the Thameslink Viaduct which now runs directly overhead. The Wheatsheaf reopened in 2014 in its new, cramped looking condition, however thankfully this historic pub survived such a dramatic change.

Construction of the Thameslink Viaduct was a significant engineering achievement, with building such a structure above a working market. The viaduct runs for 322 metres across the market, and during construction, work included the removal and replacement of the market’s historic roof.

The following photo shows the Wheatsheaf in 1943, in its original condition (the building on the right), along with the same style of barrow that I would photograph in 1977:

Globe at Borough Market

Image credit: London Metropolitan Archives, City of London: catalogue ref: SC_PHL_01_376_F1582

On the corner of Stoney Street and Southwark Street is the Southwark Tavern, a lovely Victorian corner pub dating from 1862:

Globe at Borough Market

However a more remarkable building is alongside the Southwark Tavern. This is the imposing Hop and Malt Exchange.

Globe at Borough Market

The Hop and Malt Exchange dates from 1867 and was designed by the architect R.H. Moore, and was the premises of the Hop Planters Association.

The frontage along Southwark Street is 340 feet and it covered more than an acre of land.

Although the building looks impressive today, it was originally a much taller building, however after a fire in 1920 which gutted much of the building, the top two floors were demolished. The original, larger facade just after the fire can be seen in the photo below:

Globe at Borough Market

Image credit: London Metropolitan Archives, City of London: catalogue ref: C_PHL_01_375_574c_2

The Hop and Malt Exchange was built in Southwark, as it was close to the main railway stations and goods depots that served the hop growing counties of Kent, Sussex and Surrey and provided a place were growers and buyers could meet in one place to conduct the sale of hops.

The main entrance to the Hop and Malt Exchange:

Globe at Borough Market

The pediment above the main entrance contains some wonderful decoration showing hop and malt production. Hops being grown and picked in the centre. Barley being grown on the right for the production of malt, with these products being carried in a sack on a barrow on the left.

Globe at Borough Market

Looking through the iron gates of the entrance (which are also beautifully decorated), we can glimpse the main Exchange Room:

Globe at Borough Market

The Exchange Room was the central point for trading activities. It was 80 feet long by 50 feet wide and 75 feet was the original height to the top floor. The roof was glass allowing plenty of natural light to shine on the floor below. There was a central lantern feature running along the length of the roof, and in the pre-fire building, this was 115 feet above the floor of the Exchange Room.

The Exchange Room was surrounded by four floors of offices and show rooms where growers could show off their products to potential buyers. First and second class refreshment rooms were also provided. Presumably you used the first class when trying to impress a buyer, and the second class for normal refreshment.

A view of the Exchange Room after opening:

Globe at Borough Market

Today, the Hop and Malt Exchange has been restored and is currently a location providing office, corporate hospitality and a live events space, so in some ways is still true to the original use of the building – although no longer trading in hops and malt.

Borough Market and the Hop and Malt Exchange highlight that this area was a significant place for trading agricultural products. What started off as a market on the southern end of London Bridge, grew considerably with the arrival of the railways. Road and rail access to the southern agricultural counties turned this part of Southwark into a key location where London’s shops, restaurants and breweries could negotiate and buy the key agricultural products they needed for their business.

My 1977 photo captured the very end of that long period, but Borough Market still remains serving a new, 21st century customer.

alondoninheritance.com

The Great Fire at London Bridge

If you walk out of London Bridge Station into Tooley Street, walk west up towards London Bridge, you will see a memorial to a fireman who died during what was described as the Great Fire at London Bridge in 1861 (also known as the Great Fire in Tooley Street), when a considerable number of the warehouses between Tooley Street and the River Thames were destroyed, alongside millions of pounds worth of goods.

Chances are that you will miss the memorial, installed on the first floor corner, along the side of a building facing on to Tooley Street. Although the lane alongside the building is now gated, it is called Cottons Lane, a name relevant to the warehouses destroyed in the fire.

Great Fire at London Bridge

Although the words on the memorial are difficult to read, it really does deserve a closer look. It records the death of James Braidwood, Superintendent of the London Fire Brigade who “was killed near this spot on the execution of his duty at the great fire”. These details are in the centre of the memorial, surrounded by a wreath.

Great Fire at London Bridge

Around the wreath are some details of the fire brigades profession, along with an image of the Great Fire at London Bridge.

At bottom left is a fireman’s helmet, sitting on the end of a nozzle through which jets of water were directed. To the right is an axe, followed by a water hose. Above this is the wheel of a fire engine.

At top left is a burning warehouse, with flames and smoke covering the top of the monument.

The fire that the memorial records, broke out on Saturday 22nd of June 1861. It would burn for days, destroy many warehouses and cause millions of pounds worth of damage and loss.

The following newspaper report provides a good indication of the scale of the fire:

“DREADFUL CONFLAGRATION IN LONDON. UPWARDS OF TWO MILLIONS’ LOSS – The metropolis on Saturday evening was visited by one of the most terrific conflagrations that has probably occurred since the great fire of London. Certainly for the amount of property destroyed, nothing like it has been experienced during the last half century.

The scene of the catastrophe was on the water side portion of Tooley-street, nearest London bridge, a locality which has been singularly unfortunate during the last 25 years, some of the largest fires having occurred here. The outbreak took place in the extensive range of premises known as Cotton’s Wharf and the bonded warehouses belonging to Messrs. Scovell.

They had an extensive river frontage, and the whole place on the land side extending to Tooley-street was covered with eight or nine warehouses six stories in height, some of which had formerly been used as ordnance stores, and the whole occupying, as we were informed, about three acres.

These buildings were filled with valuable merchandise of every description. There were some thousands of chests of tea and bales of silk stored in the upper floors, while in the lower was an immense stock of Russian tallow and tar, oils, bales of cotton, hops and grain. Every portion of the establishment might be said to have been loaded with goods, and of the whole of this property, not a vestige remains but the bare walls and an immense chasm of fire, which at dusk on Sunday evening still lighted up the Pool and the east end of the City.

To be added to this very serious loss is the destruction of the whole of the western range of Alderman Humphrey’s warehouses flanking the new dock, known as Hay’s Wharf, the burning of four warehouses comprising Chamberlain’s Wharf, adjacent to St Olave’s Church, besides many other buildings in Tooley-street”.

Smaller fires were a frequent hazard in the warehouses lining the Thames. The article extract above lists some of the goods stored in the warehouses. All very inflammable, and it had been a hot summer with little rain, so the buildings and their contents were dry and ready to burn.

The following print from the time gives an impression of the scale and ferocity of the fire. The southern tip of London Bridge can just be seen on the right edge of the print.

Great Fire at London Bridge

Image credit: London Metropolitan Archives, City of London: catalogue ref: p5354642

As well as the size of the fire, the print shows some of the fire fighting methods of the time. On the river are two steam powered fire boats. This method of firefighting was essential in London due to the number and size of the warehouses hard up against the river. It was frequently only possible to fight a fire from the river. One issue facing the fire boats at the London Bridge fire when they arrived was a very low tide. This prevented them getting close to the warehouses and drawing sufficient water. It was only when the tide came in that the height of water in the river was sufficient for the fire boats to be effective.

To the right of the fire, a cluster of firefighters can be seen in front of the large building at the end of London Bridge. They are directing their hoses on the western edge of the fire.

The river is full of boats carrying spectators, and I suspect the watermen of the river found it very profitable to give people a close up view of the fire, although this could be dangerous. Look at the larger boat on the left edge of the print. A fire has started on the boat, and a figure is seen jumping into the river from the boat.

Fires were almost entertainment events for Londoners, who lined London Bridge and filled the many boats on the river at all hours of the day and night. The following newspaper extract illustrates how the fire spread and the onlookers responses:

“While Chamberlain’s Wharf was in full blaze it was feared by many that St Olave’s Church and Topping’s Wharf would follow, but fortunately, a vacant piece of ground interposed, which no doubt saved both. On the other hand, Hay’s Wharf, it became evident, had caught fire in the roof, through which clouds of smoke and sharp spires of flame were darting. The iron shutters for a long time kept in the fire here, except at intervals when it forced its way upwards; it must have been at least an hour after the top floor was blazing before the fire descended to the floor below. After that the other floors followed. When Hay’s Wharf was included the river sweep of the conflagration must have been 300 yards, with a deep foreground of blazing oil and tallow. The higher the tide rose the wider became the sheet of flame, as cask after cask of tallow melted and rolled, liquidwise, into the Thames.

As the tide rose attention became fixed upon the dock at the end of Hay’s Wharf, for the spectators were anxious upon two points – first, they wished to see if there was a possibility of escape of the two vessels lying there, close to the walls of the fire proof, but fire filled buildings; and secondly, they feared that the fire would leap the narrow chasm of the dock and seize on Beal’s Wharf, and then, as must have happened, burn down a great extent of wharfage property beyond. After midnight, when the water had risen sufficiently high, the screw steamer was towed out amid the cheers of the onlookers, and ten minutes later two tugs drew out an American barque, just as the iron shutters of the building fell out of the side next to the dock, and the conflagration shot forth its fiery tongues”.

The following print of the fire shows the masts of one of the ships that were rescued from the fire. They can be seen on the left of the print, with the flames of the burning warehouses getting dangerously close.

Great Fire at London Bridge

The following plan shows the buildings destroyed in the fire:

Great Fire at London Bridge

Image credit: London Metropolitan Archives, City of London: catalogue ref: p5354659

The fire as viewed from Tooley Street:

Great Fire at London Bridge

There were a number of casualties during the fire. Five men who were in a boat collecting tallow floating on the river were either burnt to death or drowned when their boat caught fire. A number of men working in the area of the warehouses fell into the river and drowned.

Those suffering burns were taken to St Thomas’s Hospital, which also included a man who had his neck broken when the chain from a fire boat was caught around his neck.

Many of the boats on the river were collecting goods that had fallen out of the warehouses which they then sold for profit. Papers also reported that numerous mudlarks were out on the river foreshore using old sacks, saucepans, baskets, anything they could use to hold the goods from the warehouses being washed up on the shore.

The fire also brought out the worst in human behavior with groups of pickpockets making their way among the crowds watching the fire. Twenty four pickpockets were caught and taken to Mansion House for immediate judgement.

The memorial in Tooley Street records the name of the most high profile casualty – Mr James Braidwood of the London Fire Brigade.

Braidwood was the Superintendent of the London Fire Brigade and had many years of experience. The following report details the circumstances of his death, whilst he was visiting the individual groups of fire fighters in among the warehouses:

“Mr Braidwood, who had visited the men several times, was engaged in giving them some refreshment, when, all of a sudden, a terrific explosion occurred. In an instant it was seen that the whole frontage of the second warehouse was coming down, falling outwards into the avenue. Mr Henderson, the foreman of the southern district of the brigade, who was standing within a few paces of Mr Braidwood, shouted for all to run. The men dropped their hose branches. Two, with Mr Henderson escaped by the front gateway, and the others ran in the opposite direction on to the wharf where they jumped into the river. Mr Braidwood made an effort to follow Mr Henderson, but was struck down by the upper part of the wall, and buried beneath some tons of brickwork. His death must have been instantaneous. Several of his men rushed to extricate him, hopeless as the task was, but another explosion happening, they were compelled to fly. The sad fate of their chief had a most depressing effect upon all, and, to add to their trouble, the conflagration now assumed a most awful ascendancy”.

James Braidwood played a key part in establishing the London Fire Brigade. Born in Edinburgh in 1800, he was appointed superintendent of the Edinburgh fire brigade at the age of 23, and quickly gained a reputation for increasing the efficiency of the fire service in Edinburgh. In 1830 he published “On Construction of Fire-Engines and Apparatus, the Training of Firemen and the method of proceeding in the Cases of Fire”. In London at the time, the fire service was still run by individual insurance companies. This often resulted in a fire engine arriving at a fire, determining that the building was not insured by their company, and turning around.

Braidwood’s publication gained the attention of London’s insurance companies, and in 1832 he was appointed to the supreme command of the embryonic London Fire Brigade.

He initially had to overcome the prejudices and dislike of innovation from the London firemen, but gained their support and trust when they could see the benefits of the changes he put in place.

London’s fire service was very small for a city of such size and complexity, with numerous warehouses full of combustible goods. For comparison, Braidwood took on a force with 120 firemen, when at the same time, Paris had a force of one thousand trained firemen, and numerous fire appliances.

One of Braidwood’s innovative methods was his approach to fire prevention. He took an active part in advising owners of buildings how to implement precautions against fires.

He was also known for acts of bravery. In a fire in Edinburgh where barrels of gunpowder were stored in a burning building, he went in alone and carried each barrel out after having wrapped the barrels in wet blankets. In London he rescued a child from a burning building, having to walk across a plank to the room where the child was, and return via the same route.

He left a widow and six children. His wife had already suffered a similar bereavement, as a son from a previous marriage had died fighting a fire in Blackfriars Road in 1855.

His funeral took place at Abney Park Cemetery. The funeral procession was almost a mile and a half in length, and as well as the London Fire Brigade, there were members of the City and Metropolitan Police forces, members of the remaining private fire-brigades, along with many prominent persons of mid Victorian London.

The memorial in Tooley Street was installed in March 1862. I suspect it was in a more prominent place than now, as when installed it was on the west wall of a building on Tooley Street. Today it is on the eastern side of the building.

As well as the memorial, a short distance east there is a Braidwood Street, also to commemorate James Braidwood:

Great Fire at London Bridge

The inquest into the death of James Braidwood reached a conclusion of accidental death.

The jury at the inquest heard that he had been in among his fire fighters handing out brandy and encouragement when the wall fell on him, killing him instantly.

The inquest recorded the enormous quantities of goods held in the warehouses, the majority of which were highly inflammable, including a considerable quantity of salt peter, which is the natural mineral form of potassium nitrate.  Among its many uses, it is the principal ingredient in gunpowder, and as an oxidizer for fireworks and rockets. Having such an explosive chemical stored in such large quantities in a very busy warehouse complex in the centre of London shows the complete lack of any regulations at the time for the safe storage of such materials.

The area between Tooley Street and the river were still smoldering two weeks after the start of the fire. Over 200 police were employed to stop the public trying to get into the area. The fire brigade were kept busy pulling down dangerous walls and getting access to the burning vaults.

The area was though, quickly rebuilt and by the time of the 1893 Ordnance Survey map, the area is again full of warehouses. Hay’s Wharf was rebuilt, and it is the post 1861 fire version of Hay’s Wharf that we see today. ‘Reproduced with the permission of the National Library of Scotland’

Great Fire at London Bridge

If you find yourself in Tooley Street, glance up at the memorial to remember the Great Fire at London Bridge and the Superintendent of the London Fire Brigade, Mr James Braidwood.

alondoninheritance.com