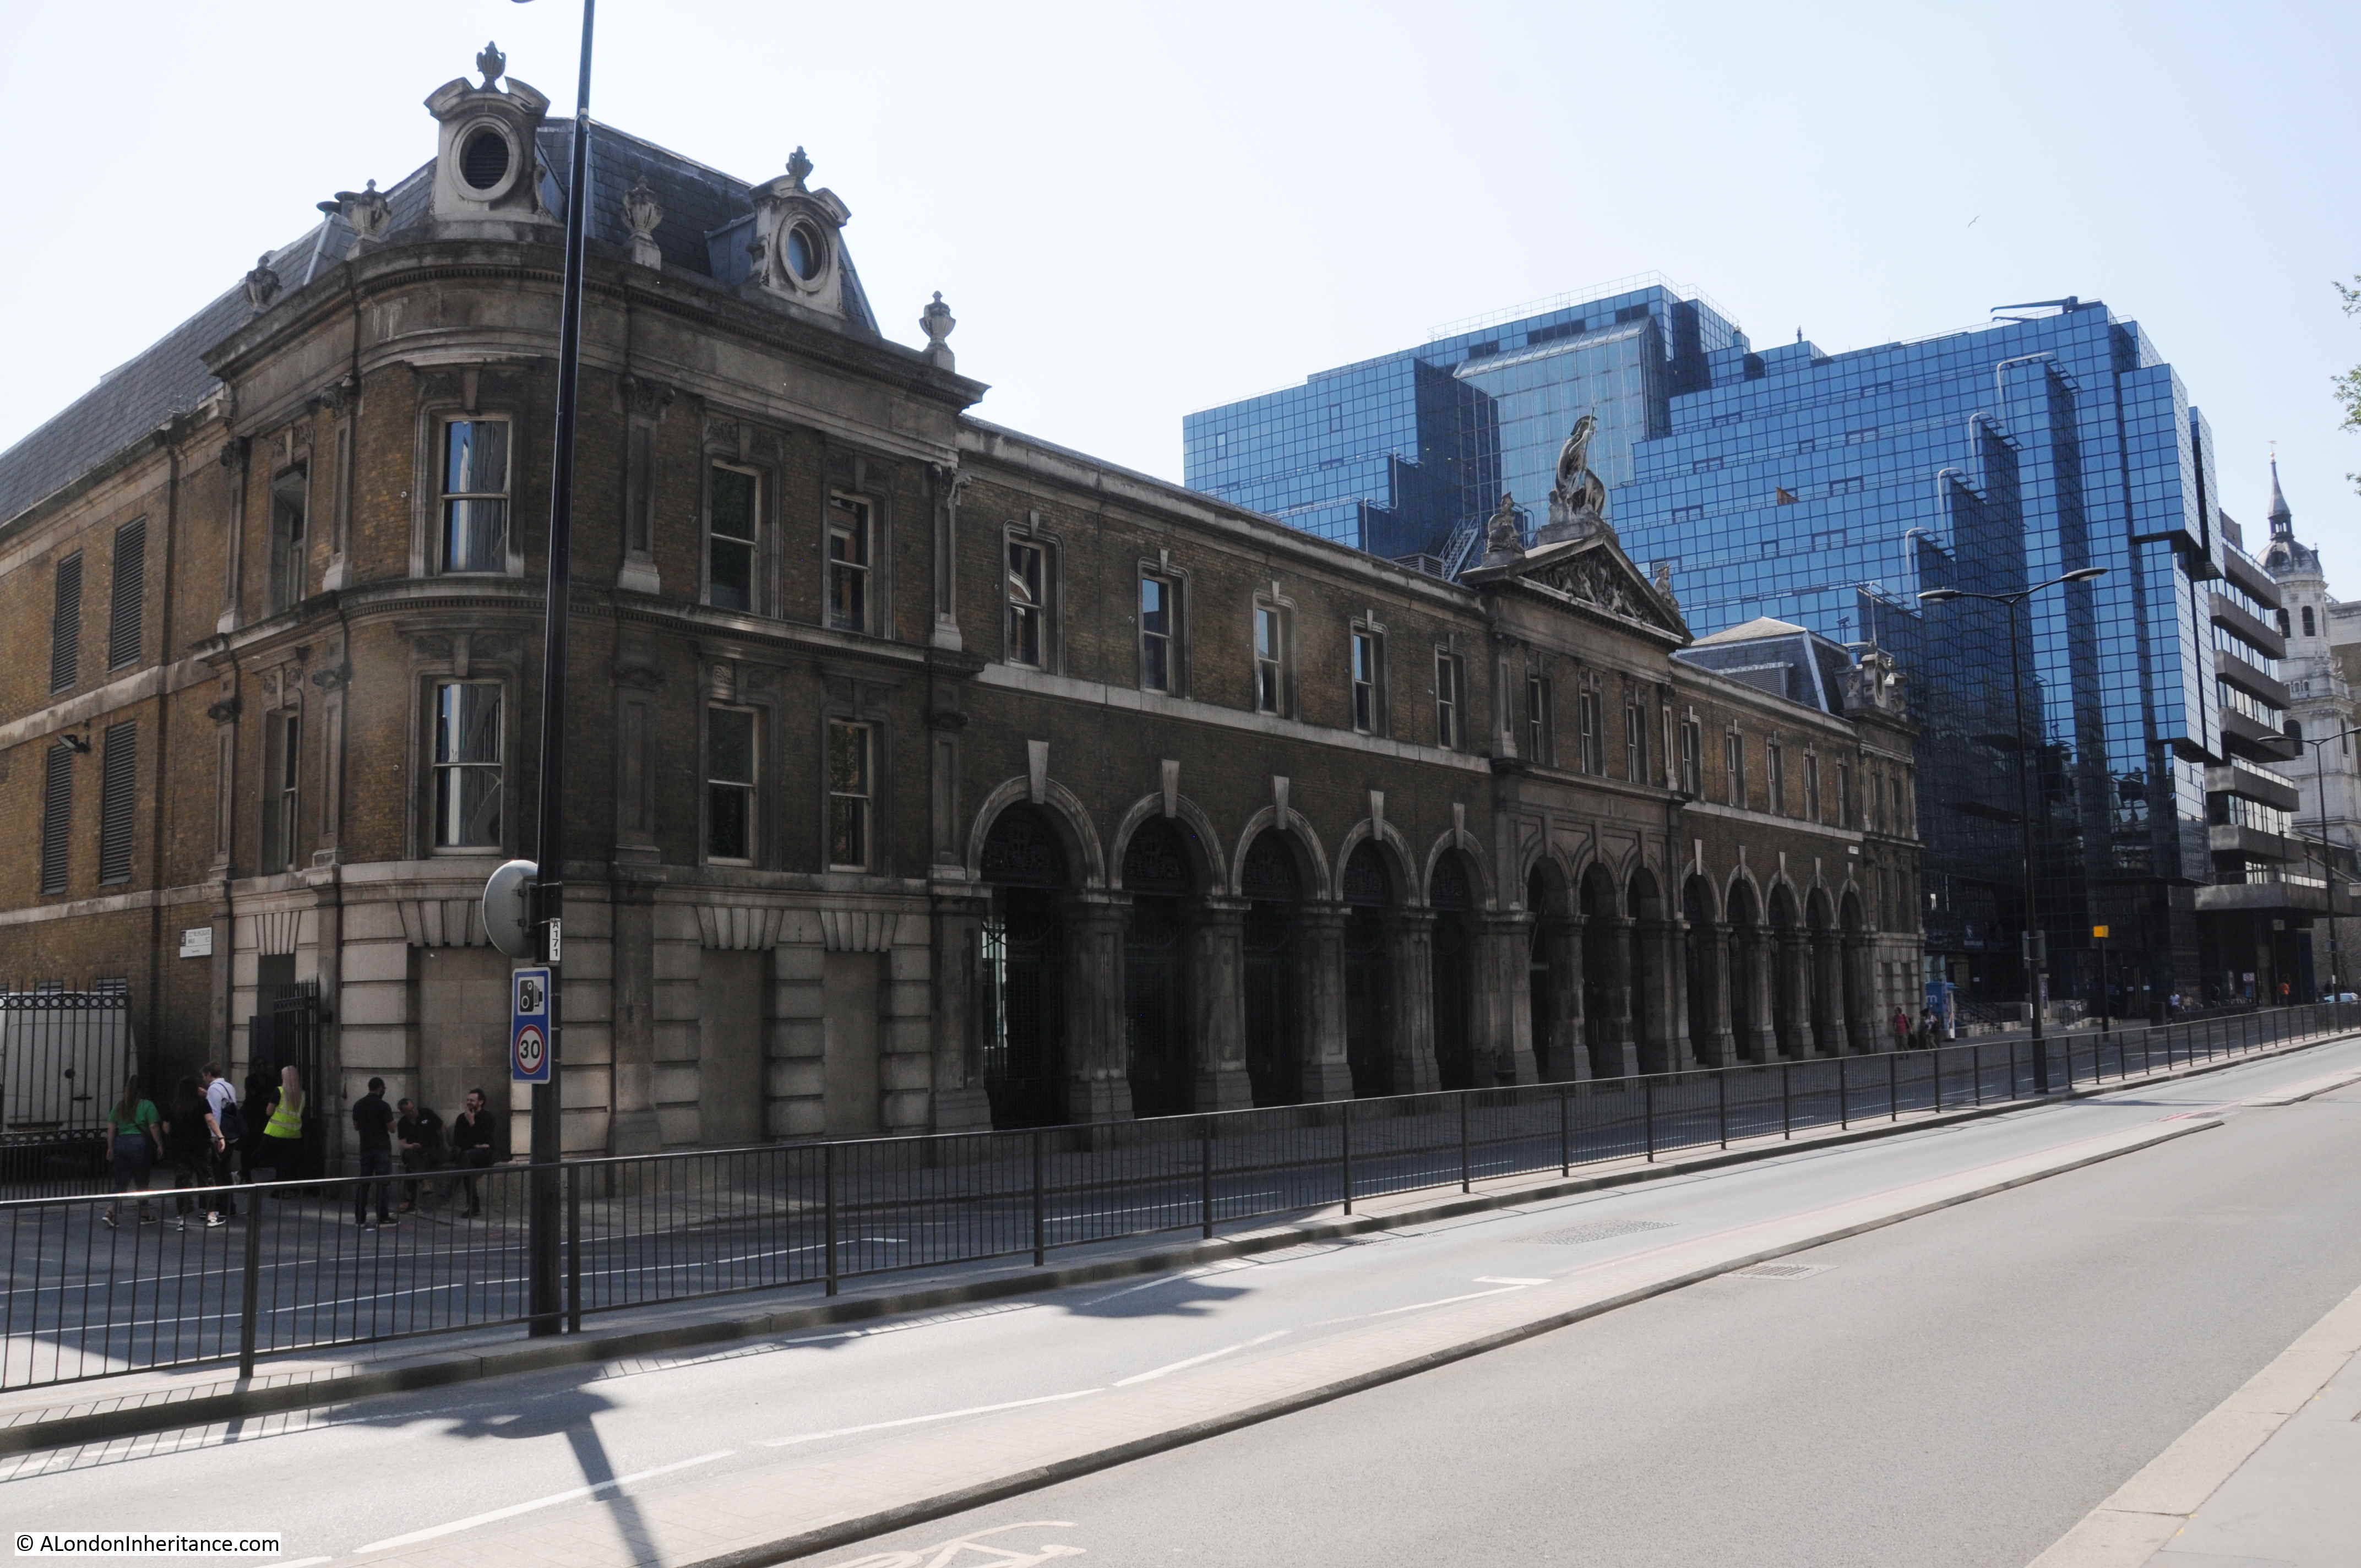
The problem with this blog is that I am constantly finding out how much I do not know. When I am researching the background for a new post, I find a new subject which takes me off on a tangent – an example being the subject of today’s post, the War Artists Advisory Committee.
Before getting into the detail of the post, I must apologise for the length, the more I looked, the more I found – I hope you will find it interesting.
When i was researching my post of a couple of week’s ago on the Temple church, I found some paintings of the damaged church in the Imperial War Museum online archive. I was aware of the work of a number of war artists, but what I did not know about was the organisation that these paintings referenced, and that was the driving force behind the breadth and depth of artistic records from the Second World War.
The War Artists Advisory Committee was part of the Ministry of Information and the creation of Sir Kenneth Clark who was already involved with a considerable number of artistic enterprises, including the organisation that would later become the Arts Council.
Clark’s plan was that a pictorial record of the war would be produced and as many artists as possible would contribute to the project which would help in keeping artists in employment during the war years. A secondary aim was that by employing a large number of artists, it would save many artists from the fate that befell a generation of artists in the First World War.
The Ministry of Information supported the creation of the War Artists Advisory Committee and the Treasury was persuaded to give financial support, however there was a challenge from the armed forces who saw the War Artists Advisory Committee as removing responsibility for war art from the control of the War Office and the Admiralty.
A compromise was reached, with four artists being allocated to the War Office and one for the Admiralty, who would also pay their salaries, however the War Artists Advisory Committee would have a say in the selection and direction of their work, and full control of the work produced.
The War Artists Advisory Committee (WAAC) was given a budget of £5,000 for the first year of operation, and met for the first time on the 23rd November 1939.
The WAAC included representatives from all three of the Armed Services and the wartime Ministries that, due to their wartime importance, were to be covered by artists commissioned by the WAAC. Sir Kenneth Clark was the chairman of the WAAC.
During the war, the WAAC employed a number of artists on a salaried basis, commissioned artists to provide works on a specific subject, and purchased the work of artists presented to the committee.
Over 300 artists would be commissioned by the WAAC. 5,570 works of art would be produced (about half of these works were given to the Imperial War Museum), and the committee’s artists had a global reach, working in all theatres of war.
The WAAC commissioned and purchased a range of works covering the impact of the war in London and it is these works which are the theme of today’s post.
The work produced would cover a wide range of London related topics, however considering that the WAAC was part of the Ministry of Information, work was not commissioned which would show a negative view of the population’s reaction to the war. There are therefore no artistic records of looting, riots or large numbers of the population leaving stricken areas. Where there was injury or death, it was normally shown in a heroic context.
I have chosen a sample of works held by the Imperial War Museum to illustrate the work commissioned by the WAAC across London. These are all © IWM and are reproduced under the IWM’s non-commercial share and reuse licence. For each picture, I have included the title, IWM reference and embedded in the title and reference a link back to the original IWM work.
To research this subject, I have also used the book “The War Artists” by Meirion and Susie Harries published in 1983 by Michael Joseph in association with the Imperial War Museum and the Tate Gallery.
So, lets start with:
Roland Vivian Pitchforth
Roland Pitchforth started work with the WAAC at the start, during the so-called phoney war. He had served in the First World War with the Wakefield Battery of the Royal Garrison Artillery. As a result of this service and the noise of the guns, Pitchforth was stone deaf which caused some problems for the WAAC when considering which commissions he should be sent on. For example, there was real concern that Pitchforth would be shot by an over enthusiastic sentry as he would not have heard any challenges or commands shouted at him.
Despite being deaf, Pitchforth was able to produce a wide range of work for the WAAC, which included initial work across the UK, before being sent further afield to work on board shipping and to the Far East.
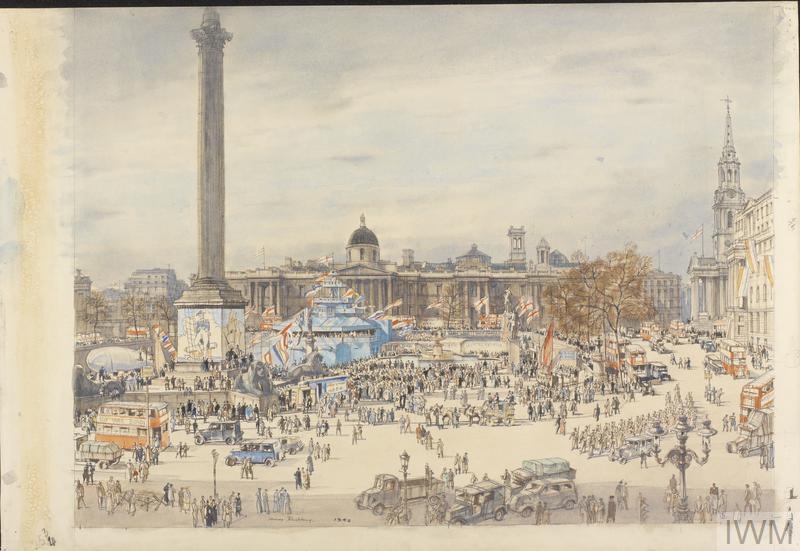
Below is a range of his London based work, starting with “Wings for Victory Week: Trafalgar Square, London WC2 (Art.IWM ART LD 2845)”
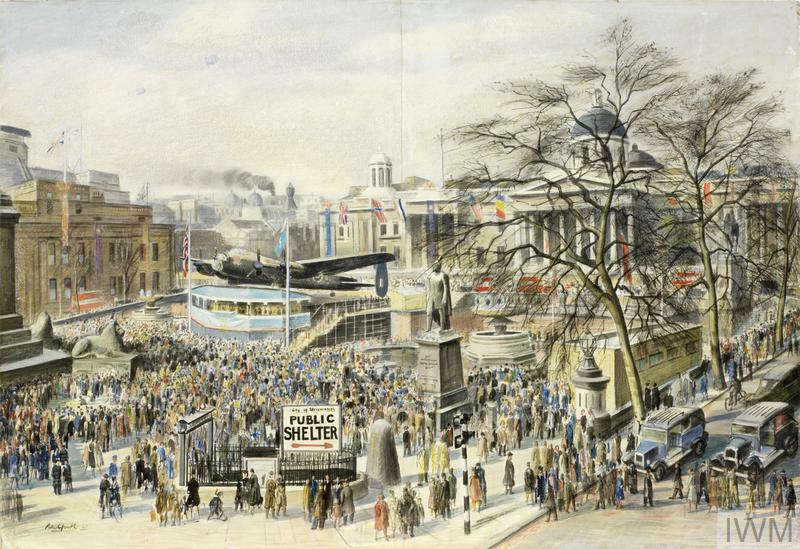
Wings for Victory Week was held in 1943 to raise money for the construction of aircraft. the event ran across the whole of the country. In the above work, a Lancaster Bomber is on display in Trafalgar Square, there are flags of the allied nations in front of the National Gallery. Note the sign for the Public Shelter in the foreground.
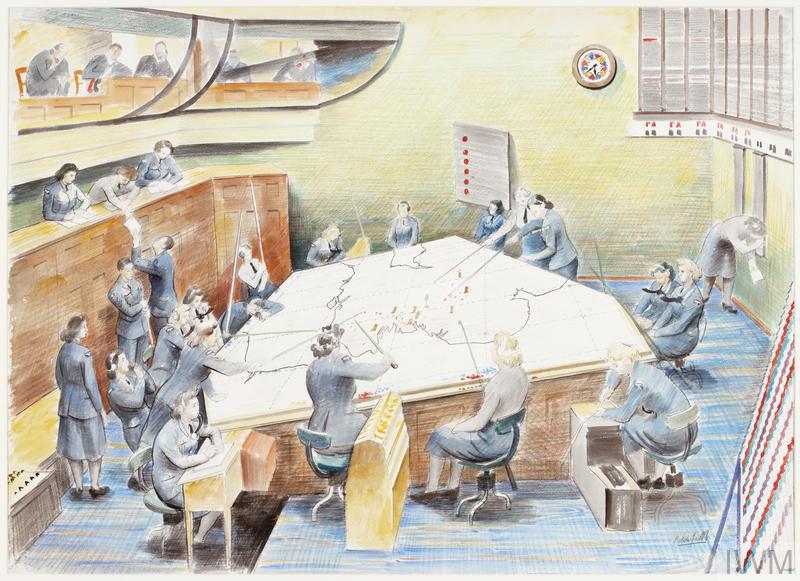
Although the next work is located in the outskirts of London, it is an iconic image showing the work of the control room in Uxbridge which had responsibility for analysing all the input from spotters and radar to track enemy aircraft and the coordination the resources needed to attack the enemy.
The work is titled “Group Headquarters, Uxbridge : radiolocation plotters (Art.IWM ART LD 2320)”
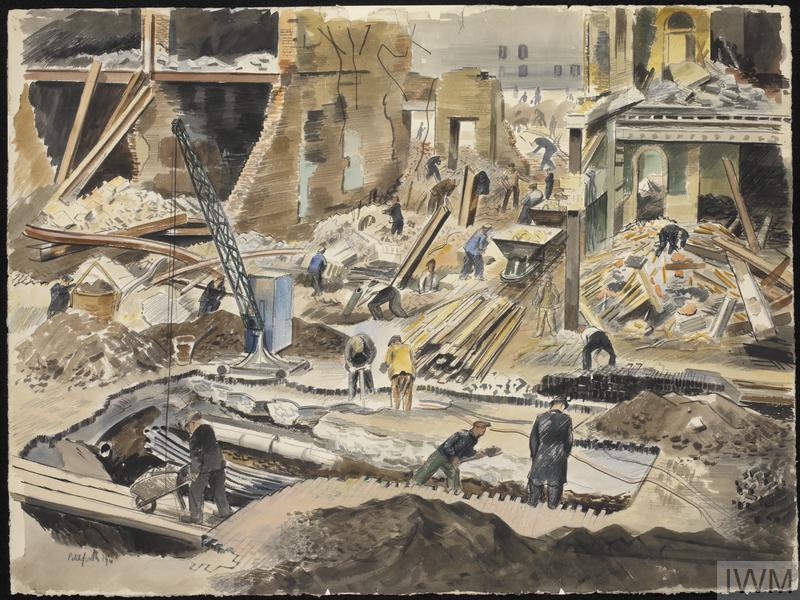
Pitchforth completed a range of works showing the impact on London when enemy aircraft did get through the defences around London. The first shows demolition workers clearing a bomb site, and is titled: “Demolition Workers, Oxford Street, London W1 (Art.IWM ART LD 1525)”
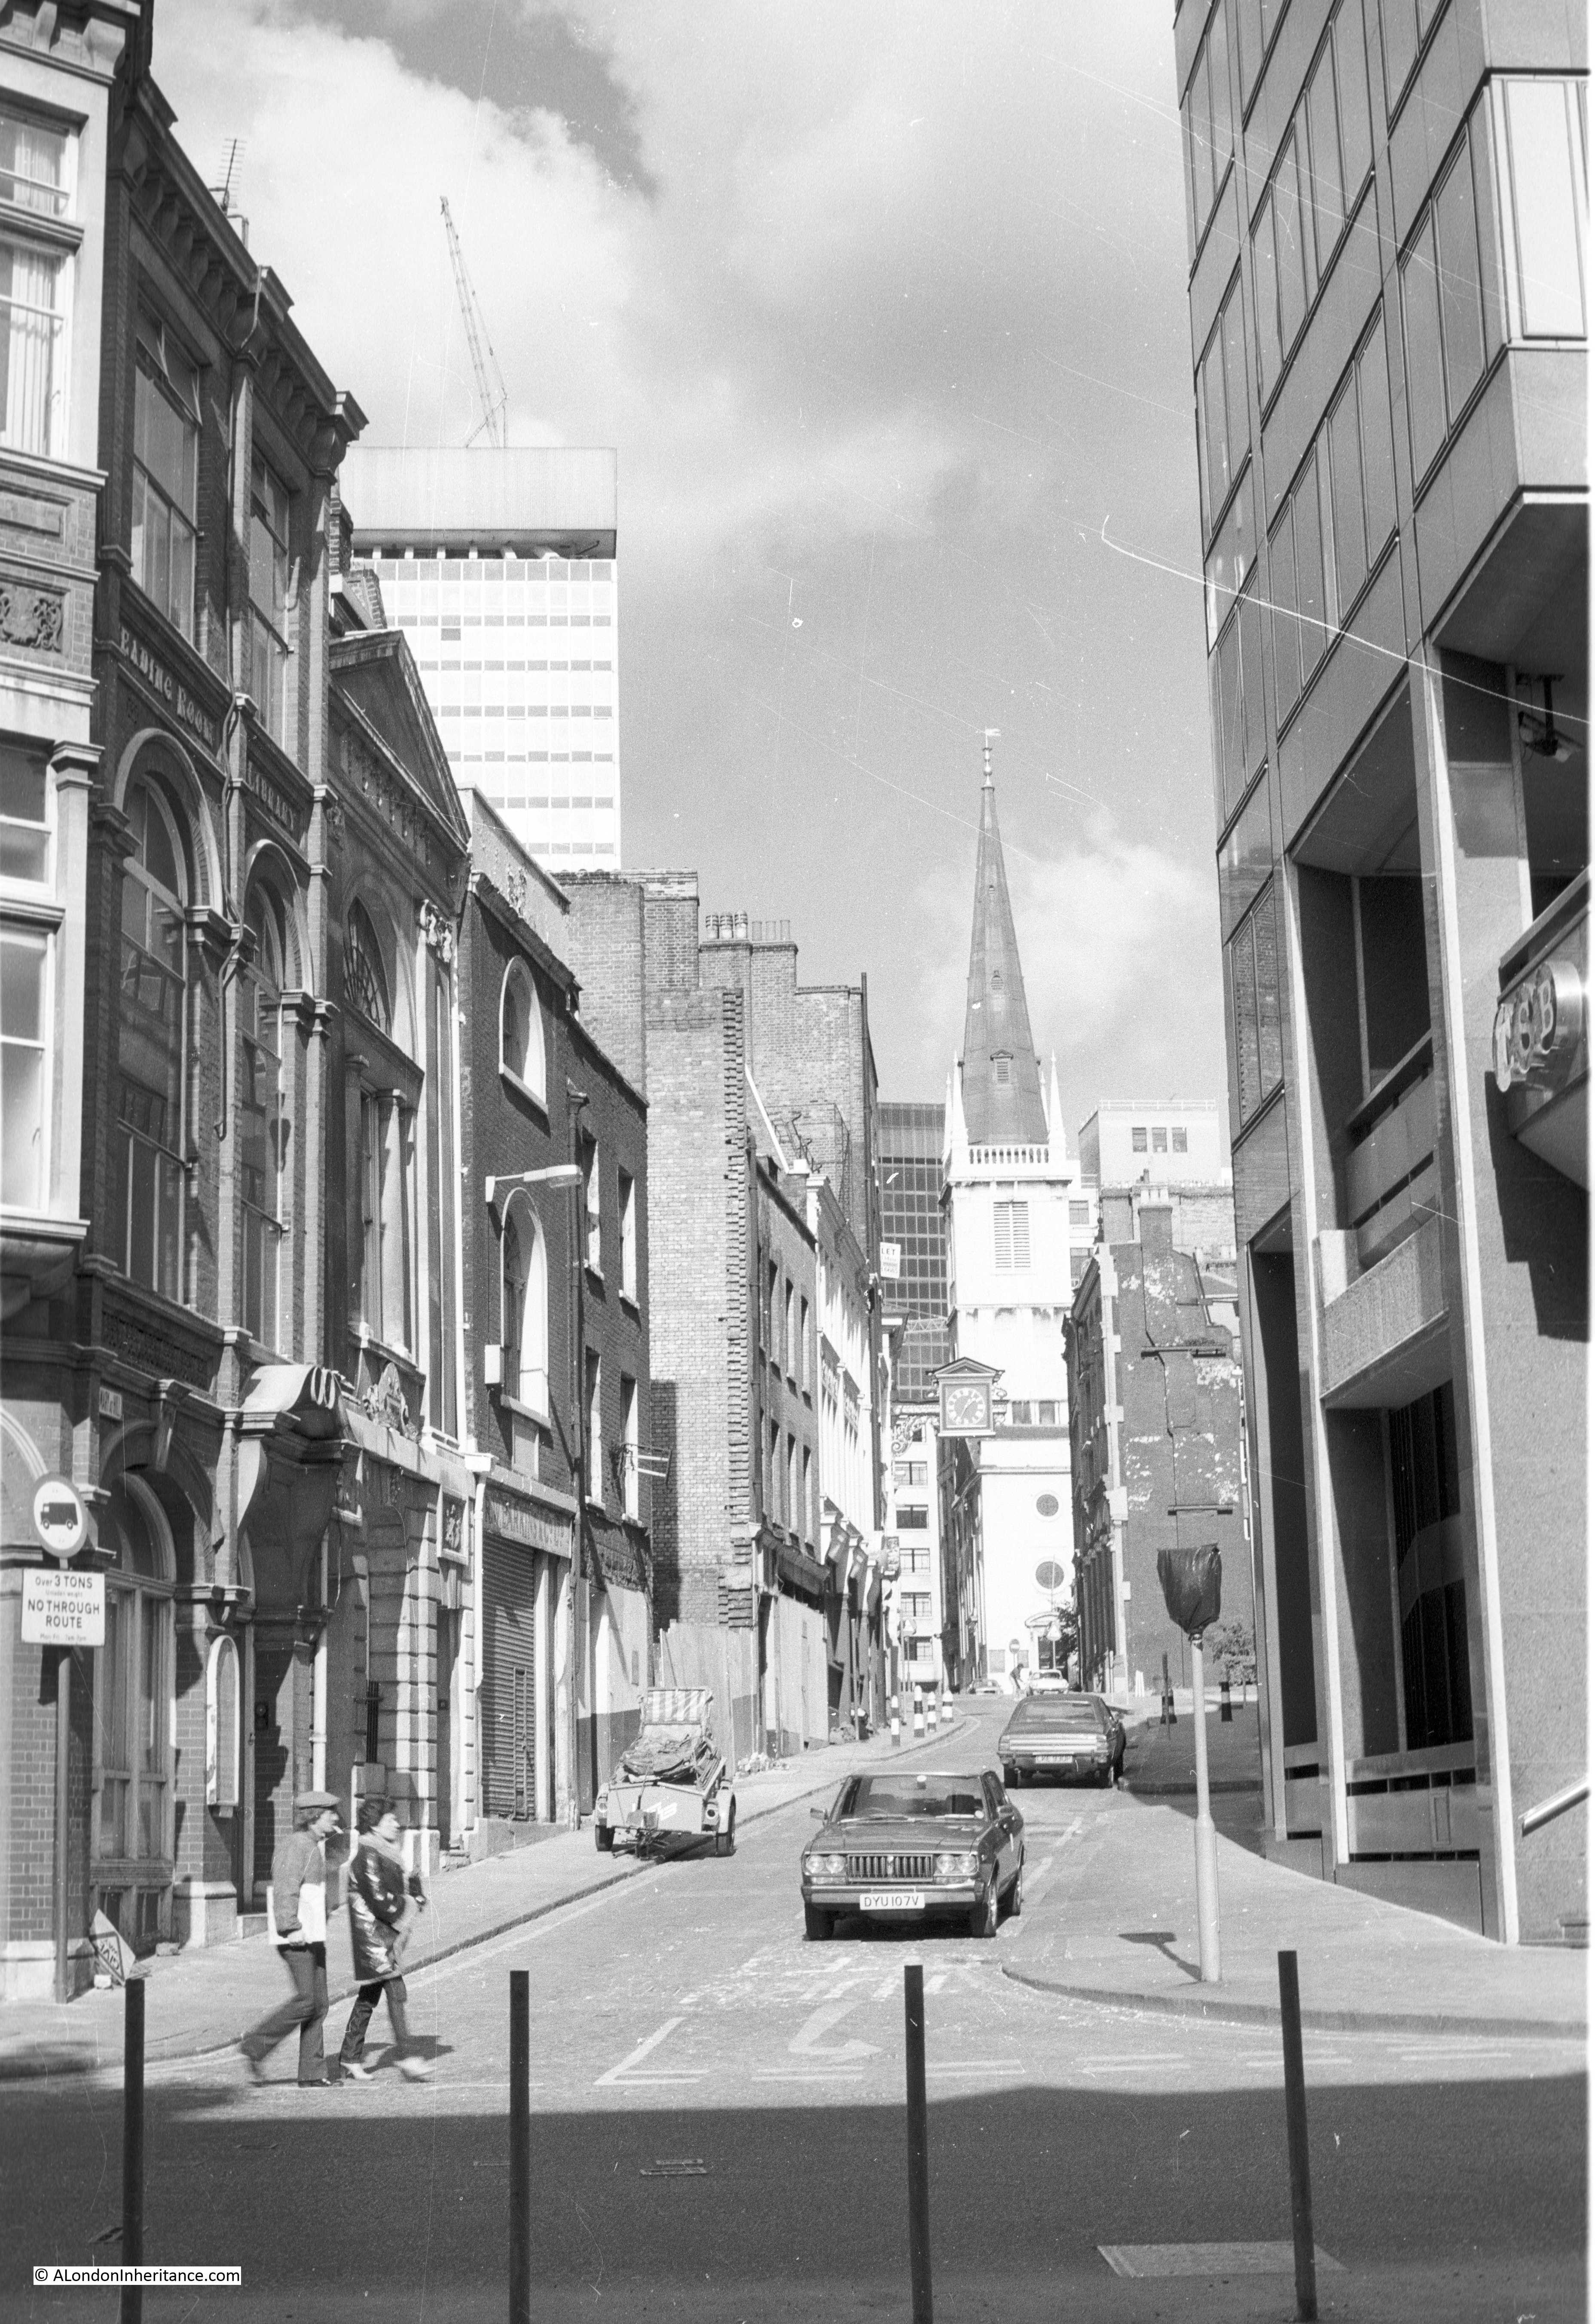
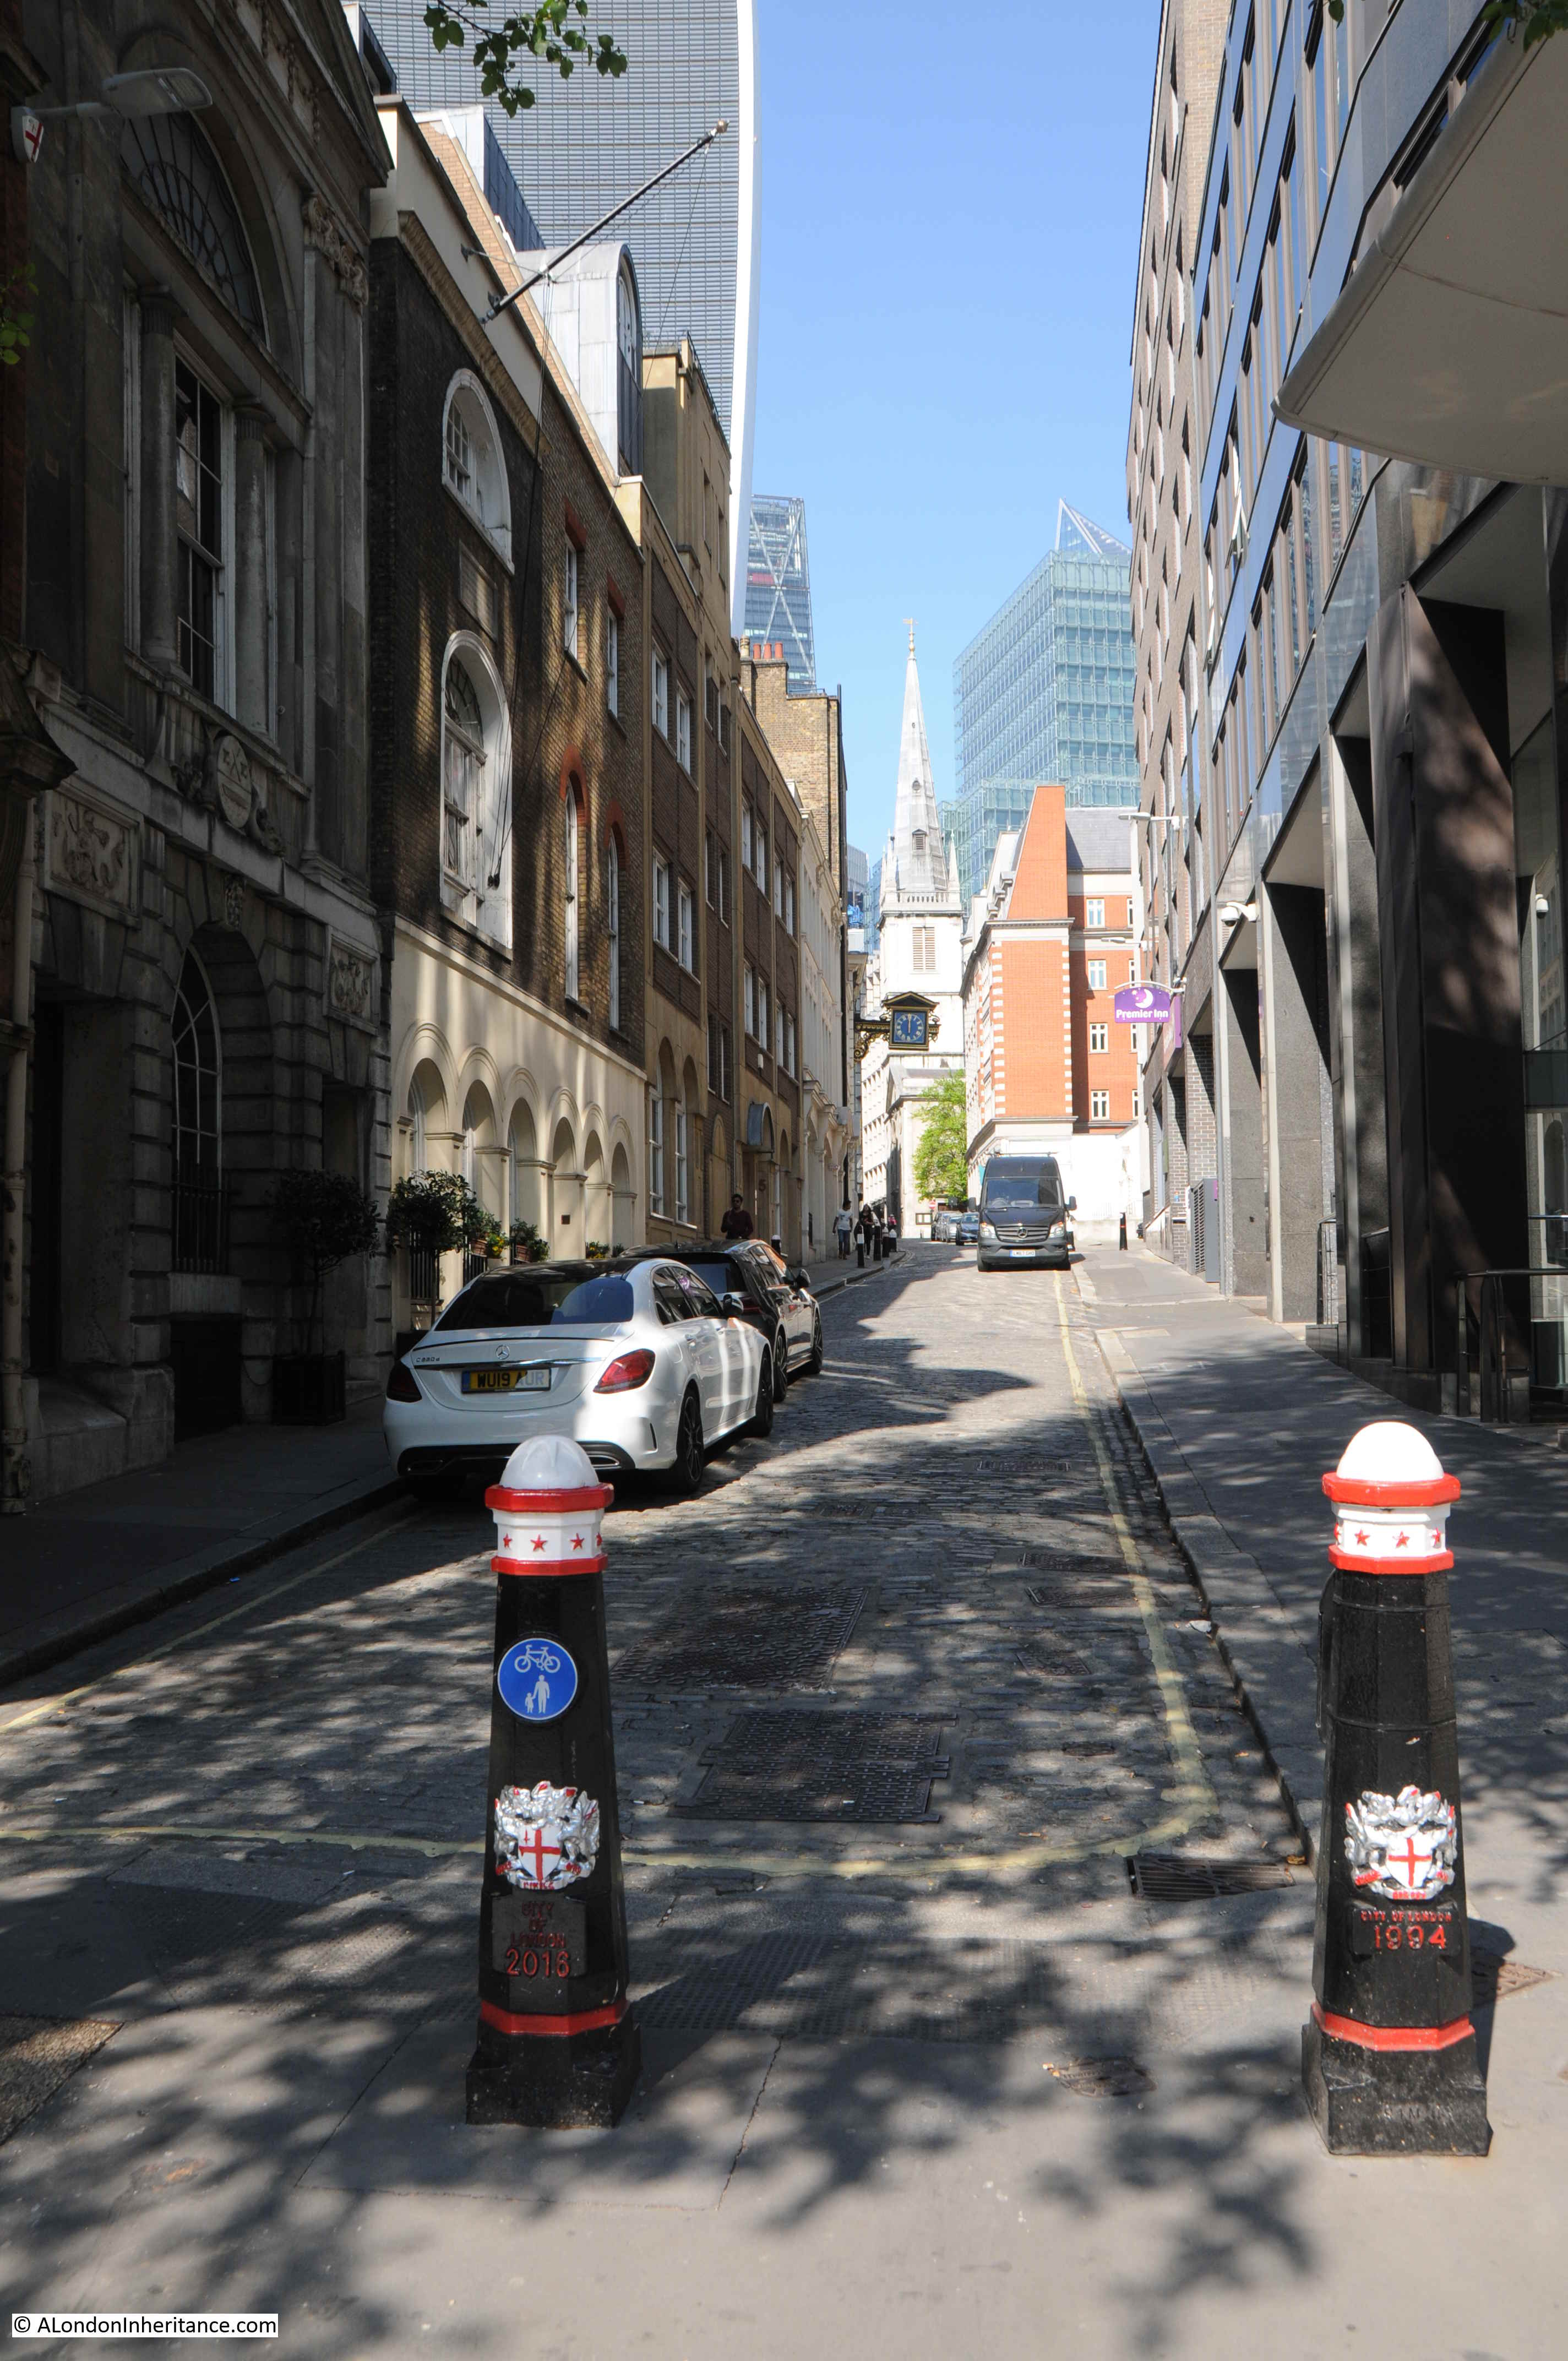
The next work is titled “Jewin Crescent, London EC1 (Art.IWM ART LD 1202)”
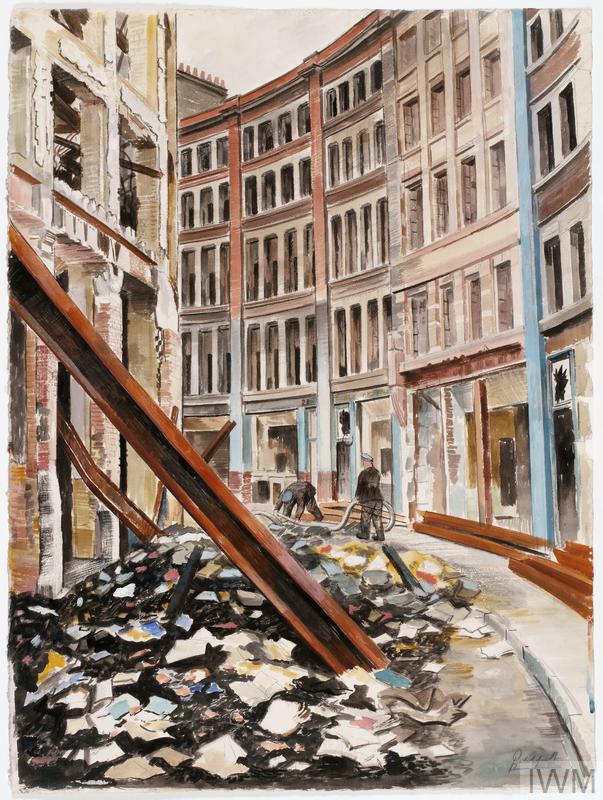
Jewin Crescent is one of the many streets that were lost under the development of the Barbican. If you walk past the church of St. Giles Cripplegate, past the City of London School for Girls which is on the right. this brings you to an open space of grass and gardens. This was the location of Jewin Crescent.
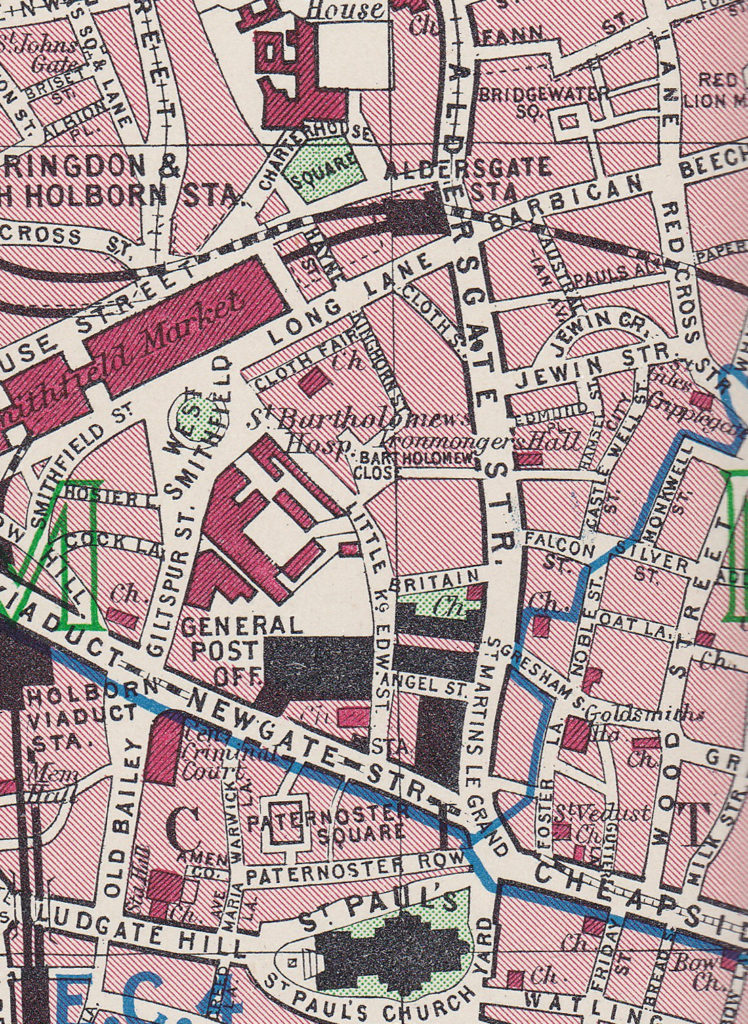
The following extract from the 1940 edition of Bartholomew’s Atlas of Greater London shows Jewin Crescent on the right hand side, just over half way up the map.
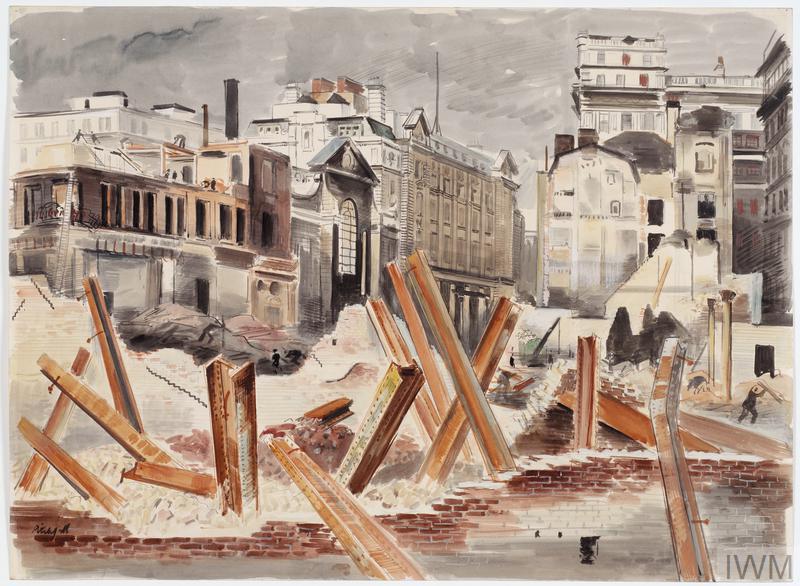
The next work is titled “Post Office Buildings (Art.IWM ART LD 939)” and shows a bomb site with steel girders sticking out of the ground.
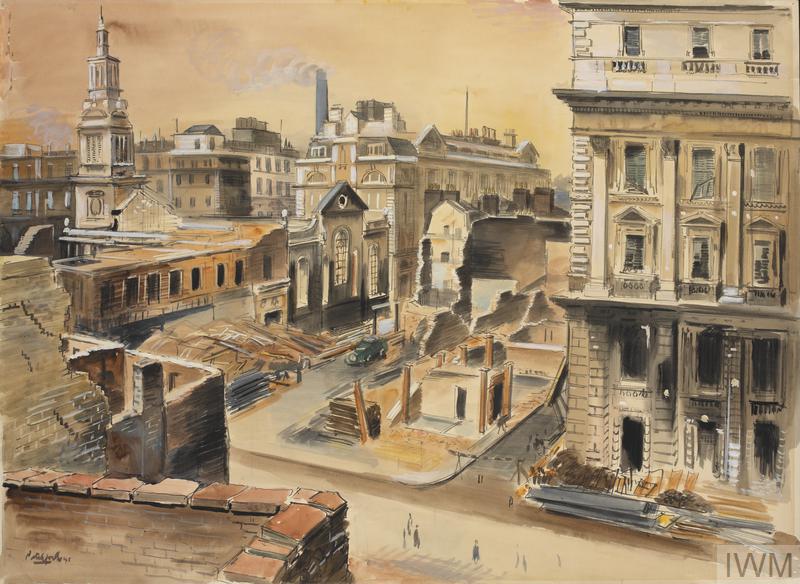
The next work, titled “Post Office Buildings : the Telephone Exchange (Art.IWM ART LD 938)” shows the church of Christchurch Greyfriars and the Post Office buildings to the right of King Edward Street.
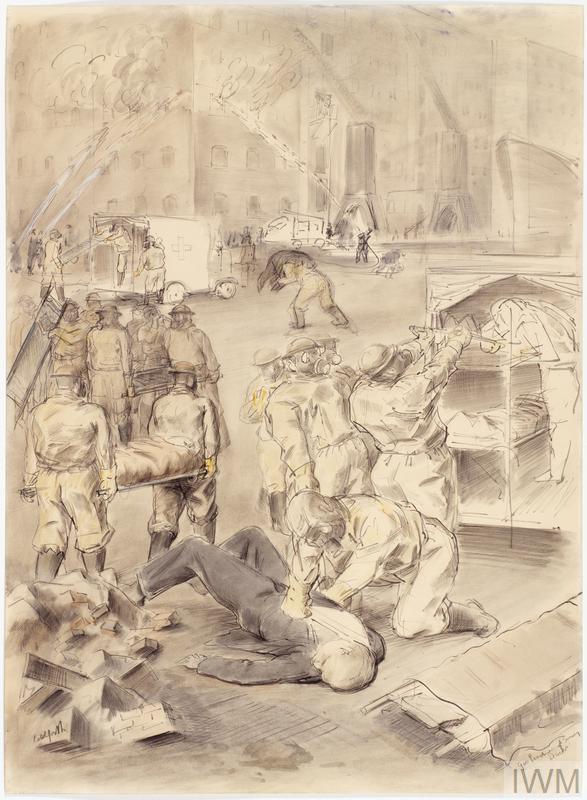
Pitchforth also produced a series of drawings showing the work of those involved in responding to the impact of bombing. The following drawing titled “ARP Practice (Art.IWM ART LD 371)” shows ARP officers in the foreground carrying stretchers to an ambulance, whilst a civilian is being attended to on the ground. In the background, firemen are fighting a fire in the 3rd floor of the buildings.
As well as scenes showing the aftermath of bombing, Pitchforth’s work included many other works showing those involved in the defence of London. The following is an example and is titled “AFS Practice with a Large Pump : On the banks of the Serpentine, London (Art.IWM ART LD 155)”

The view is of the Auxiliary Fire Service practising on the side of the Serpentine. A large pump is pushing water through the hoses and I suspect the training is focused on how to keep hold and direct a flow of water under such large pressure.
Roland Vivian Pitchforth was employed throughout the war by the WAAC. Rather than taking up individual paid commissions, Pitchfork was a salaried employee which provided him with permanent employment and also helps account for the large number of works he completed for the WAAC.
Anthony Gross
Before the war, Anthony Gross had spent almost 20 years as an artist in France. After his return to England, and at the start of the war he was taken on under the WAAC and soon became a salaried War Office Artist. He spent the first couple of years drawing and painting army life before embarking on a lengthy tour throughout the Middle East.
The following work is one that Gross completed of a scene in London and is titled “Roof Spotters (Art.IWM ART LD 684)”
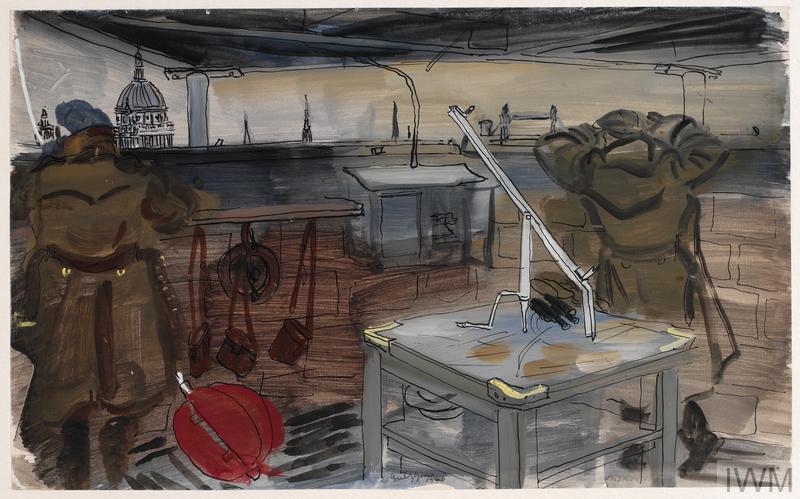
The year is 1940 and the scene is of a couple of roof spotters looking out across London. Their role was to watch for, locate and report enemy aircraft and the impact of bombs across the city. In the foreground is a mapping table and St. Paul’s Cathedral and Tower Bridge can be seen in their field of view.
His travel as a war artist in the Middle East was extensive. Starting in Egypt, he then worked through Palestine, Lebanon, Syria, Iraq and Iran. He was described by other war artists as being exceptionally good company and his travel diaries record a succession of “piss ups” and “beanfeasts”.
Henry Moore
Henry Moore was already an established artist and art teacher at the start of the war. He had served in the First World War and been injured during a gas attack.
Whilst not formally employed by the WAAC, a number of his works were purchased and he was commissioned for a number of specific projects.
His work was not simply an image of what he saw. Blurring much of the image and lack of detail produced an image that focused the eye on a specific subject. Moore produced a series of works showing Londoners huddled in the Underground stations, and the following is an example. Titled “Women and Children in the Tube (Art.IWM ART LD 759)”
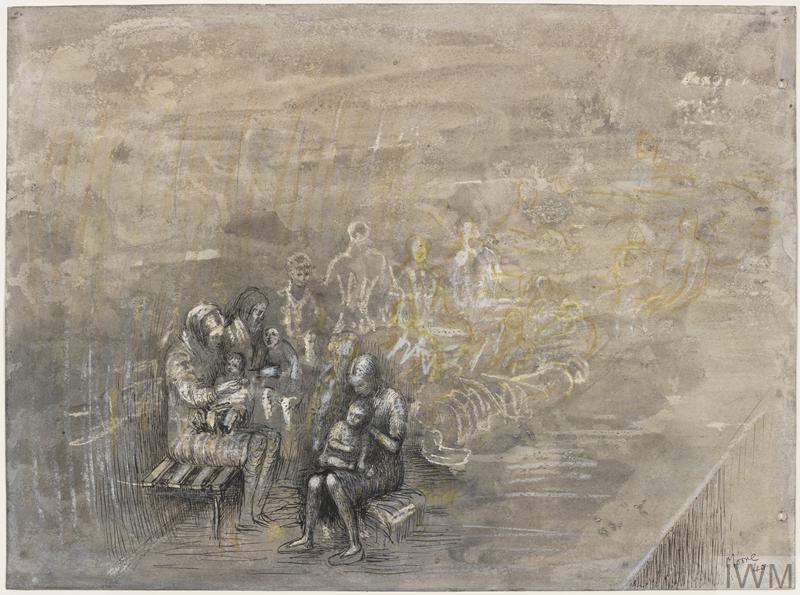
The women and children in the front of the picture are clearly drawn, however the figures become more ghost like as the view moves to the right.
Henry Moore was directly impacted by London bombing. His Hampstead house and studio was badly damaged by a bomb, so much so that he had to move out and relocated to a hamlet in Hertfordshire which would be his home for the rest of his life.
Edmond Xavier Kapp
Edmond Kapp also fought in the First World War. During the conflict he was gassed after which he withdrew from front line fighting and worked in an intelligence role.
During the Second World War, Kapp received a number of commissions to provide drawings of people sheltering under London during the blitz. A series of drawings were made in the crypt under the church of St. Martin’s-in-the-Fields and the following drawing titled “Ready for Christmas: the Canteen under St. Martin’s-in-the-Fields (Art.IWM ART LD 800)” is an example from the series.
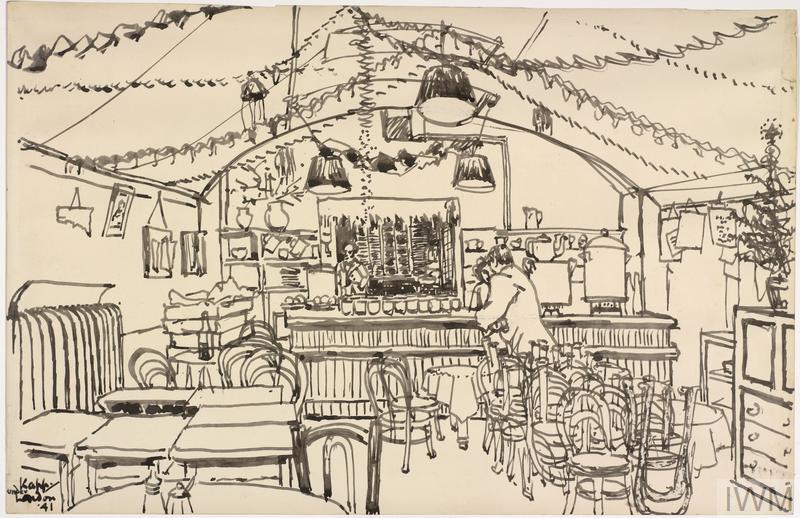
The drawing shows the canteen ready for a Christmas celebration, with a couple of figures standing at the bar.
Graham Sutherland
Graham Sutherland was an established pre-war artist, teaching at the Chelsea School of Art. He received his first commission from the WAAC in June 1940 and second set of commissions in August 1940. These were to produce works from around the country rather than in London. It was in January 1941 that he received a salary of £325 to cover six months of work, which ended up covering the City and East End.
During this period, he would spend occasional nights in the City, including sleeping in the deck chairs arranged around the Gallery of the Dome of St. Paul’s Cathedral. His works from this period are very dramatic views of the devastation he found. An example being the following work titled “The City : A fallen lift shaft (Art.IWM ART LD 893)”

Sutherland’s experiences at the time reveal the response of many of the victims of London bombing, often not portrayed in stories of the “blitz spirit”.
Sutherland requested a camera so he could quickly take photos of the scenes he wanted to paint. This would avoid spending time at a site drawing or painting as “it is difficult to draw in some places without rousing a sense of resentment in the people”.
It was a common experience among many of the war artists concentrating on the impact of London bombing. Those living in the areas they wanted to paint, and had suffered the impact of bombing often complained that war artists were “cashing in” on their misfortunes.
Harold Sandys Williamson
Harold Williamson was a commercial artists who also fought and was wounded in the First World War. He completed a short series of commissions for the WAAC, which included the following “An Emergency Telephone Office in the City: January 1941 (Art.IWM ART LD 1189)”

The image shows on the left an exterior view of a couple of figures looking over a bomb site, and on the right is a public telephone office with temporary booths set up in the foreground. Temporary telephone services were setup across the city where services into offices, warehouses and homes had been destroyed.
Dennis Flanders
Denis Flanders was an east London artist and draughtsman who used his skills during the war as part of the School of Military Engineering and later when he would create models of landscapes based on aerial reconnoissance photos.
The WAAC purchased a number of his works, showing bomb damaged buildings across the country, including Exeter, Canterbury and London.
His skill as a draughtsman is clear when looking at these drawings of the interiors of bombed buildings. The following is “The Church Of St Anne and St Agnes : Gresham Street, EC2 1941 (Art.IWM ART LD 1233)”
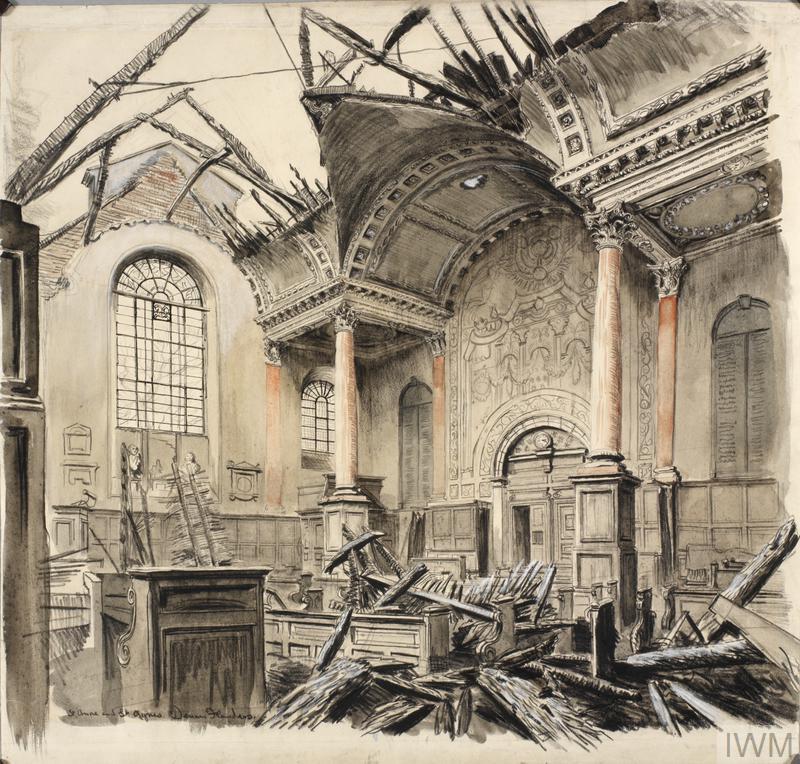
These drawings are excellent, not just by showing the damage to these buildings, but also the level of architectural detail.
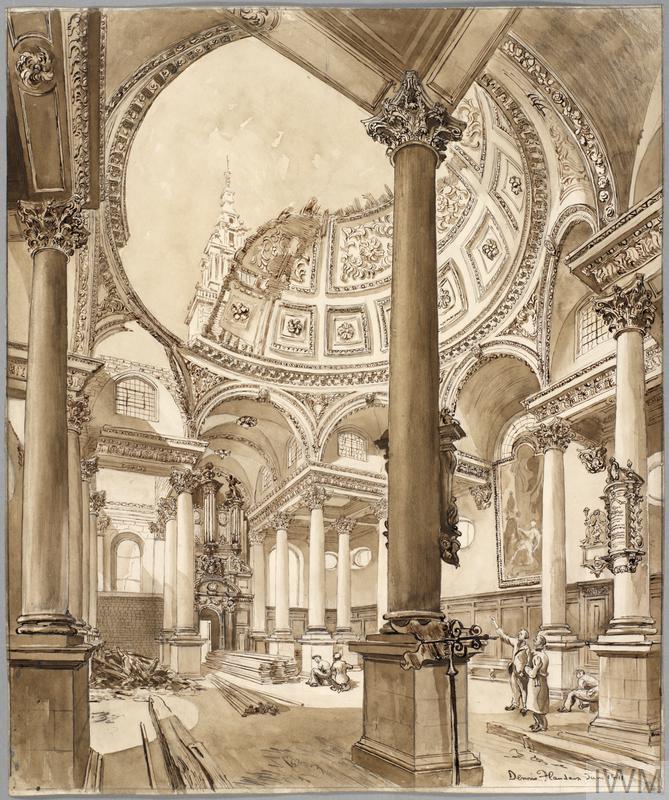
The following is titled “St Stephens, Walbrook, 1941 (Art.IWM ART LD 1381)”
As well as detailed studies of the interiors of bombed buildings, Flanders also produced view of bombed streets and buildings, again with an attention to detail. The following is of “London : Clearance of debris between Gresham Street and St Paul’s, 1941 (Art.IWM ART LD 2214)”
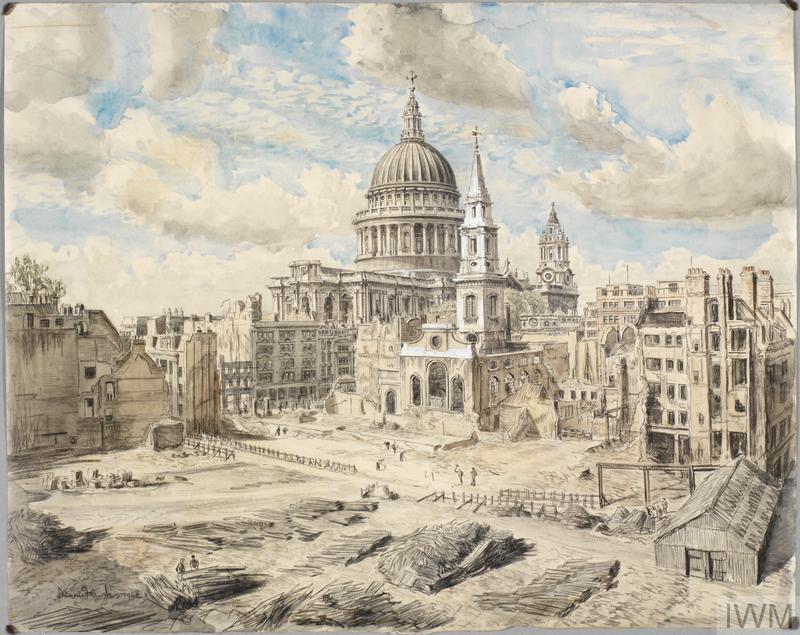
The picture shows the level of damage between Gresham Street and St. Paul’s Cathedral. The church in front of the cathedral is St. Vedast, Foster Lane.
Flander’s life’s work was drawing the landscape and ancient buildings of Britain. He would cover the country by train in search of new subjects. Many of these drawings were finally published in a book “Britannia” in 1984. The subtitle to the book is “Being a Selection of the Work of Dennis Flanders Who for Half a Century has Observed, Drawn and Loved the Landscape and Architecture of the British Isles” – that’s a rather good summary for a life’s work.
Leonard Henry Rosoman
Leonard Rosoman was teaching life classes at the Reimann School in London in 1939. He joined the Auxiliary Fire Service during the war and his experience during the blitz provided him with the source material for a number of his works.
His most well known work is the following, “A House Collapsing on Two Firemen, Shoe Lane, London, EC4 (Art.IWM ART LD 1353)” The wall collapse happened in front of Rosoman and the two firemen underneath the collapsing wall are his colleagues. As an example of the challenges of accurate source data, the book “The War Artists” states that both firemen were killed whereas Rosoman’s obituary states that one of the firemen was the novelist and travel writer William Sansom (a friend of Rosoman), and the other, unnamed fireman, died in the collapse. It was this fireman that had just taken over the hose from Rosoman. The event would go on to haunt Rosoman for the rest of his life.
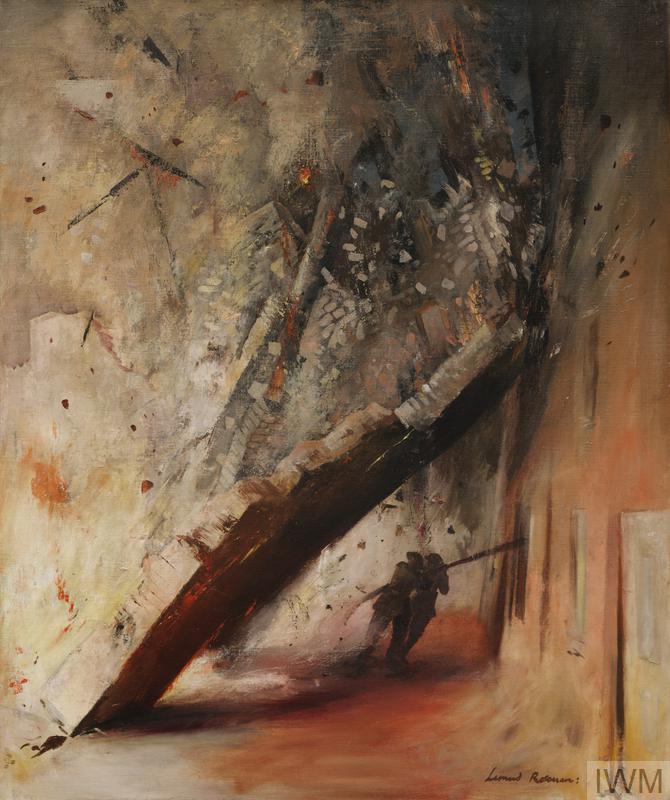
No matter which of the sources are correct, the painting depicts a scene that Rosoman experienced and graphically portrays the very real dangers faced by the firefighters on a daily basis.
As well as his work during the blitz, Rosoman was recruited by the war office to illustrate fire fighting books. When Rosoman painted the above picture he was not employed by the WAAC. The painting was purchased by the WAAC in August 1941 following an exhibition of work by Firemen Artists and Civil Defence Artists. Later in the war he was employed by the WAAC when he would spend some considerable time with the British Pacific Fleet, painting the shipping and ships crew.
The following photo (© IWM D 2617) shows Leonard Rosoman (sitting on the right) and the next artist, Bernard Hailstone (sitting on the left) on the rubble of a bomb site somewhere in London in 1940.
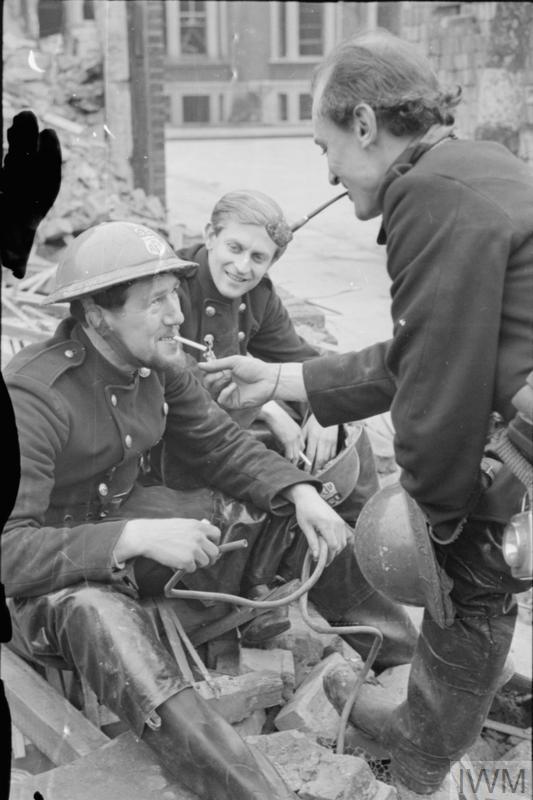
Bernard Hailstone
Bernard Hailstone was also a member of the Auxiliary Fire Service and would have experienced the same death and destruction as Rosoman.
The following is an example of his work and is titled “An Evening in the City : April 1941 (Art.IWM ART LD 1354)”. The painting shows the final damping down of a fire in the rubble of an earlier raid. The church in the background is St. James Garlickhythe.
After his work in the Auxiliary Fire Service, the WAAC commissioned Hailstone to travel with elements of the Merchant Navy Service and he toured the world working on this subject until the end of the war.
His post war career saw Hailstone become a very successful portrait painter. His work included subjects such as Winston Churchill and Laurence Olivier.
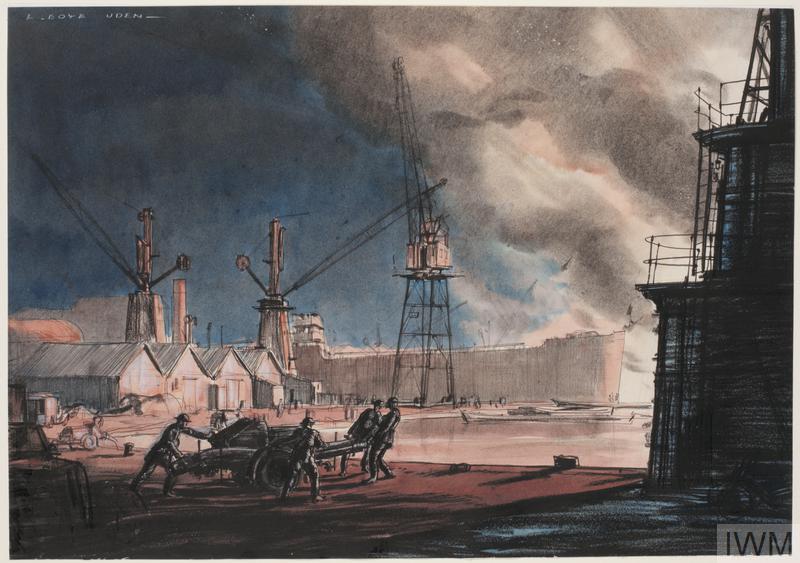
Ernest Boye Uden
Ernest Boye Uden was a commercial artist living in Greenwich at the outbreak of war. From 1941 onwards he was an artist for the National Fire Service and his work covers many scenes from across London during the blitz.
The following painting is titled “NFS Relief Crews Arriving at Millbank, London, May 1941 (Art.IWM ART LD 1359)” The location is at what is now the roundabout at the end of Lambeth Bridge, looking along Millbank to the Victoria Tower of the Palace of Westminster.

In the next painting by Uden, we are close to the River Thames and a fire crew are moving their equipment to a fire on the right as indicated by the billowing smoke. The painting is titled “A Large Fire near the Thames, October 1940 (Art.IWM ART LD 1358)”
After the war, Uden taught at the Reigate School of Art and continued his work as a commercial artist.
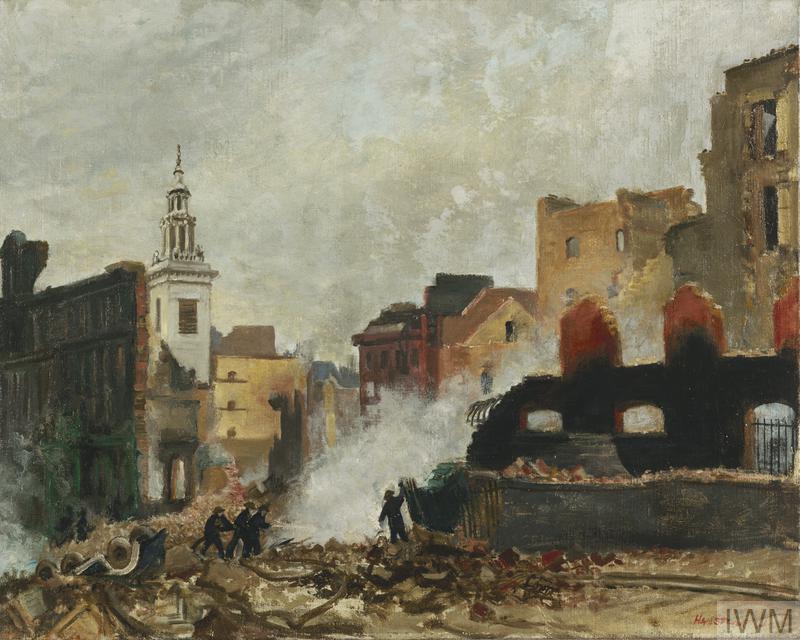
Henry Samuel Merritt
Merritt was commissioned to record the ruins of London after bombing raids. The following image shows the devastation to the south of St. Paul’s Cathedral. It is titled “St Nicholas Cole Abbey : Queen Victoria Street, EC4 (Art.IWM ART LD 1509)” and shows the ruins of the church of St. Nicholas Cole Abbey on the left.
The illustration is very similar to a photo that my father took of the church and area to the south of the cathedral, however by the time my father has taken the following photo in 1947 the remains of the badly damaged buildings seen in front of the cathedral in Uden’s picture had been cleared (see my post on the church here).
Merritt’s wartime work was very different to the country and coastal scenes that were his typical subject matter.
Paul Nash
Paul Nash had been a War Artist during the First World War and had created a series of works that uniquely captured the horror of the battlefields. Although he was chronically ill with bronchial asthma he took up an artist position with the Air Ministry at the start of the Second World War (the Air Ministry wanted to run their own separate scheme outside the WAAC), however Nash was later recruited as a salaried artist into the WAAC.
His modernist style was often viewed as not suitable to depict the events of war, however the works he did create provide a very unique viewpoint of events during the war, which included the following titled “Battle of Britain (Art.IWM ART LD 1550)”
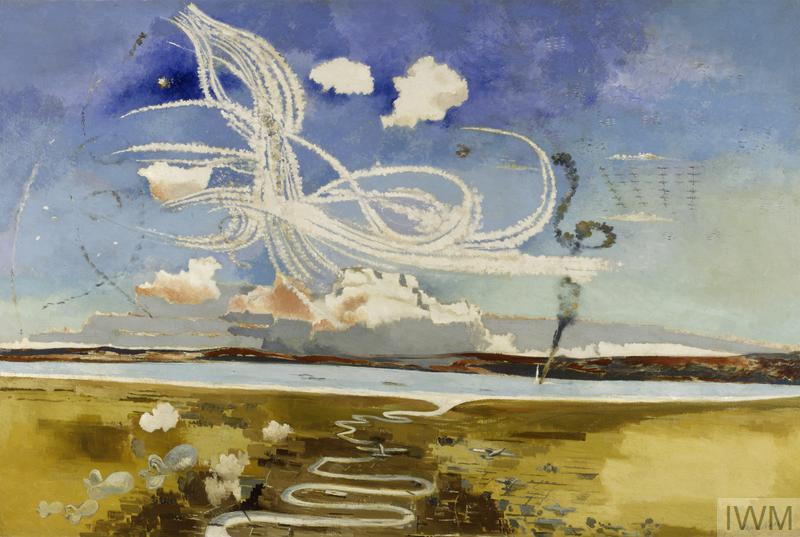
Although not strictly a London scene, the viewpoint is from above London with the River Thames winding towards the estuary and the sea. Barrage balloons protecting the city can be seen at lower left and the trails of dogs fights run across the sky. To the upper right a formation of planes can be seen, possibly a formation of bombers making their way to the city. There is also the trail of dark smoke coming from a stricken plane as it crashes into the water.
The painting captures so much about the Battle of Britain and the raids on the city.
Nash would die soon after the war in July 1946, however his work from both the First and Second World Wars capture the horror and scale of these conflicts.
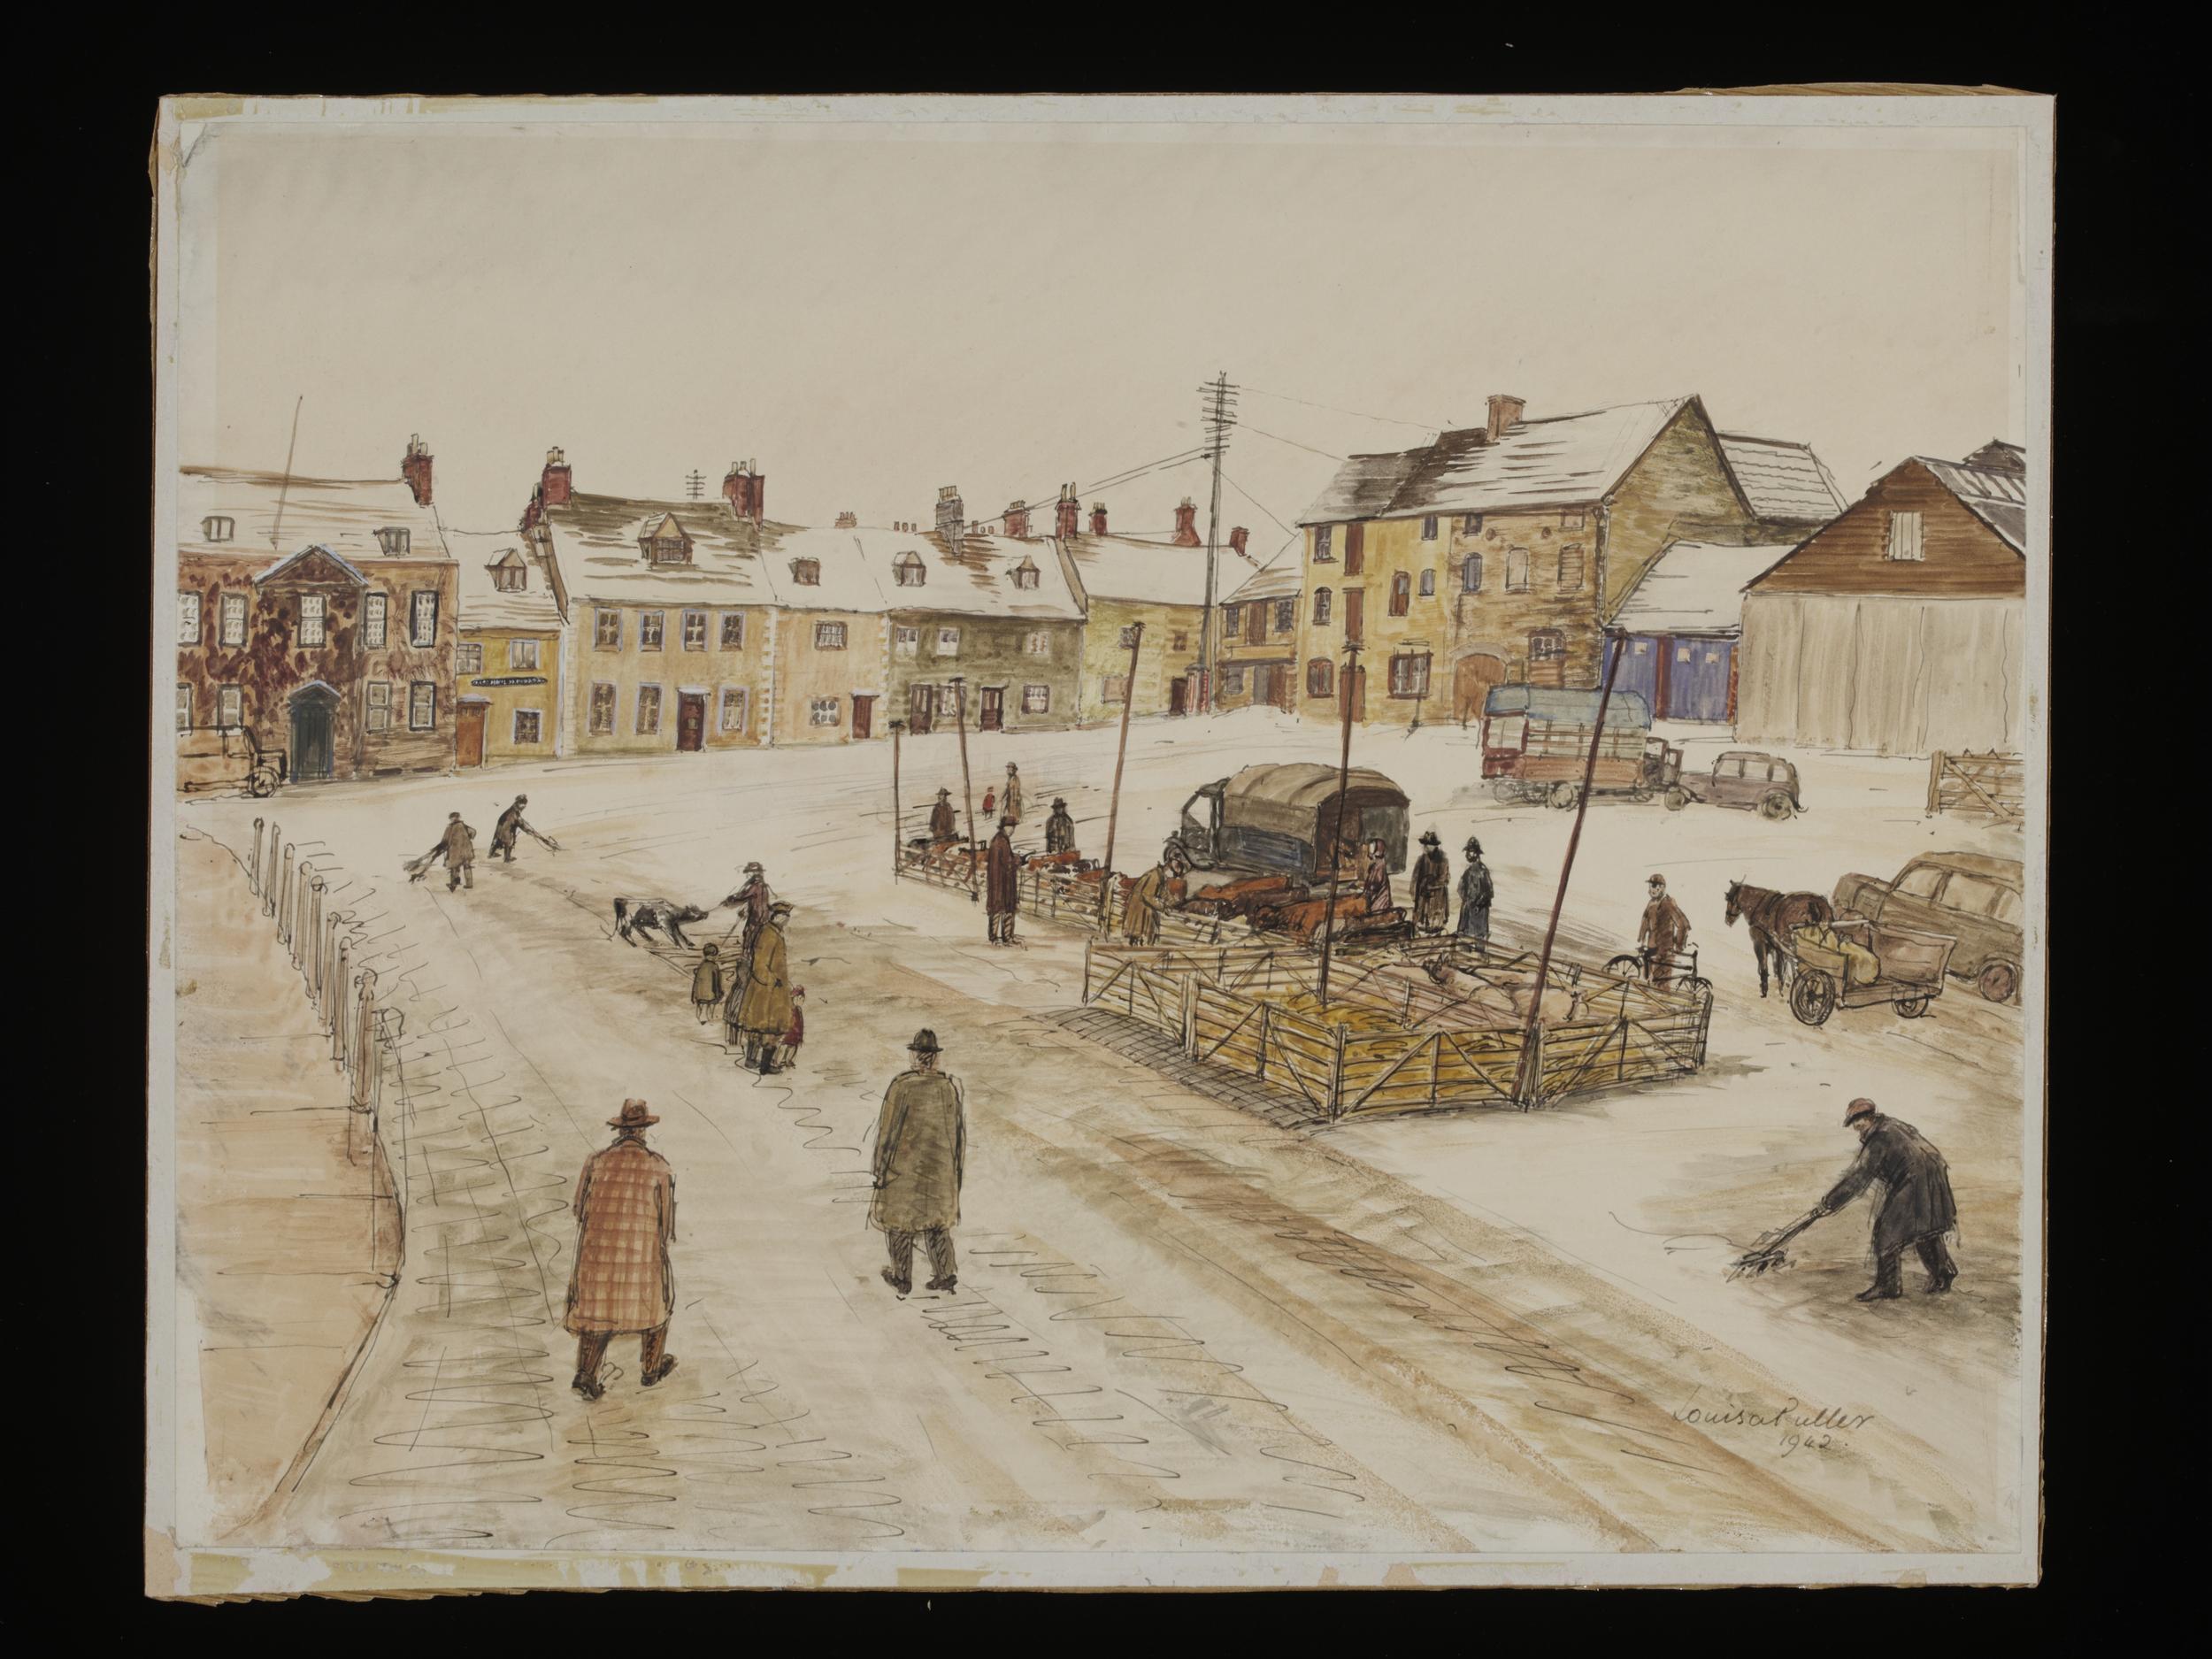
Louisa Puller
Louisa Puller was an artist who worked for the project funded by the Pilgrim Trust to Record the Changing Face of Britain, a project to record the rapidly changing countryside and urban landscapes of Britain in the 1940s.
The WAAC also purchased some of Puller’s work, one of which was “St Paul’s Cathedral : seen from Chiswell Street, near Moorgate Street,London (Art.IWM ART LD 1692)”
The view shows the devastation caused by the raids of 1940/41 across the City and are in stark contrast to her work for the Recording Britain project which documented the rural side of the country as shown, for example, in the following work from 1942 of a livestock market in Cross Hayes, Malmesbury (© Victoria and Albert Museum, London):

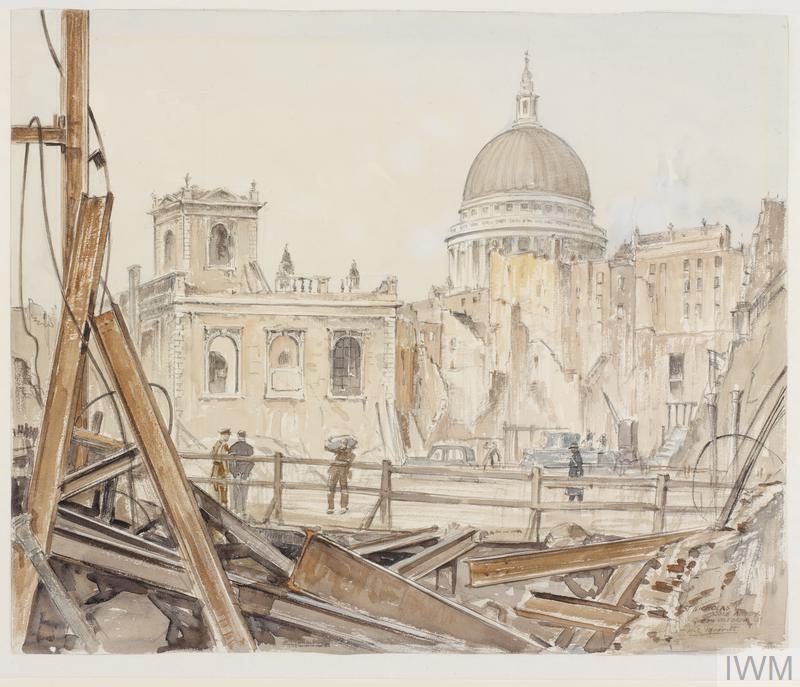
Duncan James Corrows Grant
Duncan Grant was a member of the Bloomsbury Group of artists and lived at 21 Fitzroy Square. During the war he was commissioned by the WAAC to produce two paintings, one of which is “St Paul’s 1941 (Art.IWM ART LD 1844)”
The painting is from the south of St. Paul’s and again shows the church of St. Nicholas Cole Abbey. The wooden fencing is alongside Queen Victoria Street and the remains of the cellars that were under buildings that once stood on the southern side of Queen Victoria Street are in the foreground of the picture.
Henry Rushbury
Henry Rushbury had been a First World War artist and was employed by the WAAC for the duration of the Second World War. He was known for his ability to record busy scenes and the majority of his work appears to have been munitions factories and shipbuilding. As an example of how the WAAC worked, Rushbury was commissioned by the WAAC for 100 guineas to complete three large drawings of shipbuilding on the Clyde.
He also produced some London based work, which included the following titled “Warships Week, Trafalgar Square, London, WC2, 1942 (Art.IWM ART LD 1929)”
The scene shows Trafalgar Square decorated with flags, including naval signal flags with a mock-up of part of a war ship in the centre of the square. Warship Week was an event organised by Narional Savings to raise money to fund the build of warships and associated naval craft.
John Edgar Platt
John Edgar Platt was an art teacher before the war, and worked on a number of commercial projects which included the design of posters for the London Underground.
During the early years of the Second World War, a number of his works were purchased by the WAAC and in 1943 he received a contract to produce paintings of river and coastal based transport. This commission was only made possible when a representative from the Ministry of War Transport joined the WAAC in 1943 and persuaded the Treasury to provide the funding for two artists to work on transport based subjects.
The following work is an example of his depiction of River Thames traffic and is titled “War-time traffic on the river Thames: War-supplies at Paul’s Wharf (Art.IWM ART LD 2640)”
Note the dome of St. Paul’s Cathedral which is just visible in the gap between the buildings on the far side of the river.
William Lionel Clause
Although William Lionel Clause lived in London, he was mainly a landscape artist. Rather than works covering bomb sites, ruins, military equipment etc. his work for the WAAC always included people as the main subject. The following being an example “Civil Defence Day – 15th November 1942 : At the south door of St Paul’s Cathedral. The march past of representatives of all Civil Defence Services. (Art.IWM ART LD 2864)”
The street edge in the foreground has the standard wooden fencing used across the City to fence of the street from the remains of building basements and cellars. In the background a couple of barrage balloons can be seen in the sky.
His work for the WAAC were his last main commissions as he died soon after in 1946.
Ian Strang
Ian Strang’s work consisted mainly of drawings and etchings as he was an accomplished draughtsman. He had served in the First World War and produced a number of works during this period.
Although not directly employed by the WAAC in the Second World War, a number of his works were purchased by the WAAC. These consisted of detailed drawings of bomb sites in London. The title of the first drawing by Strang is “Cassell’s Tower and the Spire of St Bride’s, Fleet Street, London, EC4 (Art.IWM ART LD 3782)”
The view is looking across ruins of bombed building towards the spire of St. Bride’s Church. In common with other wartime works, barrage balloons can be seen in the sky.
The next drawing is titled “St Michael Paternoster Royal, College Hill, London, EC4 (Art.IWM ART LD 3785)”
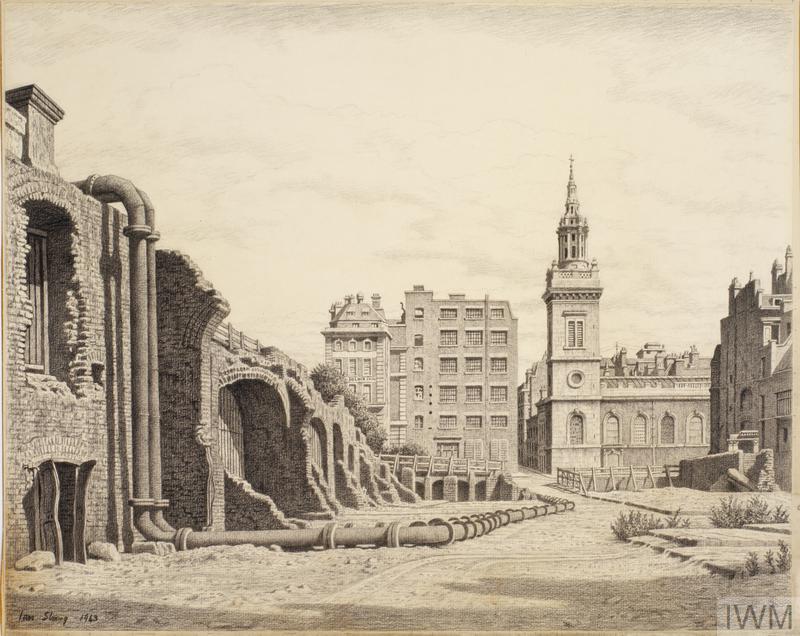
A railway viaduct runs along the left of the picture and from this descend a couple of large pipes that then run along the ground in the direction of the church. These were probably put in place to replace underground services that were damaged, or could have been pipes leading up from the river which carried water to a number of temporary reservoirs put in place across the City to provide emergency suppliers of water for fire fighting.
The next drawing is titled “Ruins in Cripplegate, London, EC1 (Art.IWM ART LD 5305)”
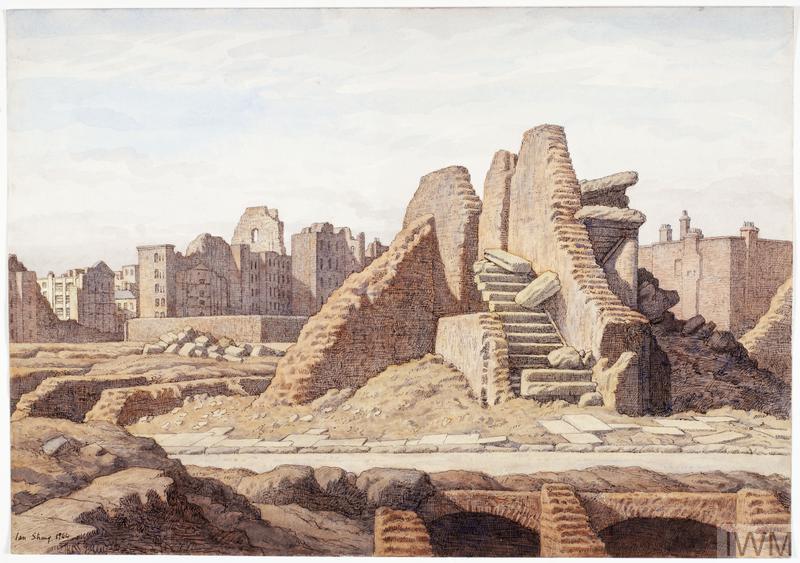
The steps, now without a destination, are all that remain of the building that once stood on the site.
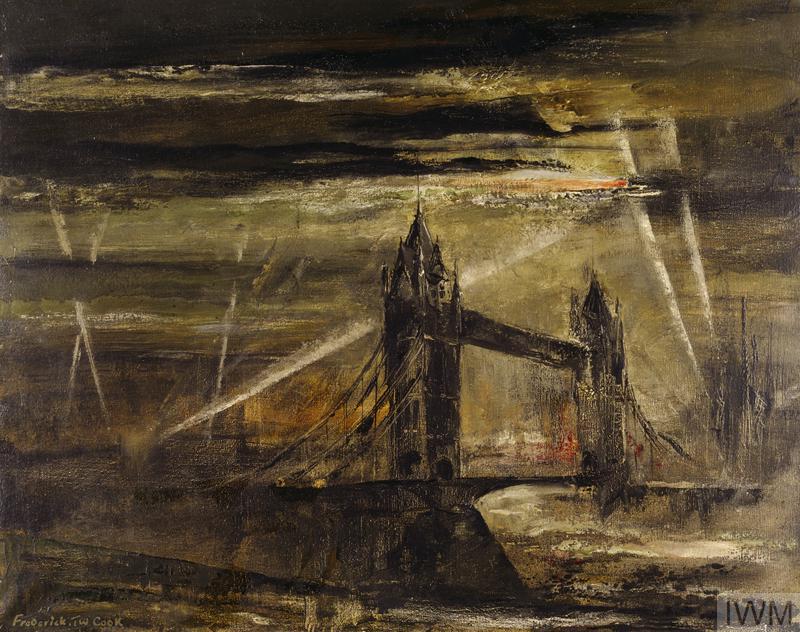
Frederick T.W. Cook
Frederick Cook sold a couple of works to the WAAC. In the following painting the main theme of the work is easy to miss at first glance, however look above the right hand tower of Tower Bridge and a Flying Bomb can be seen, the orange flame from the missile running back across the top of the bridge. Search lights are scanning the sky and one appears to have found its target. The painting is titled “A Flying-bomb over Tower Bridge (Art.IWM ART LD 4719)”
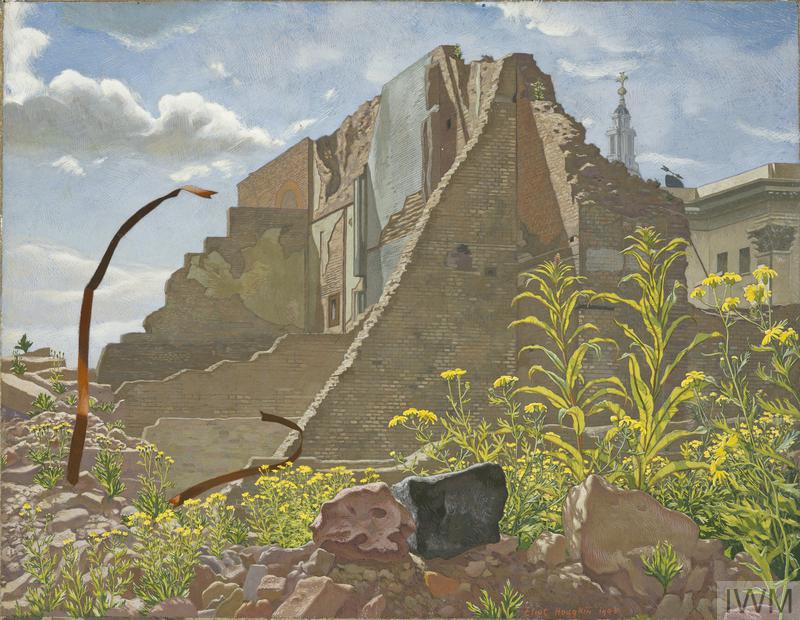
C. Eliot Hodgkin
Eliot Hodgkin worked for the Ministry of Information during the war, and although he do not work directly for the WAAC, he was making paintings of bomb sites, mainly focusing on the plants that were colonising these sites in the later years of the war. He was offered a commission in 1945 and delivered two paintings to the WAAC, one of which was accepted so this is Hodgkin’s only work within the scope of the WAAC. Although it is basically a view of another bomb site, the difference is the focus on the plants growing in the foreground.
The work is titled “The Haberdashers’ Hall, 8th May 1945 (Art.IWM ART LD 5311)” and shows the ruins of the Haberdashers Hall with examples of the plants that had swiftly colonised the City bomb sites in the foreground.
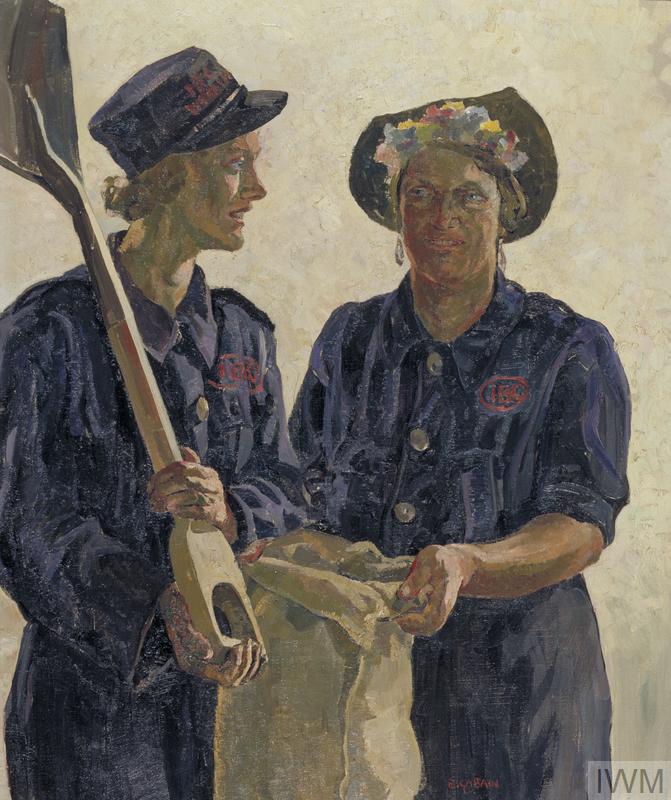
Ethel Gabain
Ethel Gabain was a French / British artist who spent much of her life in Hampstead. Gabain was one of the first artists commissioned by the WAAC in early 1940 and she worked across the country, mainly focusing on detailed portraits of people.
The WAAC commissioned a series of paintings of women who had taken over the jobs of the men who had been called up to the services. Her work also included women employed in many of the auxiliary services and the following is an example, titled “Sandbag Filling, Islington Borough Council (Art.IWM ART LD 1443)”
The final work by the WAAC in today’s post is the following by Gabain. One her commissions by the WAAC was a series of five lithographs on the theme of Children in Wartime. Although in Southend rather than London, this scene of children being evacuated by train would have been a common site in London – my father was one of those evacuated at the start of the war, but he quickly returned after only a few weeks away.
The title of the work is “The Evacuation of Children from Southend, Sunday 2nd June 1940
by Ethel Gabain. (Art.IWM ART LD 264)”
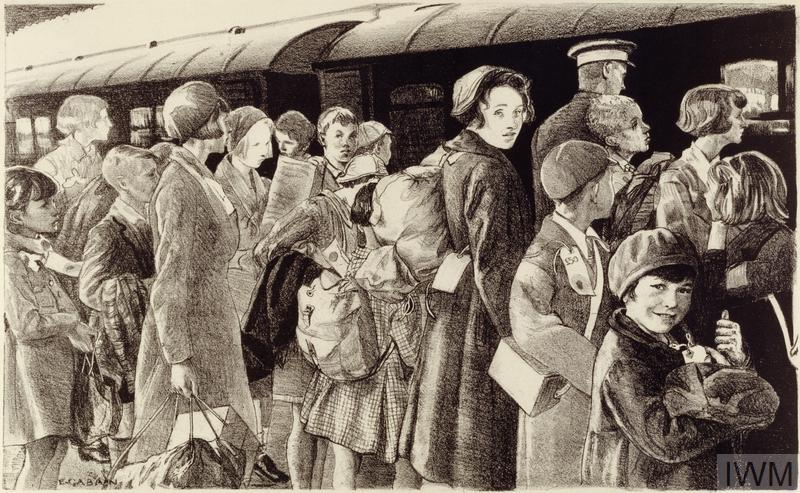
Gabain produced a significant number of works for the WAAC during the war years, with a total of 38 being purchased. This level of output was completed despite poor health, and having to travel the country in search of her subjects.
The War Artists Advisory Committee managed to last through the war, despite financial challenges from the Treasury and continued competition from the Armed Forces who believed they should own the responsibility for the art produced by their own part of the forces.
The War Artists Advisory Committee continued to the end of 1945, however with the end of the Ministry of Information, there was no home for the WAAC and the committee was dissolved after 197 meetings. Administration of the collection produced for the WAAC passed to the Imperial War Museum.
The War Artists Advisory Committee was responsible for producing a considerable body of work, documenting nearly all aspects of the war.
I hope that this sample of works covering London has illustrated the work of the WAAC and the considerable talents of the artists working for the committee.
alondoninheritance.com